• Skip to primary navigation
  • Skip to main content
PMT Security Logo

PMT Security

Advanced Access Control

  • Home
  • About Us
    • Our Partners
    • Our Integrators
  • Solutions
    • Education
    • Retirement & Healthcare
    • Manufacturing
    • Government Facilities
    • Residential
    • Retail Businesses
    • Campgrounds & Outdoor Resorts
  • Products
    • Access Control
      • Control Features
      • Reporting & Monitoring
      • Control Module
      • Digital IO Module
      • Reader Module
      • Readers
    • Video Management
      • Integration
      • Analytics
      • Search & Export
    • Visitor Management
    • Intercom
    • Live Guard Video Monitoring
    • Housings & Pedestals
  • Support
    • Knowledgebase
    • Download Center
    • License Request
    • RMA Request Form
  • Blog
  • Contact Us

Security Best Practices & Support

Wiring for iDFace to OSDP

How to wire the iDFace reader to an existing OSDP reader module.

1. **Wiring Overview**: Demonstrates how to wire the iDFace reader to an existing OSDP reader module.

1-Jun-04-2025-12-49-05-6827-PM

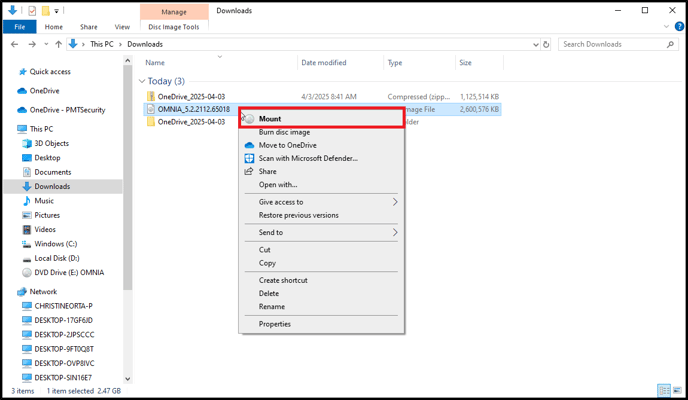
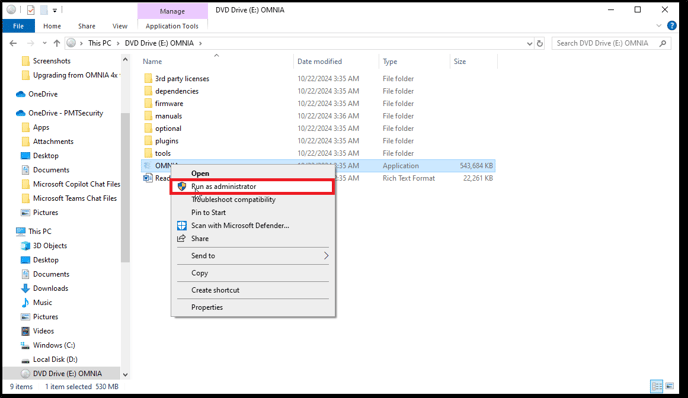
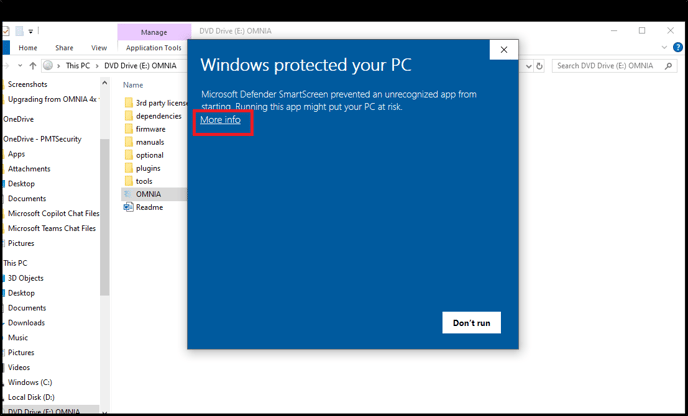
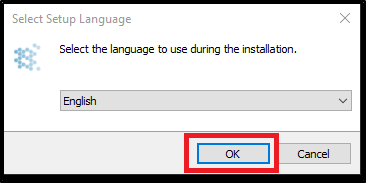
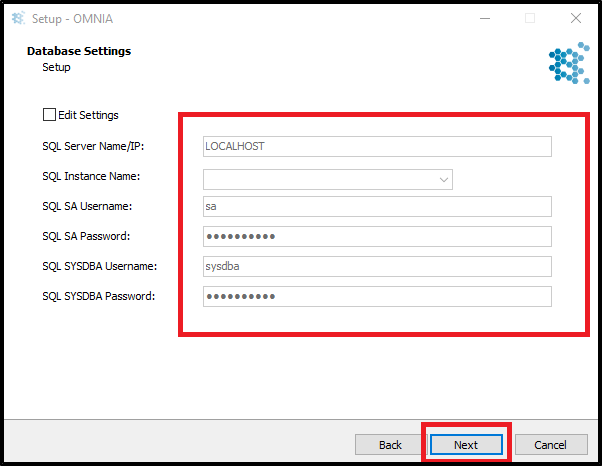
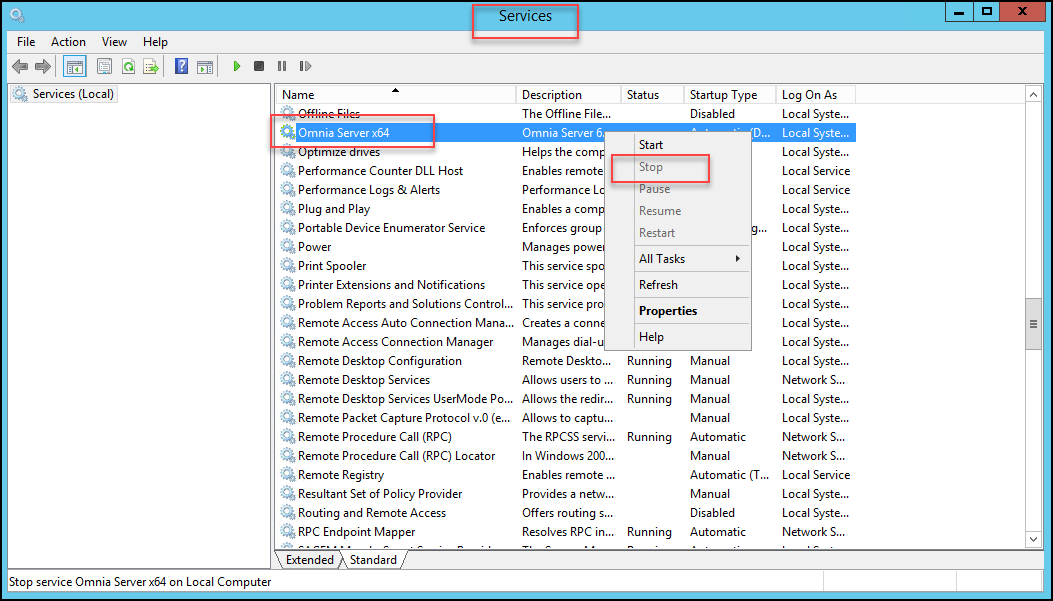
2. **OSDP Support**: Installation is supported with the OMNIA system.

2025-06-12 09_39_08-2025-06-12 09_32_24-Window

3. **Connection Instructions**:
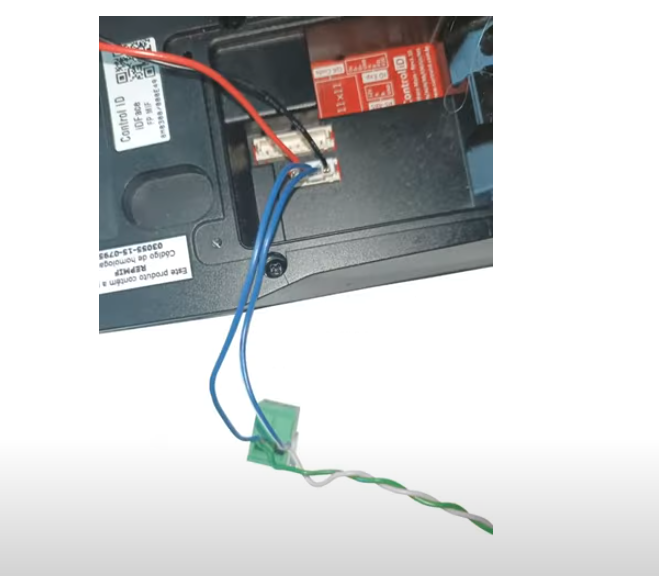
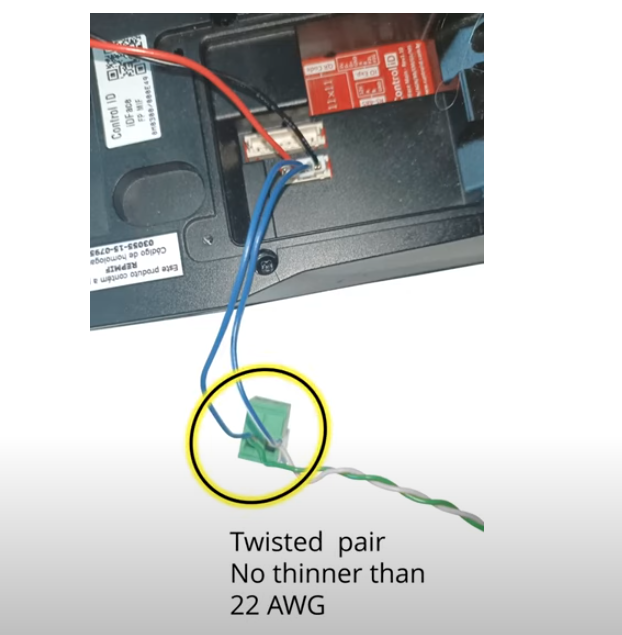
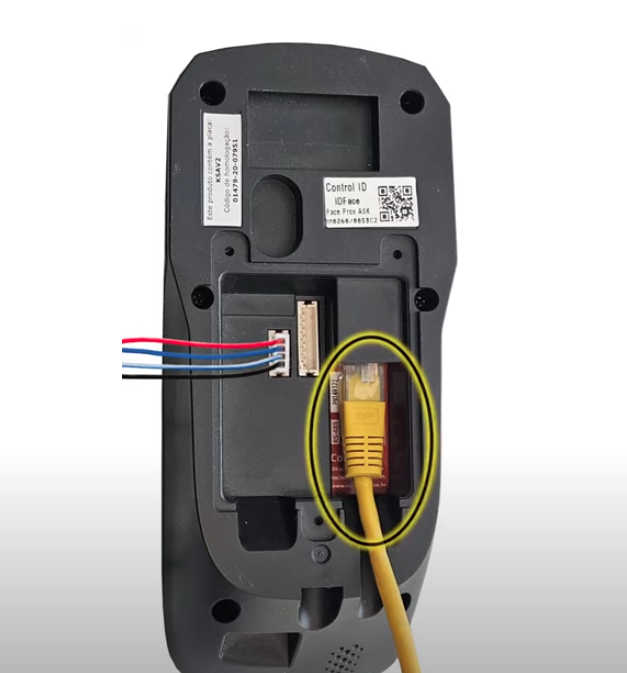
– Use one of the provided four-pin plugs for wiring.
– Extend short wires as necessary to reach the OSDP reader module.
– Utilize green and white twisted pair wires (minimum 22 AWG).
– Cut wire to a length sufficient to reach from the iDFace to the OSDP reader module, allowing 30 cm extra.

3-Jun-04-2025-12-49-05-7567-PM

4. **Wiring Connections**:
– Connect green wire to the blue iDFace wire.
– Connect white wire to the blue and white iDFace wire.
– Connect red and black wires to a 12V DC power supply (2 amps required).

4-Jun-04-2025-12-49-05-7591-PM
7-Jun-04-2025-12-50-55-4866-PM

5. **Mounting**: Close the unit with the provided cover and follow mounting instructions.

8-4

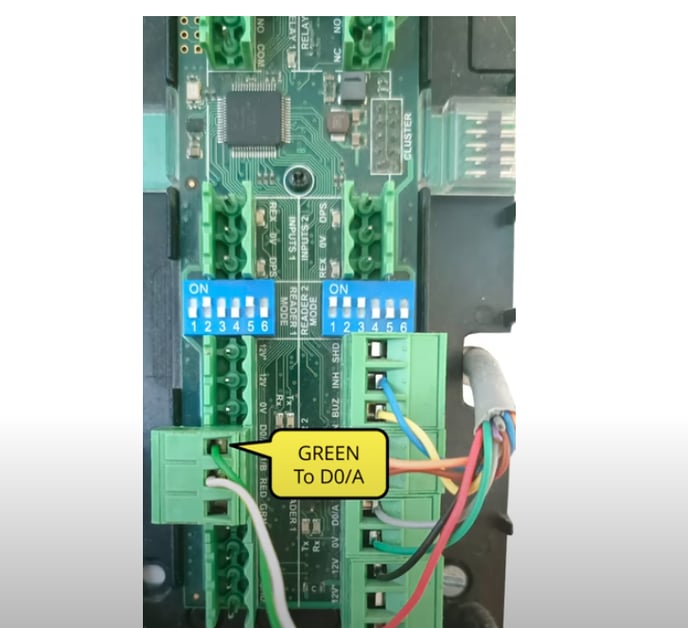
6. **Wiring to OSDP**: Wire green to the D0/A terminal and white to the D1B terminal on the OSDP reader module.

10-3

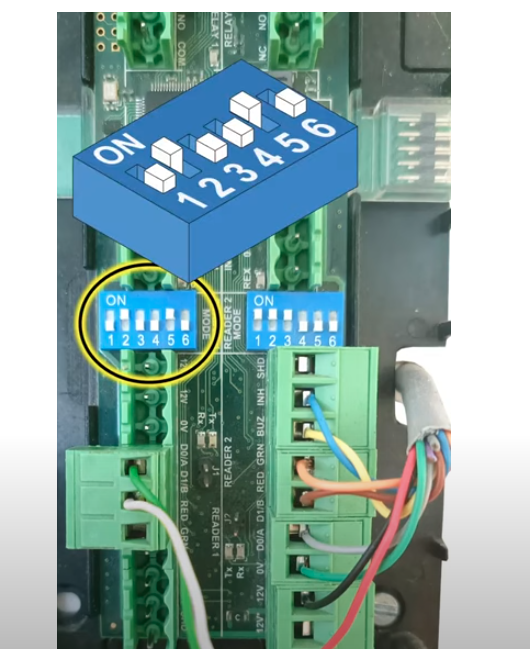
7. **Dip Switch Configuration**: Set the reader port dip switch to 010010 for OSDP mode.

12-3

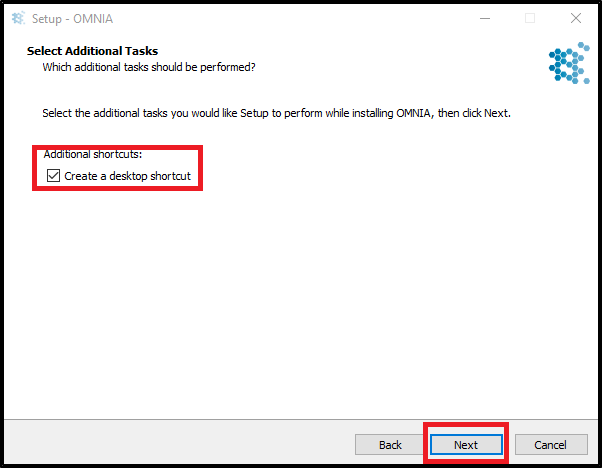
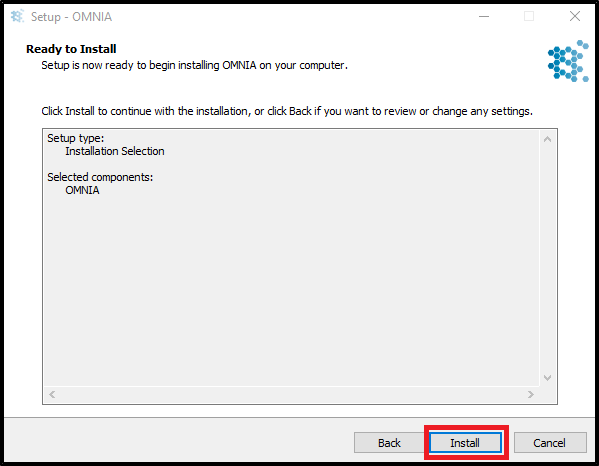
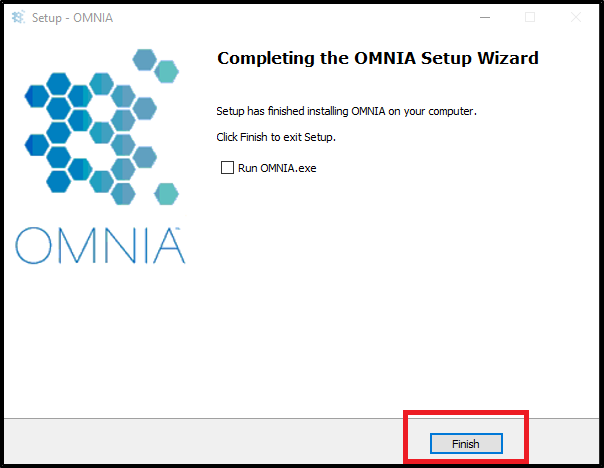
8. **Next Steps**: Setup the iDFace using the OMNIA software.

Upgrading from OMNIA 4X to 5X

Upgrading from OMNIA 4X to 5X

Upgrading from OMNIA 4x to 5x. Using SQL 2019

Stop/Exit the engine for OMNIA 4x.

Select the arrow in the bottom right of the screen to open up the hidden Icons. 

Stop Engine 1

Right Click on the OMNIA ICON. (Make sure you are not selecting the Plug in Manager) Select Stop Engine and then select Exit. 

Stop Engine 2

Stop OMNIA as a Service.

In the search bar enter “services”

Services 1

Search for Omnia Server x64. Either right click and select stop or select stop as shown below. 

Services 2

DETACHING THE DATABASE
In the search bar type SQL Server Management Studio. Open the App.

SQL 1

Sign-in. Either Windows Authentication or SYSDBA. 

SQL 2

Expand Database Tree. Right Click on the Database “OMNIA”. Open Tasks and select Detach…

SQL 3

Check the Box under Drop… Then Select OK

SQL 4

Move DATABASE

Open up Windows File Explorer. Selects Windows (C:)

move data 1

Select the OMNIA folder. 

Database Copy-1

Select the Database folder.

Database Copy 2

Highlight then drag and drop the OMNIA and OMNIA log to another location on the PC. (example is to put files on the desktop)

move data 5-1

When you are done it should look like this.

move data 4
In the Windows (C:) Rename the OMNIA folder to OMNIA Old

move data 2-1

New OMNIA Install V5x

Open Browser and enter Http://pmtsecurity.com/ 

1-Apr-11-2025-01-57-19-1593-PM

Move curser over Support to reveal Support tree. Select Download Center.

2-Apr-11-2025-01-57-19-0116-PM

Select Access Control

3-Apr-11-2025-01-57-19-0327-PM

Select OMNIA

4-Apr-11-2025-01-57-19-0204-PM

Select Omnia Software

5-3

Select Advanced

6-3

Select OMNIA_5.2.2112

7-3

Go to File Explorer and open the Downloads folder. Right Click OMNIA_5.2.2112.65018 and Select Mount

10-1

Right Click OMNIA and Run as administrator.

12-1

This window will appear Select More info

13-1

Select Run Anyway

14

Select Language

15

Select Next

16

Review License Agreement, Accept, and select Next to Continue

17

Select OMNIA then next.

18-1

Make sure you have followed the previous steps on detaching the Database.
Select Yes.

19

Select Next

20

Select Next

21

Select Next

22

Installation

23

DO NOT start OMNIA.exe. 
Select Finish

24

Attaching Database

Open Windows (C:)

OMNIA 5x 2

Open OMNIA folder. 

move data 2-2

Select Database

Database Copy 2

Grab your Database and Database Log files, drag then drop them in the Database Folder

move data 4

This is what it should look like. 

move data 5

Open Microsoft SQL Server Management Studio

SQL 2

Right Click on Database and Select Attach.

attached data

Select Add…

attached data 2

Expand the OMNIA folder then select Database. The OMNIA.mdf should show. Highlight and select OK.

attached data 3

Scroll Right and expand the Owner options and select sysdba.
Select OK

attached data 4

Exit from Microsoft SQL Management Studio and Open OMNIA. 

If you are running OMNIA as a service. Open up the services app and start OMNIA. Open browser after 4 minutes and type LocalHost:82 in the browser search bar.

Need further assistance?

Submit a Support Ticket

Submit a Support Ticket

FAQ

General

Technical Bulletins

Access Control

AmanoNet

Nexxus220

Omnia

Omnia Lite

PM Tronics Hardware

Amano Readers and Credentials

Legacy Hardware

Partner Products

Partner Products

Video Management Systems

Cathexis Video (Amano Vision)

AmanoDVMS

Vision

Quick Start Guide for Cathexis Vision Version 2025

Cathexis Quick Start Guide

Quick Start Guide for Cathexis Vision Version 2025

Cathexis Quick Start Guide

  1. Log In
  • Username: admin                                    
  • Password: admin

2. Licensing

        A. Trial License

  • Automatically applied: 2 IP cameras, 48-hour review limit.

    B. Full License Activation
  • Online: Use product key via Tools > Local server licenses.
  • Offline: Generate .rqst file → email to support → upload .pack file.
         If the unit from which the user is performing the licensing does not have internet connection, a .pack file needs to be uploaded. A .pack file is a file that contains all the licensing information for a unit. Getting a .pack file requires 3 steps, outlined below, and covered in more detail in the following sections.
    →    Retrieve a .rqst (request) file from the unit being licensed.
    →    Email the .rqst to support@cathexisvideo.com.
    →    Upload the .pack file once is has been sent.
         To upload the .pack file go to: Tools / Local server licenses / Upload a license .pack file from this server
    →    Select the .pack file from the dialogue that appears.
    →    Click Next.
    The server will now be licensed. For further assistance, contact support@cathexisvideo.com.

3. Create & Connect to a Site

  • Open File> Enterprise Manager:
  • Add Site Name by right clicking in Site, Selecting New Site and Giving the Site a Name, disregarding entering a Site ID
       
       
  • Add Connection (IP of Master NVR) by right clicking in |Target| Route| Priority| Route connection via site master| window and selecting New connection. Use Point-to-Point as Connection Type and Enter the IP address of the Master Server 
  • Fetch Site ID
    Right Click the Site Name and Select Fetch site ID


    Enter User Name and Password 


4. Add & Configure Cameras

  • Go to File> Open site> (Select site you made)
  • Go to Site> Open tab> Setup > Configure Servers > Cameras
  • Use Select new

5. User Management

  • Go to Setup > Users
  • Add users with access levels (1–30)
  • Optional: Enable LDAP integration

6. Recording Setup
        A. Scheduled Recording

  • Setup > Configure Servers > Scheduled Recordings
  • Define schedule, database, framerate
    B. Motion-Based Recording
  • Setup > Configure Servers > Motion Recordings
  • Configure scene type, sensitivity, masks

7. Video Analytics

  • Access via Setup > Configure Servers > Video Analytics
  • Add analytics per camera:
    • Basic, Intermediate, Advanced
    • Object detection, queue length, mask detection, etc.
  • Configure zones, triggers, day/night settings

8. Events & Actions

  • Go to Setup > Configure Servers > Events

Need further assistance?

Submit a Support Ticket

Submit a Support Ticket

FAQ

General

Technical Bulletins

Access Control

AmanoNet

Nexxus220

Omnia

Omnia Lite

PM Tronics Hardware

Amano Readers and Credentials

Legacy Hardware

Partner Products

Partner Products

Video Management Systems

Cathexis Video (Amano Vision)

AmanoDVMS

Vision

Upgrading To OMNIA 4.6.5 and 2019 SQL Express With Tools

How to upgrade OMNIA and SQL Express to OMNIA 4.6.5 and 2019 SQL Express With Tools

Upgrading OMNIA to 4.65 and SQL to 2019 Express

Pre Installation NOTES:

SQL 2019 Express With Tools is only compatible with some Windows Operating System.

     Windows 10, 11, and Windows Server 2016, 2019, and 2022 have been tested.

SQL Server Management Studio 19 (SSMS) does not install with the OMNIA.iso, this will have to be downloaded, installed, and used to Attach OMNIA database into SQL.

OMNIA 4.6.5 is compatible with SQL 2014 Express.

Download OMNIA 4.6.5 

Navigate to PMTSecurity.com and download the software and save for use at a later step.

OMNIA.exe will Install OMNIA 4.6.5 ONLY

OMNIA.iso  will Install OMNIA 4.6.5 and SQL2019 Express

Backup the OMNIA database.

This step is highly recommended. Keep in mind, regular backups should be conducted. A backup kept off the localhost ensures recovery if OMNIA server becomes unrepairable.

See Knowledgebase Article for Backing Up OMNIA Database

https://pmtronics.com/omnia-database-backup

Ensure the current version of OMNIA Server App and/or OMNIA Service is not running.

OMNIA Server App

Exit out of the OMNIA Server App.
Right Click the OMNIA Server App Icon in the “Show Hidden Icons” from the taskbar and select EXIT

If OMNIA is running as a Service, Open Services and Stop the Service.

Detach the Database from SQL using the Sql Server Management Studio (SSMS)

Open SQL Server Management Studio (SSMS)

Connect Using  “Windows Authentication”

Expand the Database tree, Select OMNIA and Right Click, Select Tasks then Select Detach.

Select Drop and then Select OK

Create a Copy of the OMNIA Database and the OMNIA Database  log file. Save for use in a following step

     Navigate to C:\OMNIA\Database\

     Select and Copy BOTH the OMNIA.mdf and OMNIA_log.ldf files. Save files where they can be accessed again. 

Stop the current SQL service

Open the Services, Search for SQL Server, Right Click and Select Stop

Rename the current OMNIA folder.

We recommend this step as a precaution, keeping the previous OMNIA version folder ensures the ability to roll back to the previous version in case of upgrade failure. Renaming the OMNIA folder will provided a clean path of installation for the new software version. The OMNIA installation will create a new OMNIA folder. 

Navigate to C:\OMNIA, highlight the OMNIA folder, right click and select rename.

Name the folder something else. ex.  OMNIA4_5

Uninstall the older version SQL Server Management Studio as well.

If the existing site has SQL 2014 configured, the uninstallation of SQL 2014 is required before installing 2019. The OMNIA installation does not upgrade SQL 2014 to SQL 2019 automatically and the SQL 2019 Installation will not occur.

Begin the OMNIA 4.6.5 Installation

Mount the OMNIA 4.6.5 .ISO 

Right Click OMNIA.exe and run as AdministratorUsing the new OMNIA installer, follow the prompts to complete installation.

Accept the Agreement and Select Next

Select what options you want installed.

In this example we are installing OMNIA, the OMNIA Plugin Mgr,  and SQL 2019 Express with tools. We will be also running the SQL Configuration and Scripts.

Confirm a Database backup has been made, or a copy of the database has been made.

If you receive the message below, you have not completely uninstalled the previous version of 

SQL express completely. Select Yes and Next

Leave this page blank unless the basic OMNIA information has been changed/updated.

Select Next

The below error is common and does not cause concern. SQL has not been installed yet so it cannot connect to the SQL Instance, Select Yes, then Next

This is a false indicator, this installer will not upgrade SQL 2014 to SQL 2019. Select Yes

Select if you would like a short cut for the OMNIA Server App to be placed on the desktop,

Select Install

The installation process may find programs that need to be restarted, Select Automatically close the applications then select Next

The Installation Wizard will complete.

NOTE:

Do not start OMNIA now, You will need to place the OMNIA Database and Log File into the new OMNIA installation database folder before starting OMNIA.

24

In the C: drive you will see two OMNIA folders.

Navigate to C:\OMNIA\Database and Place the copy of the OMNIA.mdf and OMNIA_log.ldf files there.

Download and install the latest version of the SQL Server Management Studio App.

Download from Microsoft.com and run the Installer as Administrator

Open the SQL Server Management Studio App

Open the SQL Server Management Studio App

Log into SSMS with “Windows Authentication” with the Encryption set to “Optional”

Highlight Databases, Right Click and Select Attach

In the Attach Database Window

  1. Select Add and a Locate Database Files window opens, 
  2. in the Locate Database Files window, Use the tree to Navigate to OMNIA, click the (+) to Expand OMNIA
  3. Select database
  4. Select the OMINA.mdf file
  5. Select OK

In the next window, in the Database to Attach field, scroll right to display the “Owner” Column. Use the dropdown to select sysdba as the owner.

  1. In the Attach Database window and in the Databases to attach window, Scroll right
  2. Find the Owner Column
  3. Use the dropdown to select sysdba as the owner
  4. In the OMNIA database details, Scroll right to the Current File Path
  5. Verify location of database and log file is correct. 
  6. Select OK

Start OMNIA Server App.

Navigate to C:\OMNIA\Bin64.

Run OMNIA.exe as Admin

If you get Database connection test failed.

Replace the sysdba password with masterkey and select Test Database Connection 

The End Result will be as below, 

Select Save and Restart.

OMNIA is now Upgraded

Submit a Support Ticket

FAQ

General

Technical Bulletins

Access Control

AmanoNet

Nexxus220

Omnia

Omnia Lite

PM Tronics Hardware

Amano Readers and Credentials

Legacy Hardware

Partner Products

Partner Products

Video Management Systems

Cathexis Video (Amano Vision)

AmanoDVMS

Vision

How to upgrade OMNIA hardware firmware using the OMNIA Firmware Upgrade Tool

How to upgrade OMNIA hardware firmware using the OMNIA Firmware Upgrade Tool.

Using the OMNIA Firmware Upgrade Tool

How to upgrade OMNIA hardware firmware using the OMNIA Firmware Upgrade Tool.

In this example we will be upgrading an XRT920, iTRT. This process can be used to upgrade any OMNIA Hardware firmware version.

Open the Firmware Upgrade tool.

  • Navigate to C:\OMNIA\bin64\FirmwareUpgrade.exe

Before Using Stop OMNIA from communicating with Controller.

There are multiple ways of Stopping the Engine.

  • From the hidden Icon Tray, Right Click the OMNIA Icon and select Stop Engine
  • Or from the OMNIA URL by disabling the Auto-Sync
  • Setup/Services/Advanced
  • Select Disable Auto-Sync

Search For Devices

After launching the Firmware Upgrade Tool, You must search for the IP of the OMNIA Controller the device is associated with.

  1.  Select Search for Devices to search via the Subnet or manually enter IP address of controller and Search by IP.
  2. From the Search Results, Select the Controller
  3. Select System Status
  4. Select Refresh to discover devices associated with the OMNIA Controller

The Search will return with a list of associated devices. 

Note:

RS485 Communication Terminals will appear even if not installed yet but IP terminals will only appear after being installed/associated with Controller.

Select the Terminal you want to upgrade.

  1. Select the Terminal ( Both Fixed Addresses will upgrade )
  2. Select Upgrade Selection

The upgrade process begins and begins displaying a progress bar.

After the upgrade has completed, the screen will refresh. You will be able to see the new Firmware Version.

The Firmware upgrade process is now complete.


Ensure to use the Correct Firmware Version.

The Firmware Upgrade Tool will use the firmware versions located in the OMNIA firmware folder. 

To Ensure you are upgrading to the correct Version of Firmware, you will need to replace the current version of firmware.

NOTE:

It is recommended not to delete or overwrite the current version of firmware. This is just in case the firmware upgrade does not provide the required results and a rollback to the previous version of firmware is needed.

It is recommended to rename the current version.  Example: For this tutorial we are upgrading an XRT920, the firmware for this is named ITWINUP.HEX. Rename ITWINUP.HEX to ITWINUPHEX.4.16 and save, then copy over and paste in the newer version of firmware. It will have the name ITWINUP.HEX.


Submit a Support Ticket

FAQ

General

Technical Bulletins

Access Control

AmanoNet

Nexxus220

Omnia

Omnia Lite

PM Tronics Hardware

Amano Readers and Credentials

Legacy Hardware

Partner Products

Partner Products

Video Management Systems

Cathexis Video (Amano Vision)

AmanoDVMS

Vision

  • « Go to Previous Page
  • Page 1
  • Interim pages omitted …
  • Page 3
  • Page 4
  • Page 5
  • Page 6
  • Page 7
  • Interim pages omitted …
  • Page 23
  • Go to Next Page »
  • Facebook
  • LinkedIn
  • Twitter

PMT Security

Copyright © 2026 PMT Security, Inc. | All Rights Reserved