• Skip to primary navigation
  • Skip to main content
PMT Security Logo

PMT Security

Advanced Access Control

  • Home
  • About Us
    • Our Partners
    • Our Integrators
  • Solutions
    • Education
    • Retirement & Healthcare
    • Manufacturing
    • Government Facilities
    • Residential
    • Retail Businesses
    • Campgrounds & Outdoor Resorts
  • Products
    • Access Control
      • Control Features
      • Reporting & Monitoring
      • Control Module
      • Digital IO Module
      • Reader Module
      • Readers
    • Video Management
      • Integration
      • Analytics
      • Search & Export
    • Visitor Management
    • Intercom
    • Live Guard Video Monitoring
    • Housings & Pedestals
  • Support
    • Knowledgebase
    • Download Center
    • License Request
    • RMA Request Form
  • Blog
  • Contact Us

Security Best Practices & Support

Replacing Nexus220 Controller with APC Controller and Wiegand Reader Module

Replacing Nexus220 Controller with APC Controller and Wiegand Reader Module

Steps to replace a Nexus220 Controller with and APC Controller

With the Nexus220 Controller not being manufactured anymore, when a Nexus220 Controller becomes faulty it will need to be replaced with an APC Controller with a Wiegand Reader Module.

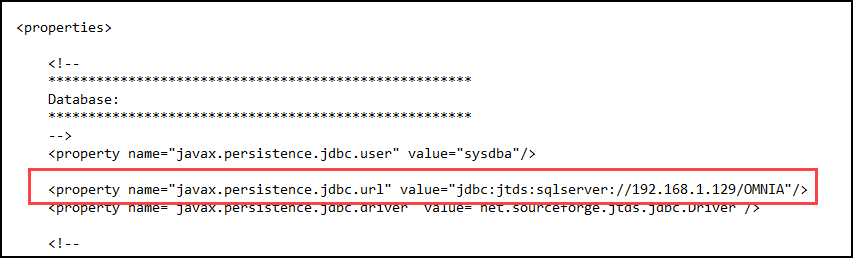
In this example we will be replacing the Nexus220 Controller with IP address of 192.168.1.110.

Information Needed from 220 Controller

  • IP Address
  • Controller Logical Address
  • Controller Fixed Address
  • Wiegand Reader Port Fixed Addresses

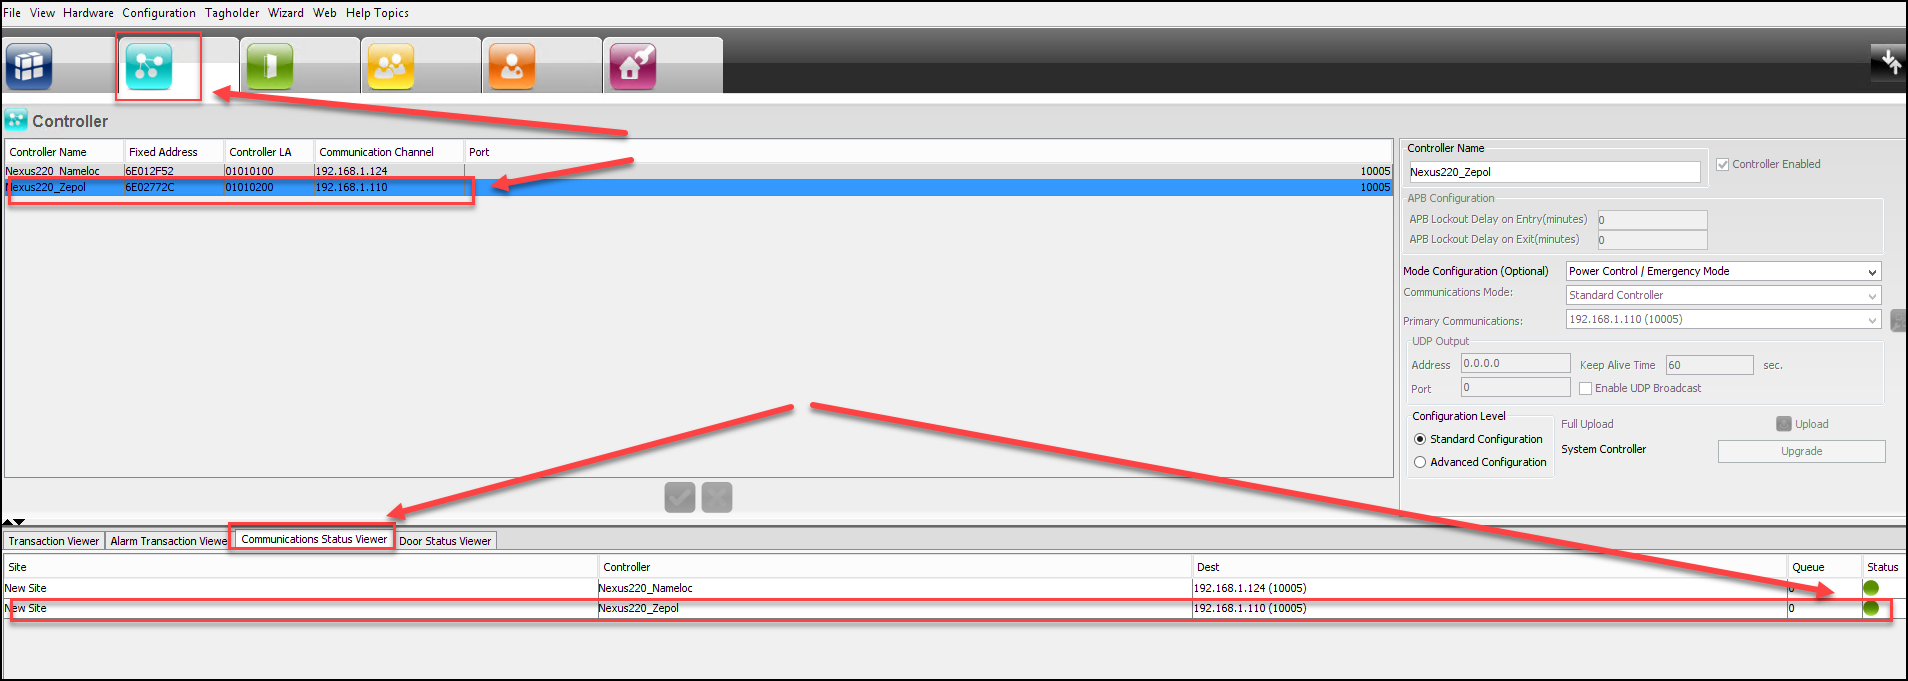
In the Nexus220 Software, go to the Controllers Tab, here you will find the IP address, Controller Logical Address (LA), and the Controllers Fixed Address

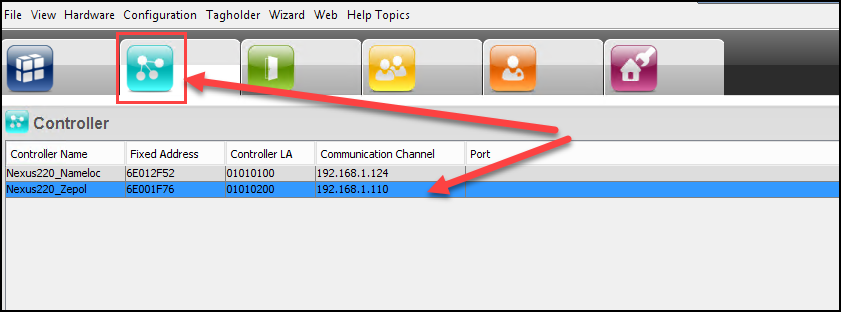
In this case we will be replacing the Nexus220 Controller with the name of Nexus220_Zepol,  IP address of 192.168.1.110, Controller Logical Address of 02, and Fixed Address of 6E001F76

You will also need to know the Fixed Addresses of the Wiegand Reader Ports on the Nexus220 Controller. 

NOTE: With the Controller having a Fixed Address of 6E001F76, Reader port 1 will have a Fixed Address of 6F001F76 and Reader Port 2 will have Fixed Address of 70001F76. We will need to know these Fixed Addresses for steps further into this replacement process.

We will be replacing the Nexus220 Controller with an APC Controller in 220 mode with an attached Wiegand Reader Module. We will need to know the Fixed Address of the APC Controller and the Fixed Addresses of Reader Port 1 and Reader Port 2 on the Wiegand Reader Module

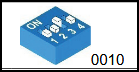
The APC Controller DIPS should be 1 off, 2 off, 3 on, and 4 off. Make sure the APC controller powers up with the DIPS set.

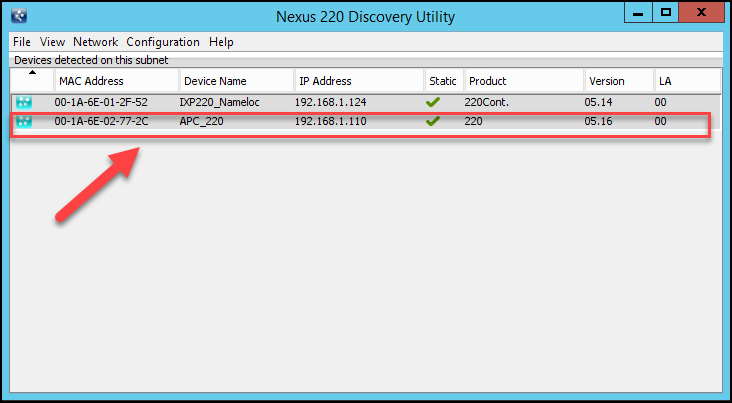
APC Controller Fixed Address is 6E02772C, the attached Wiegand Reader Module Fixed Addresses are FA(1) 005936AD and FA(2) 005936AE.

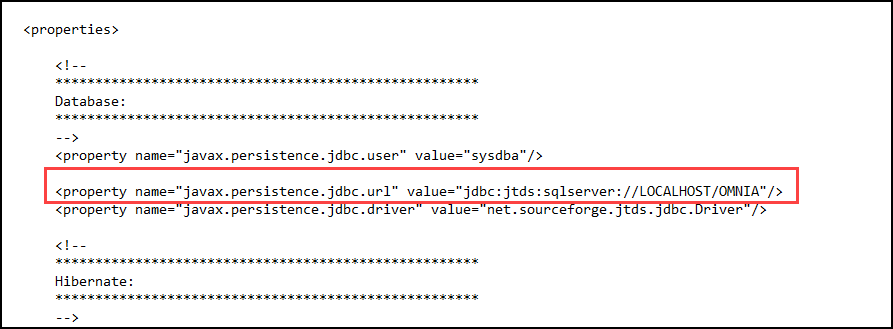
NOTE: The New APC Controller MUST have the same IP address as the Nexus220 Controller for the controller swap to work.

Refer to Knowledge Base Article regarding setting IP Addresses on PMTronics Inc. Access Control Hardware:

Setting IP on PMTronics Inc. Access Control Hardware

Remove the Nexus220 controller from the Network. Place APC Controller on the network. Find the APC Controller with the Nexus220 Discovery Tool. Set the IP address of the APC Controller to the same IP address, Subnet Mask, and Gateway currently assigned to the Nexus220 Controller.

With the IP Address set on the APC Controller, it is now time to swap the Controllers in the Nexus220 Software.

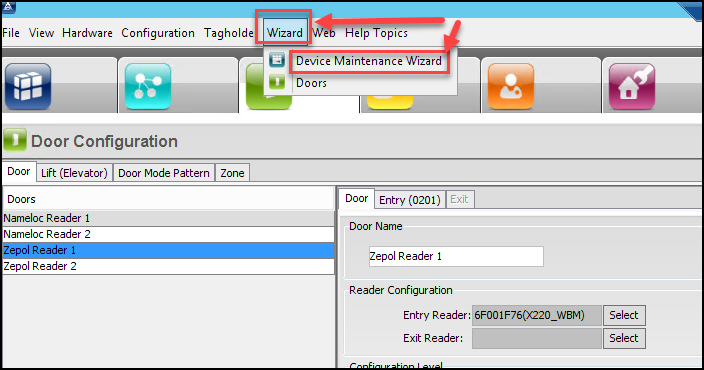
In the Nexus220 Software, select the Wizard, then choose Device Maintenance Wizard.

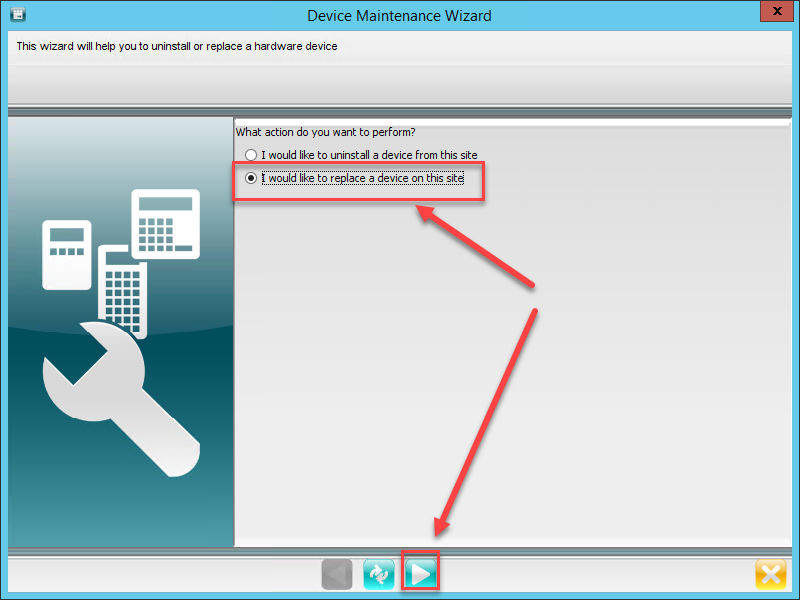
A Device Maintenance Wizard window will appear. Select I would like to replace a device on this site. Then Select the Next Arrow

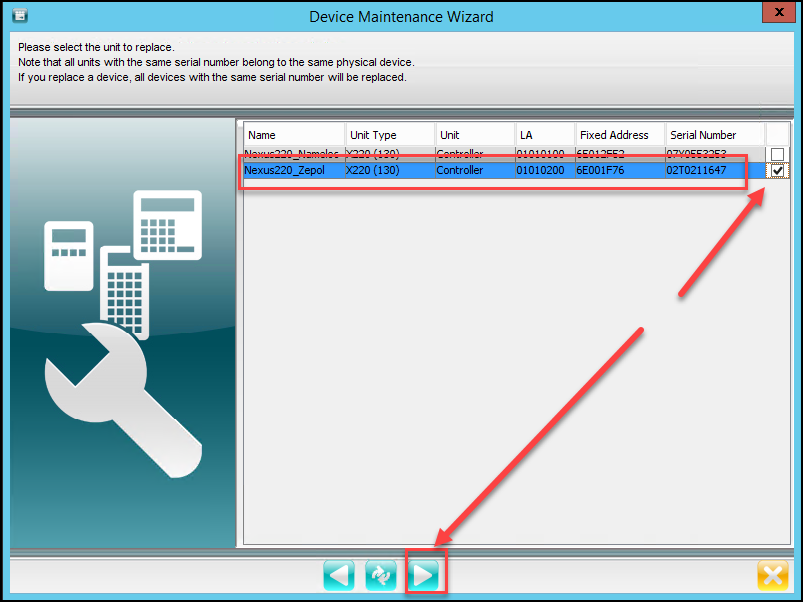
Select the Controller you want to replace. Ensure you place a tick mark in the box, selecting the Controller. Then Select the Next Button

Choose Yes for the Replace Confirmation

In the next window, in the Communication Section. You can choose:

Type of Communication Channel;

  • RS485 or
  • Ethernet

How to Load the IP Device Configuration;

  • Import or
  • Search Subnet

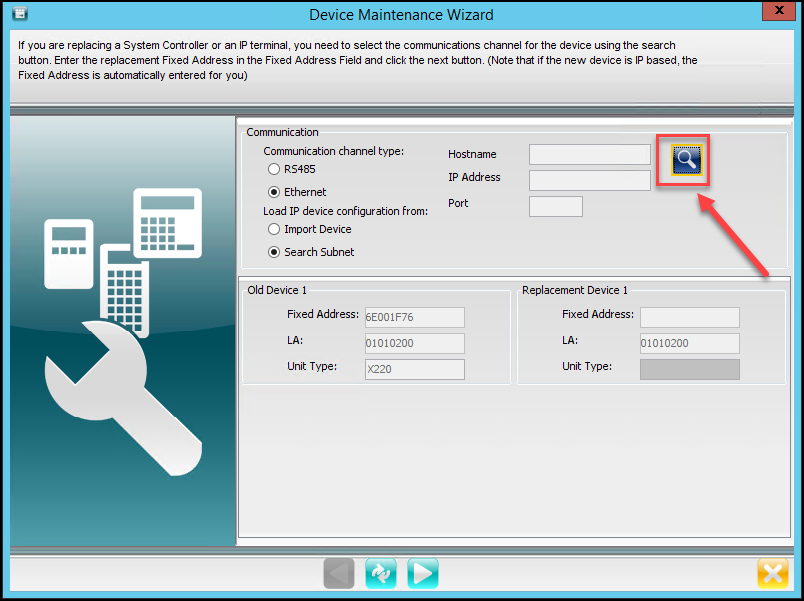
For our Example,  Select Ethernet for the Communication Channel and Select Search Subnet for the Load IP From. Then select the Search Icon

NOTICE: The Fixed Address, the Logical Address (LA), and the unit type for the old device is auto populated from previous selection.

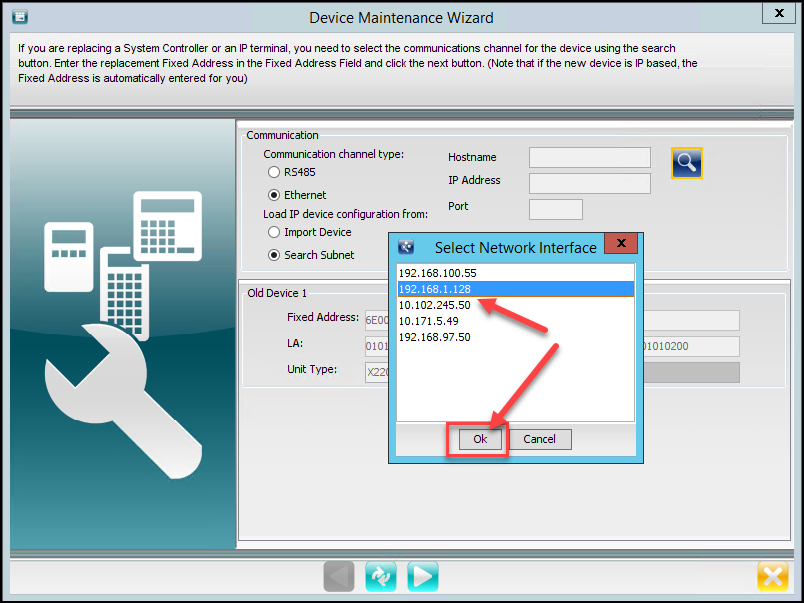
After Selecting the Search Icon, Select the Network Interface and select OK.

Select the Subnet Mask then select the Green Check to continue.

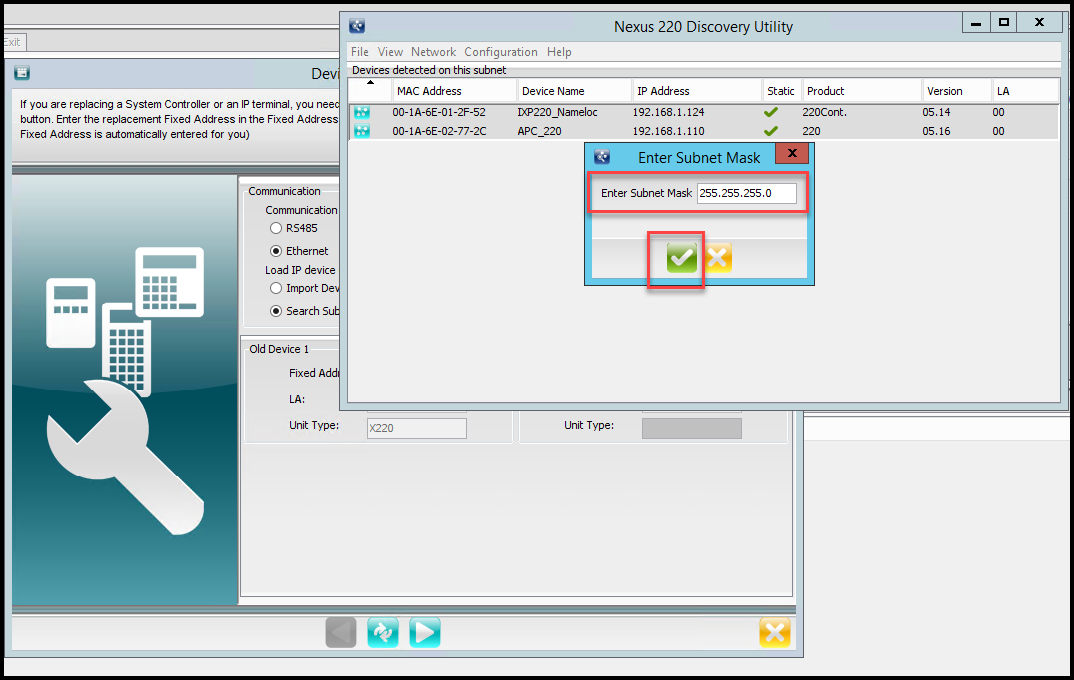
After a few seconds the Select Device window will appear. Select the APC controller by double clicking the controller.

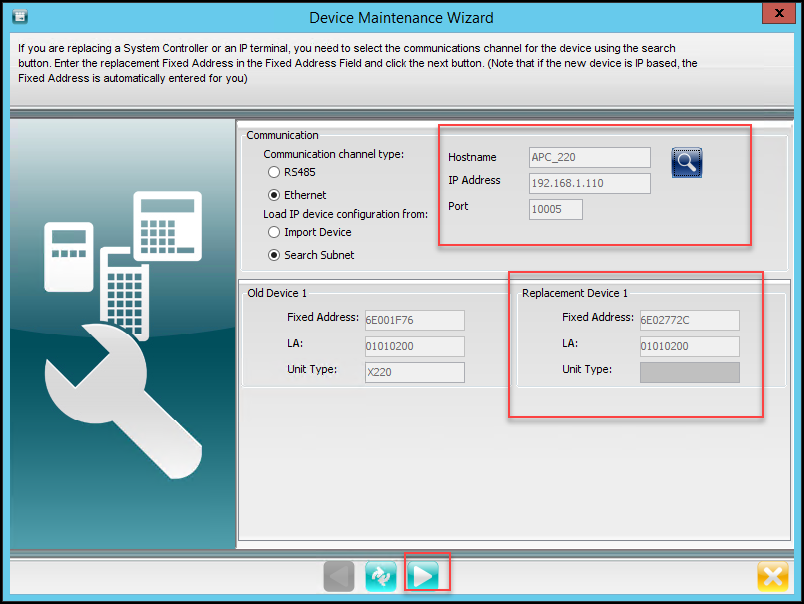
The information from the APC controller will now appear in the Device Maintenance Wizard Window. Select Next

The Device Maintenance Window will Close when the swap has been completed.

To Verify swap was completed, Select the Controller Tab and verify the Fixed Address has changed to the New APC Controllers Fixed Address. If you are still in the Controller Tab, Select another Tab then go back into the Controller Tab to refresh the new Controller information.

You will notice the New APC Controller has retained the same Controller Name, Controller Logical Address (LA) and the Controllers IP address as the old Nexus220 Controller.

You can verify communication/connectivity to the Controller by Selecting the Communications Status Viewer Tab. Here you will see if the software is communicating with the New APC Controller. 

Once we have the Nexus220 Controller replaced and communicating with the software. It is time to replace/swap the Fixed Addresses for the Doors that were associated with the Nexus220 Controller with the Fixed Addresses that are associated with the new Wiegand Reader Module.

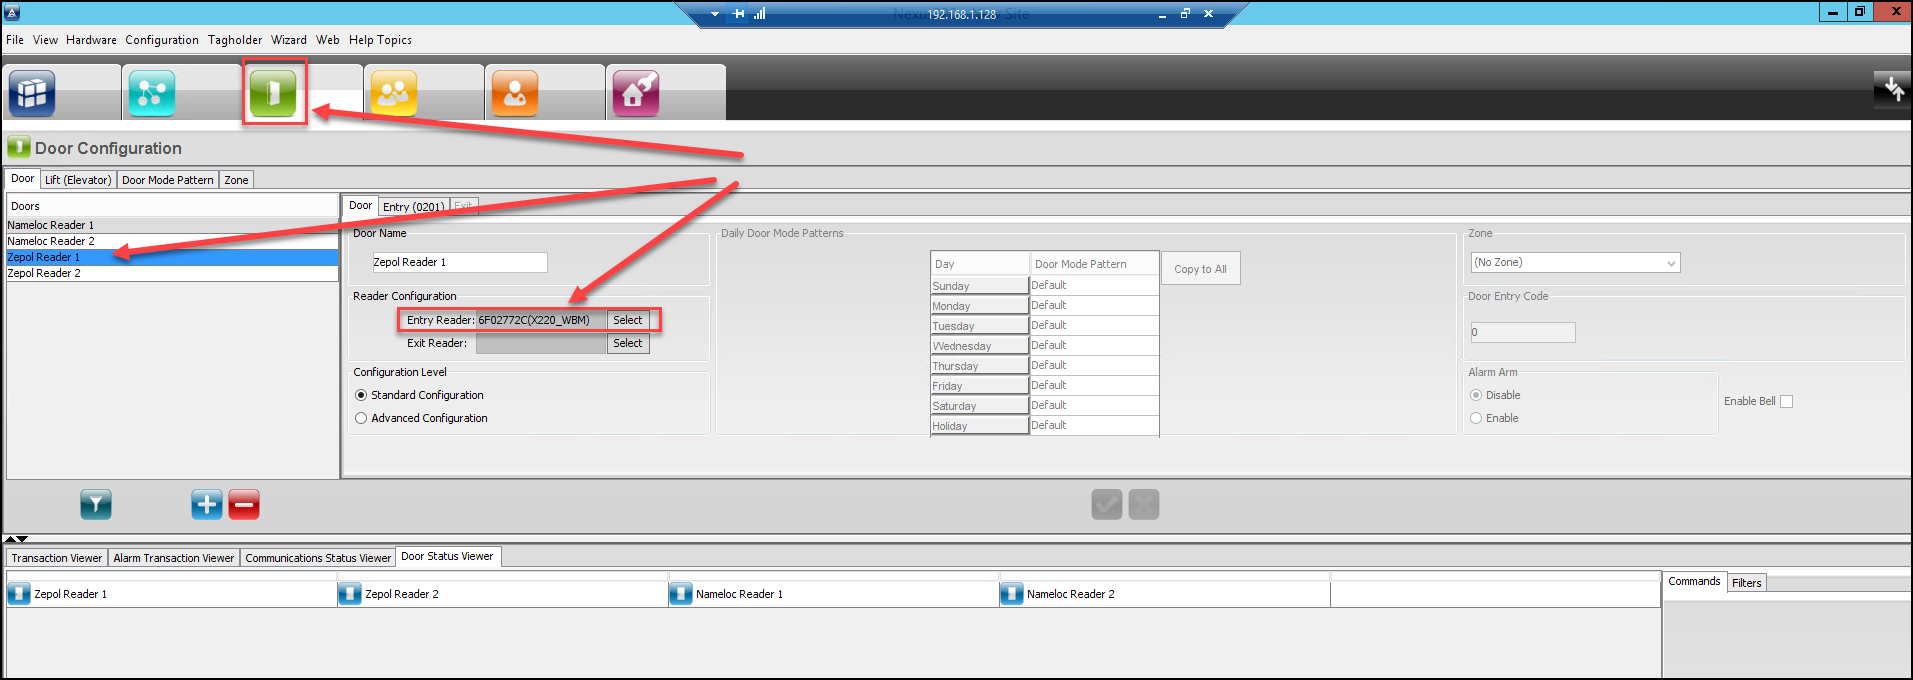
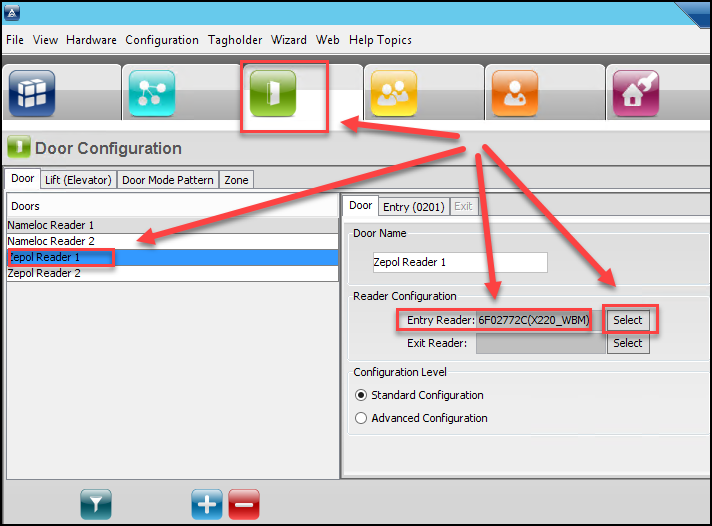
Go to the Doors Tab, and select one of the Doors  that was previously associated with the Nexus220 controller.

NOTE: Notice the Door Readers Fixed Address, they will have a Fixed Address similar to the Fixed Address of the New APC Controller. This is not correct because we will need to use the Fixed Addresses of the Wiegand Reader Module that is connected to the APC Controller instead.

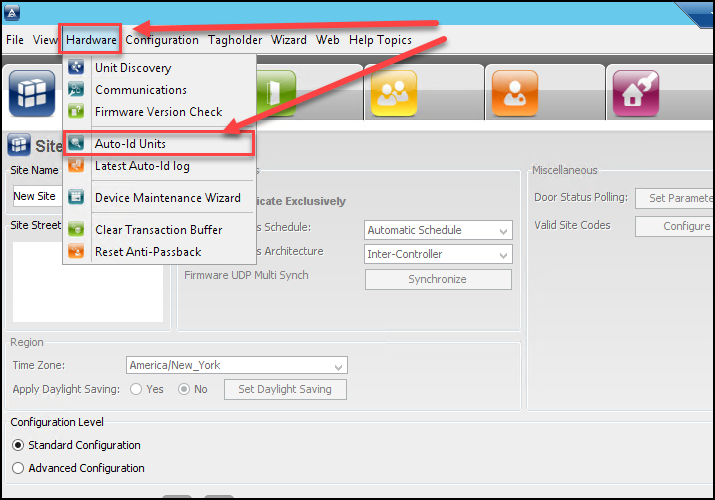
To Install the Wiegand Reader Modules Fixed Addresses, we will need to perform an AutoID for that Controller.

Select Hardware from the Nexus220 Software. From the drop down menu, select Auto ID units. Select OK for the Confirm Auto ID

Select the New APC Controller by placing a tick mark in the Auto ID Channel box. The Select the Green Check box. This will install the Wiegand Reader Modules reader ports Fixed Addresses.

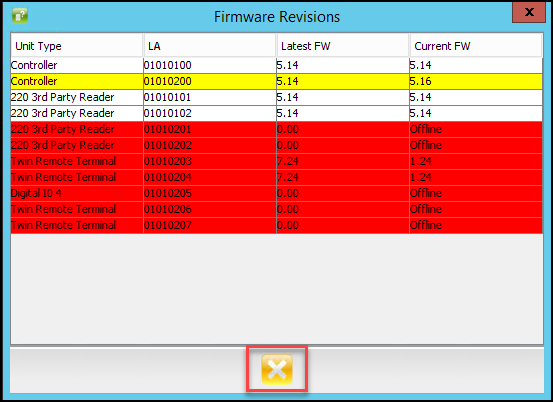
NOTE: After the completion of the Auto ID a Firmware Revisions Screen will appear providing information about the version of firmware that is installed. Close this window.

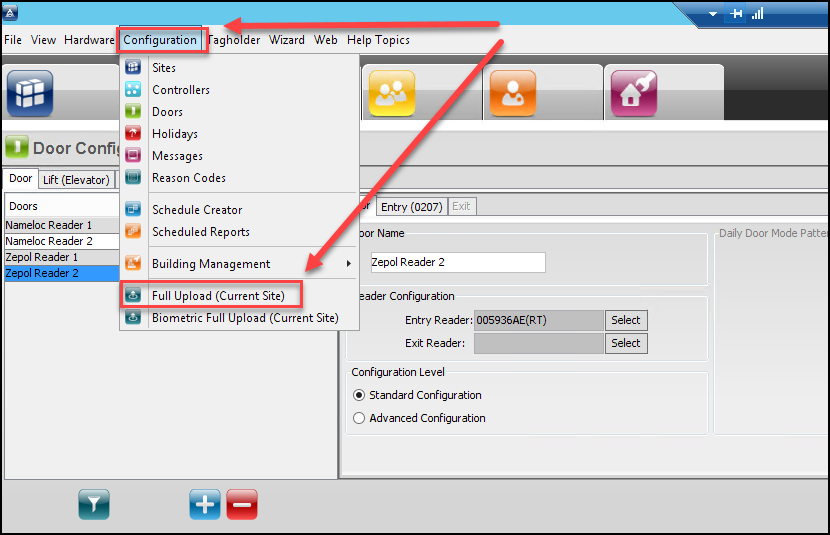
Go to the Doors Tab, Select the Door to replace, then click on the Select button in the Reader Configuration section. 

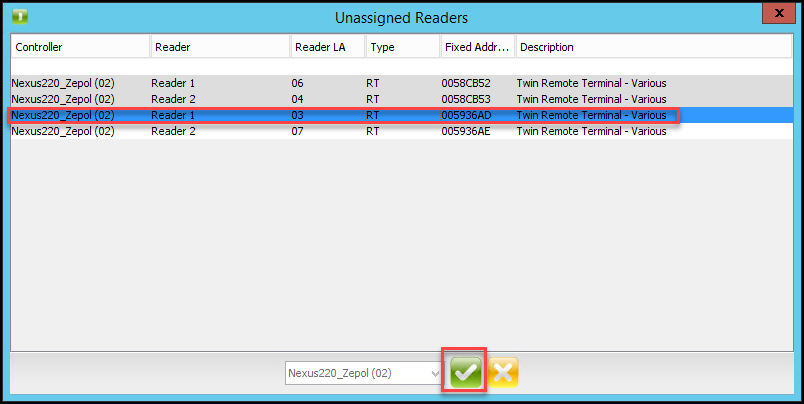
From the Unassigned Readers Window, select the correct reader and then select next to continue.

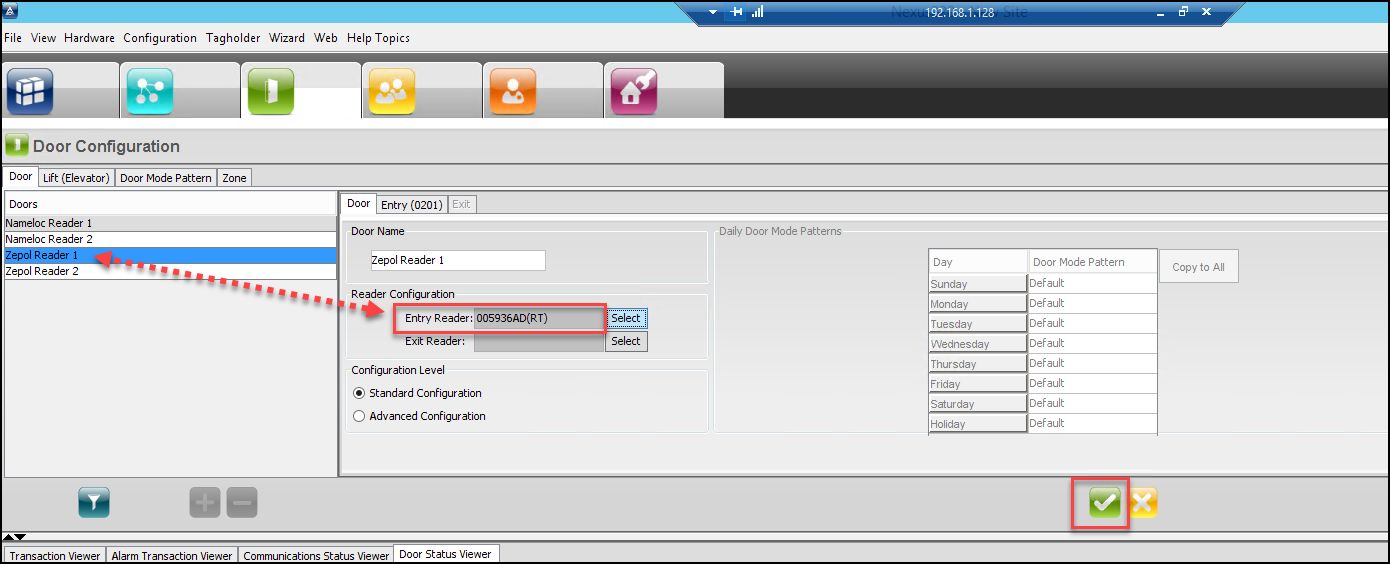
We can now see the door has the new Wiegand Reader Modules Fixed Address. Select Next to save this configuration.

Perform the same action for the next door.

After replacing the Fixed Addresses for the doors. Perform a Full Upload to the New APC Controller. Go to Configuration and from the drop down menu, select Full Upload

This completes the Controller and Terminal replacement.

Need further assistance?

Submit a Support Ticket

Submit a Support Ticket

FAQ

General

Technical Bulletins

Access Control

AmanoNet

Nexxus220

Omnia

Omnia Lite

PM Tronics Hardware

Amano Readers and Credentials

Legacy Hardware

Partner Products

Partner Products

Video Management Systems

Cathexis Video (Amano Vision)

AmanoDVMS

Vision

How to move Nexus220 to a different PC

How to move Nexus220 to a different PC

Steps to Move Nexus220

PLEASE ENSURE THE USER LOGIN BEING USED TO INSTALL NEXUS220 HAS FULL ADMINISTRATIVE RIGHTS.

From the PC where the software is being moved from:

Close all software on all computers running Nexus220
Copy the database file to an intermediate source such as a flash drive or network drive.
Default location: c:\Nexus220\database\db220.fdb

If the site has individual End User Logins, perform the following steps on the old PC.


Copy security file to an intermediate source such as a flash drive or network drive.
Default 32-bit path: c:\program files\firebird_2_1\firebird\security.fdb

Default 64-bit path:  c:\program files (x86)\firebird_2_1\firebird\security.fdb

*Firebird security file may be named security2.fdb

On new PC where software is being moved to:

IMPORTANT!!!! Verify you are installing current or newer version of Nexus220 software than what is currently installed.

Install new instance of software from installation disc or download

PLEASE ENSURE THE USER LOGIN BEING USED TO INSTALL NEXUS220 HAS FULL ADMINISTRATIVE RIGHTS.

Download Nexus220


Rename database created during installation to Nexus220_empty.fdb
Default Location: C:\Nexus220\database\DB220.fdb

Paste database copied from original PC into the c:\Nexus220\database\ folder.

Move over USB device that was connected to old PC to the new PC
Run Driver Setup for USB device driver, setup.exe found at C:\Nexus220\driver\USB Device Driver.

If the site has individual End User Logins, perform the following steps on the new PC.


Rename security.fdb (or security2.fdb) file created during installation to securityOLD.fdb (or security2OLD.fdb respectively)
Paste security file copied from the original PC into the appropriate folder.
Default 32-bit path: c:\program files\firebird_2_1\firebird\security.fdb
Default 64-bit path:  c:\program files (x86)\firebird2_1\firebird\security.fdb

Need further assistance?

Submit a Support Ticket

Submit a Support Ticket

FAQ

General

Technical Bulletins

Access Control

AmanoNet

Nexxus220

Omnia

Omnia Lite

PM Tronics Hardware

Amano Readers and Credentials

Legacy Hardware

Partner Products

Partner Products

Video Management Systems

Cathexis Video (Amano Vision)

AmanoDVMS

Vision

Adding Widgets to the OMNIA Dashboard

Adding Widgets to the OMNIA Dashboard

The OMNIA dashboard is the central hub for your access control system, the dashboard allows you to easily see useful information and make commonly used tasks available in one central page.

The OMNIA dashboard is the central hub for your access control system, the dashboard allows you to easily see useful information and make commonly used tasks available in one central page. 

From the dashboard, you can view status of doors, see live access transactions, view health aspects of the system and set up shortcuts that allow you to quickly do common tasks without having to leave the dashboard. 

Here is a list of available widgets: 

  • Access Group capacity Graph – Shows a graphical representation of people with a particular access group that are inside a given zone. 
  • Commands – Shows executable commands such as remote door open. 
  • Enrollment Graph – Total enrollments for the week and highest, lowest enrollments. 
  • Find Image – Shows the images of the person with matching id number. 
  • IP Camera – View live feed from an IP camera. 
  • Last 10 Transactions – Shows the last 10 transactions for a person. 
  • Live! – Shows a live view of access in the system. 
  • Monitor Comms Queue – Shows total queue size and total offline controllers. 
  • Monitor Door – Monitor a single door or reader on site. 
  • Quick Enroll – Enroll a person or asset. 
  • Shortcut – Shortcut loads a user defined view when clicked. 

Setting up the Dashboard. 

Once logged in to OMNIA, select the menu item at the top left ‘Dashboard’. 

To add a widget, click on the blue plus sign at the top right.   

You will be presented with a menu: 

Click on the arrow to bring up a list of available widgets. 

Select the widget that you wouls like to use: 

Here I have sellected “Commands” and Set the command to act on a site level, this will allow me to reset Anti-Passback on the site. 

Note that you can customize the widget colors. 

The dashboard optimizes itself, always trying to fill empty space, so newly created widgets will fill from the top left, you can move widgets by dragging them. 

Once your widget is where you want it, click the green check at the top right.  

This is the completed widget. From here you can put the site into LOCKDOWN (If configured), EMERGENCY LOCKDOWN (If configured) or reset APB LOCKDOWN (If configured).  

Here is an example of a well populated Dashboard: 

Need further assistance?

Submit a Support Ticket

Submit a Support Ticket

FAQ

General

Technical Bulletins

Access Control

AmanoNet

Nexxus220

Omnia

Omnia Lite

PM Tronics Hardware

Amano Readers and Credentials

Legacy Hardware

Partner Products

Partner Products

Video Management Systems

Cathexis Video (Amano Vision)

AmanoDVMS

Vision

OMNIA CSV Imports

OMNIA CSV Imports

Importing Tagholders into OMNIA with .CSV File

The OMNIA application provides a simple CSV import utility that can be used to import tagholders, vehicles and visitors. 

  1. Create a CSV file with headers and required data. A list of fields available for import can be seen in the table below. 
Birthday Fax (H) Postal Address (W) 
Company Fax (W) Second Name 
Department First Name Street Address (H) 
Device Serial No Gender Street Address (W 
Driver’s License No ID Number Suffix 
Email (H) Last Name Title 
Email (W) Mobile Number Vehicle Color 
Email Address Name of person visiting  
Employee No Position  
Employer Postal Address (H)  

CSV Document should resemble this: 

  1. Go to the OMNIA Server Application and select the TOOLS tab: 

Click the ‘Browse’ button and browse to your caved CSV file and select the file: 

The Browse box should now show the path to your CSV file. 

  1. Move down to Step 2: Column Mapping, before doing anything else, create a New Profile Name. In the left of the table, you will see the column headers from you CSV file, we now need to map those to fields in the database that we want to populate with the import. 

Map the source to destination by clicking on the red DESTINATION rows on the right, these are drop-downs that you can use to map your CSV source to the correct field in the database, save the profile by clicking the save button: 

  1. Move down to Step 3: Process File, press the Process button  

Review the summary at the bottom to confirm that the import was successful: 

  1. Errors or failures are usually caused by the use of special characters, extra spaces before or after records, lines between records or mismatches between sours and destination mapping. 

Need further assistance?

Submit a Support Ticket

Submit a Support Ticket

FAQ

General

Technical Bulletins

Access Control

AmanoNet

Nexxus220

Omnia

Omnia Lite

PM Tronics Hardware

Amano Readers and Credentials

Legacy Hardware

Partner Products

Partner Products

Video Management Systems

Cathexis Video (Amano Vision)

AmanoDVMS

Vision

How to Print Tags in OMNIA

How to Print Tags in OMNIA

Printing Tags in OMNIA

NOTE:

Install your printer to the PC, before installing the Plugin Manager

To print tags in OMNIA you must install the OMNIA Plugin Mgr, Update the Printer Persistence File, and Create a Tag Template

See Knowledgebase article titled, How to Install the OMNIA Plugin Mgr.

How to Install The OMNIA Plugin Manager

Seen Knowledgebase article, How to Use the OMNIA Card Designer.

How to Use The OMNIA Card Designer

Select your printer in the Plugin Manager

Right click the OMNIA Plugin Manager Icon, select Plugin Status

From the Settings Tab, use the dropdown to select your printer click save settings.

Log into the OMNIA URL , if currently logged in, log out then back in.

Go to Enrollment\Tagholder and select a Tagholder

In the Tagholder Screen, Select Tags, then Select the Tag Code

Select Printing, the Print Window will appear. Select your previously designed Card Template by using the arrow and selecting the desired template

After Selecting the Template, Select Print

The print job will be sent to the Print Queue.

After the OMNIA Plugin Mgr has been installed, you may have to update the Printer Persistence.xml file.

          Update the Printer Persistence.xml file located at:

          C:\Program Files (x86)\OMNIA\OMNIA Plugin Manager\print\META-INF.

Open the file in Notepad to edit the path and the name of the Database.

Use the IP address of the Database or localhost if the Database resides on the PC you are wanting to print tags from.

Change the Database Name from Portal to OMNIA

NOTE: There are two (2) Locations on the Printing Persistence File that need to be updated.

Using IP of SQL Server

Using LOCALHOST

    Need further assistance?

    Submit a Support Ticket

    Submit a Support Ticket

    FAQ

    General

    Technical Bulletins

    Access Control

    AmanoNet

    Nexxus220

    Omnia

    Omnia Lite

    PM Tronics Hardware

    Amano Readers and Credentials

    Legacy Hardware

    Partner Products

    Partner Products

    Video Management Systems

    Cathexis Video (Amano Vision)

    AmanoDVMS

    Vision

    • « Go to Previous Page
    • Page 1
    • Interim pages omitted …
    • Page 7
    • Page 8
    • Page 9
    • Page 10
    • Page 11
    • Interim pages omitted …
    • Page 23
    • Go to Next Page »
    • Facebook
    • LinkedIn
    • Twitter

    PMT Security

    Copyright © 2026 PMT Security, Inc. | All Rights Reserved