• Skip to primary navigation
  • Skip to main content
PMT Security Logo

PMT Security

Advanced Access Control

  • Home
  • About Us
    • Security and Trust
    • Our Partners
    • Our Integrators
  • Solutions
    • Education
    • Retirement & Healthcare
    • Manufacturing
    • Government Facilities
    • Residential
    • Retail Businesses
    • Campgrounds & Outdoor Resorts
  • Products
    • Access Control
      • Control Features
      • Reporting & Monitoring
      • Control Module
      • Digital IO Module
      • Reader Module
      • Readers
    • Video Management
    • Visitor Management
    • Intercom
    • Live Guard Video Monitoring
    • Housings & Pedestals
  • Support
    • Knowledgebase
    • Download Center
    • License Request
    • RMA Request Form
  • Blog
  • Contact Us

AmanoNet

How to get PMTSecurity a copy of the AmanoNet Access Control Database

How to Get PMT Security a Copy of the AmanoNET Access Control Database

Before PMT Security can perform an upgrade of your AmanoNET Access Control System to OMNIA, we need a copy of your current database for evaluation and compatibility testing. This ensures installed access control hardware and configurations are accurately assessed for transition.

Making a Backup of Your AmanoNET Database

AmanoNET uses either a Firebird database or a SQL database. The file type will determine which files you need to copy.

Locate the Database Folder

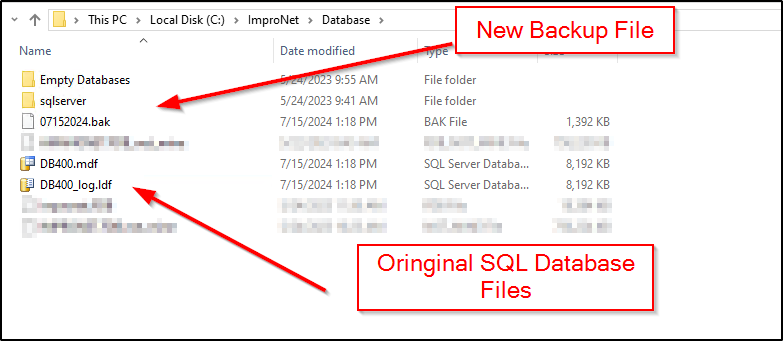
Access your server or workstation where AmanoNET is installed and navigate to:

C:\AmanoNet\Database

There may be multiple database files in this folder.

Firebird Database

If your system uses a Firebird database, the file will be named:

AmanoNet.FDB

This file will not contain extra characters before, after, or in the middle of the name, and it should reflect the current date in its filename.

SQL Database

If your AmanoNET installation uses SQL, you will see two associated files:
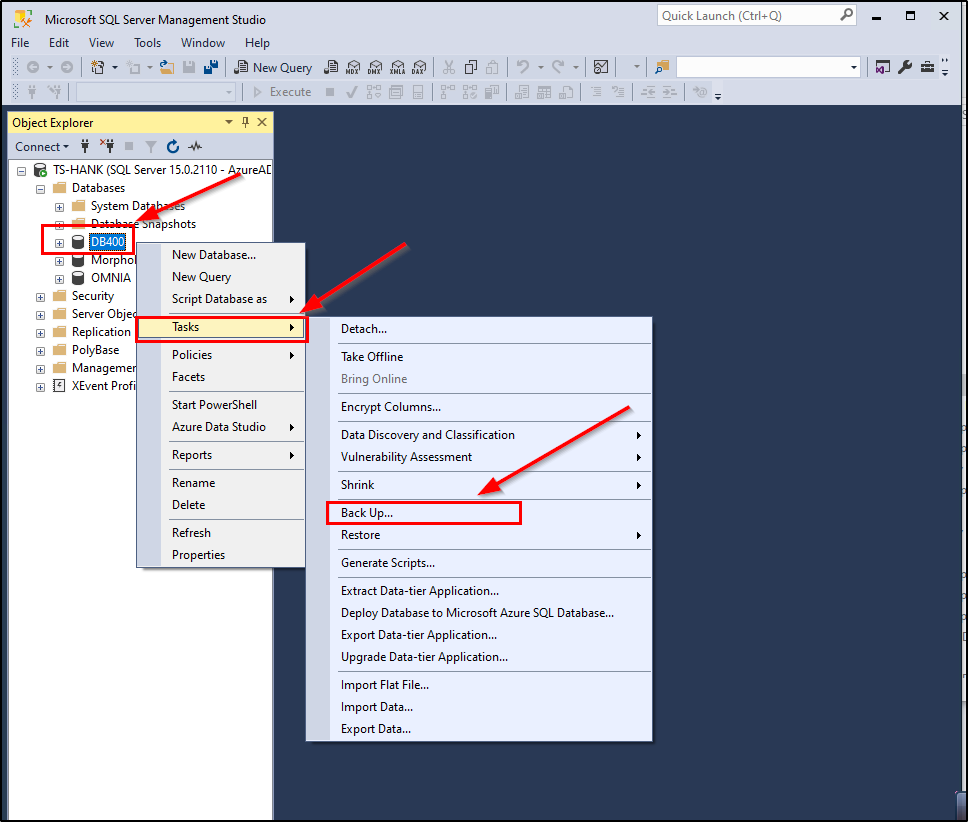
  • DB400
  • DB400_log

Both files are required for a complete export and must be included in the upload.

Best Practices for a Clean Export

To help ensure a reliable, non-corrupted copy of your database:

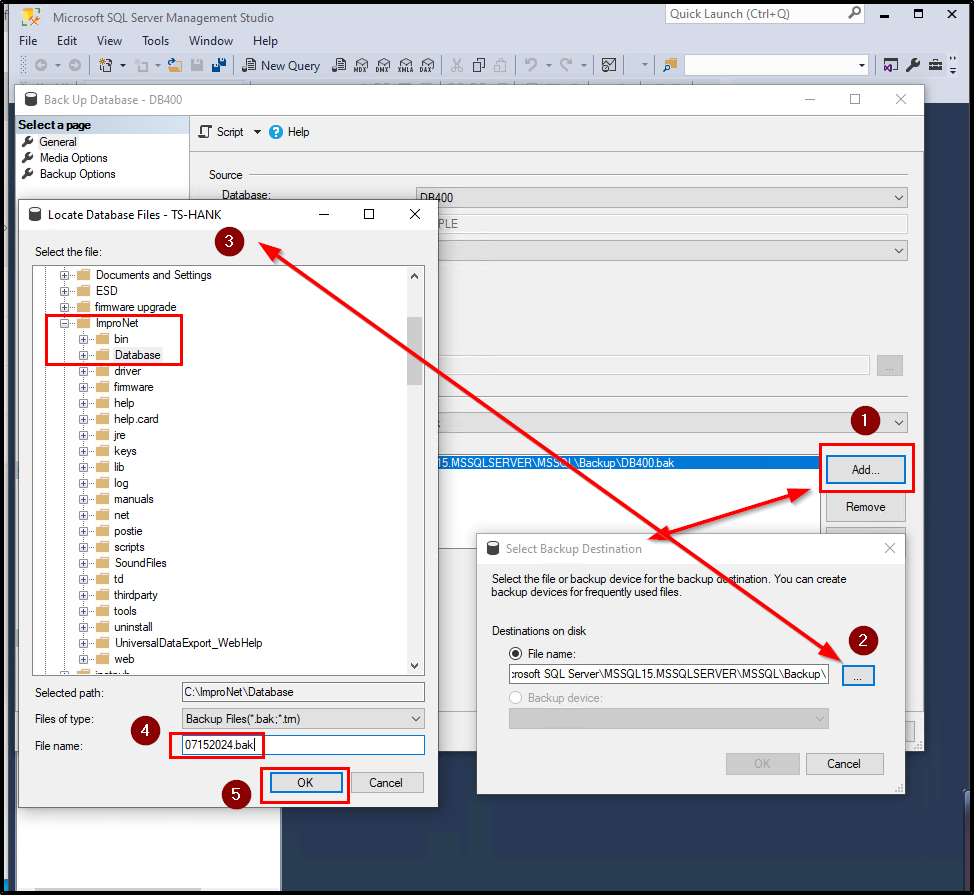
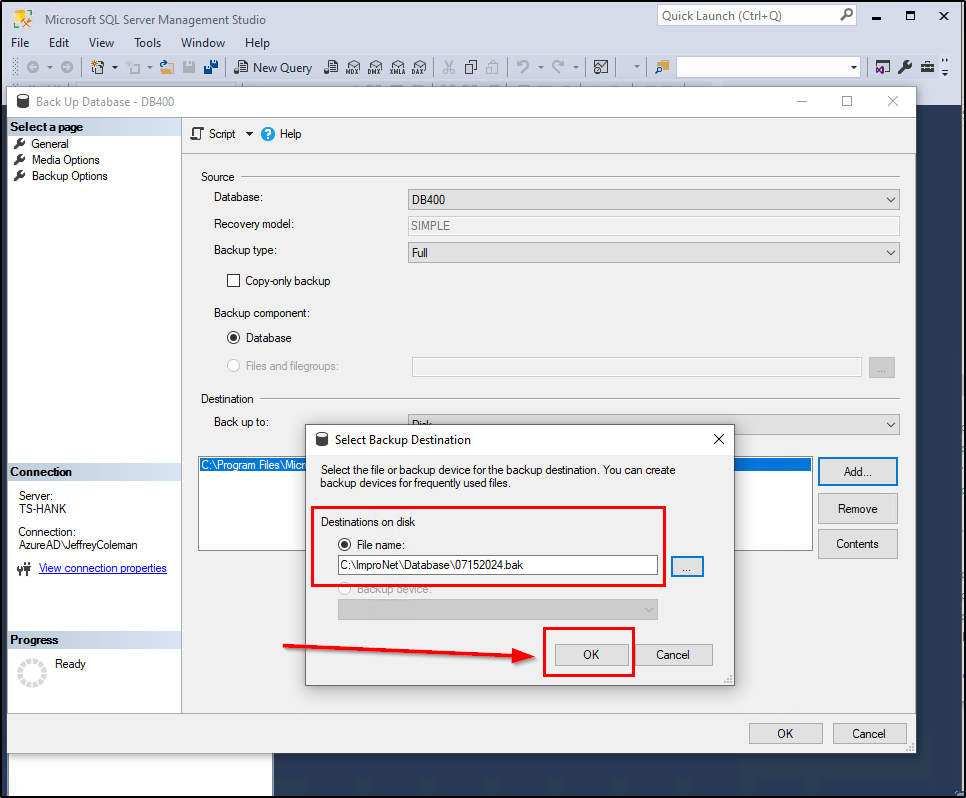
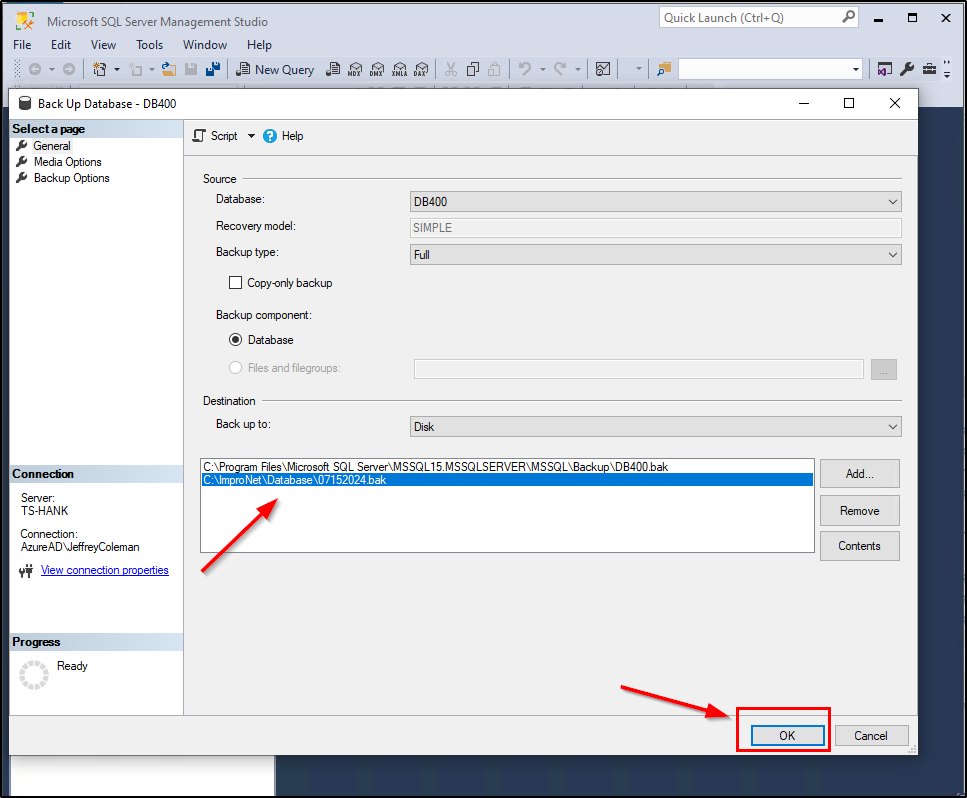
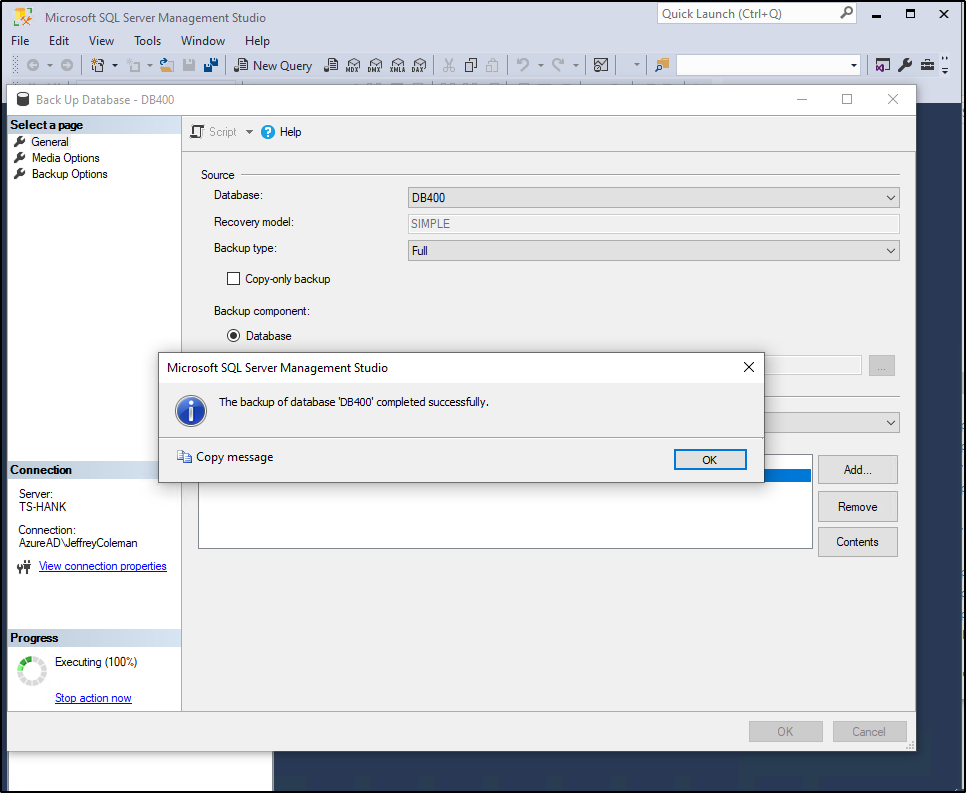
  1. Create a backup of the database before exporting.
  2. Upload the backup file — not just the live database — to avoid partial or locked file issues.

Using a backup also preserves the integrity of the database for testing.

Reference Articles for Database Backup

We recommend consulting detailed Knowledgebase articles for guidance on backing up specific AmanoNET database types:

  • AmanoNet Back-up using IB Console — covers Firebird database backups.
  • mproNet/AmanoNet Database Backup: SQL — explains SQL database backup procedures.

These articles walk through the necessary steps to safely export your database.

Uploading Your Database to PMT Security

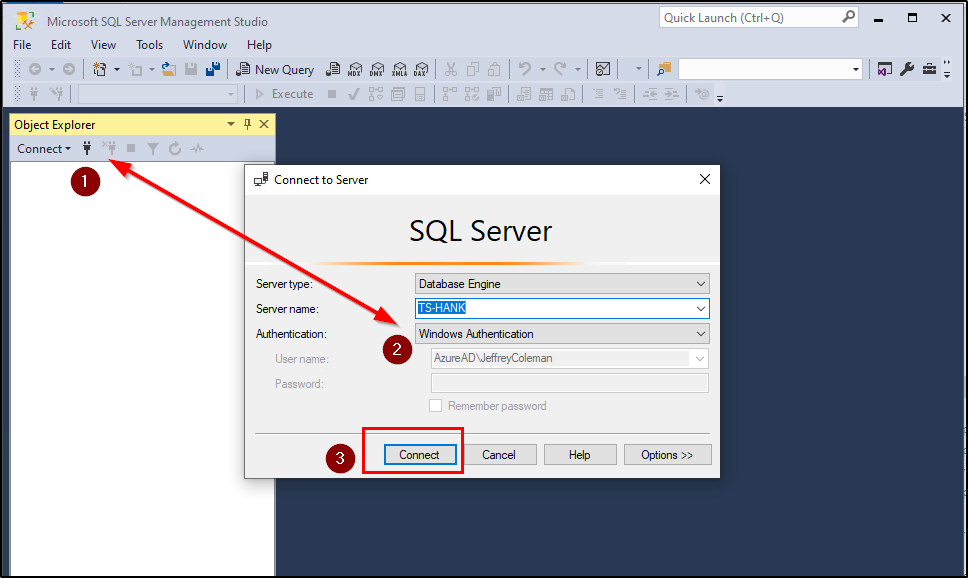
Once you have the backup files ready, contact Technical Support to receive a secure upload link.

Need Further Assistance?

If you encounter issues creating a backup or locating your database files, PMT Security Support is available to help. Submit a support ticket through the portal, and our technical team will assist you with the process.

Need further assistance?

Submit a Support Ticket

Submit a Support Ticket

Replacing an Antenna Reader terminal with a iTRT or iTRT2 in AmanoNet

Replacing an Antenna Reader terminal with a iTRT or iTRT2 in AmanoNet

Replacing an Antenna Reader terminal with a iTRT or iTRT2 in AmanoNet.

Replacing an Antenna Reader terminal with a iTRT or iTRT2 in AmanoNet

Before stating make sure your new hardware is installed.

(Note* When replacing an Antenna reader terminal with an iTRT or iTRT2 you must replace the reader)

Open the Engine.exe and select stop. Then Select Advanced

Find the Controller LA locate the Reader terminal you would like to replace. Open Access and search for the terminal that will be replaced then select.  Next to Logical address take note of the highlighted section below. (Example 01)


Type START AUTOID (Logical Address of Controller)(Example 01) Then Select Enter

To see the Unassigned Terminals close and reopen Access.exe

Now that you see the Unassigned Terminals Click and drag the device into the required location. 

Need further assistance?

Submit a Support Ticket

Submit a Support Ticket

FAQ

General

Technical Bulletins

Access Control

AmanoNet

Nexxus220

Omnia

Omnia Lite

PM Tronics Hardware

Amano Readers and Credentials

Legacy Hardware

Partner Products

Partner Products

Video Management Systems

Cathexis Video (Amano Vision)

AmanoDVMS

Vision

TCP and UDP ports for ImproNet/AmanoNet

TCP and UDP ports for ImproNet/AmanoNet

Ports that AmanoNet uses to Communicate Properly

Ports in AmanoNet are used for various purposes and protocols. Here is a list of TCP and UDP ports along with their corresponding functionalities:

TCP Ports:

– Port 80: Used for HTTP Web Reports.

– Port 443: Used for SSL Web Reports.

– Port 1433: Used for MS SQL.

– Port 3050: Used for Firebird.

– Port 10008: Used for All IP Terminals.

– Port 10500: Used for Discovery.

– Port 11010: Used for Morpho.

– Port 26661: Used for Alarm Viewer.

– Port 26663: Used for Transaction Viewer.

– Port 26665: Used for Messaging Port.

– Port 26667: Used for Door Status Port.

– Port 26668: Used for Engine Status Port.

– Port 26669: Used for Host Validation Port.

– Port 26680: Used for Security Server Port.

UDP Ports:

– Port 10002: Used for EC2 Controller.

– Port 10008: Used for IP Terminals.

– Port 10500: Used for Discovery.

These ports play a crucial role in facilitating communication and data transfer within the AmanoNet system.

Need further assistance?

Submit a Support Ticket

Submit a Support Ticket

FAQ

General

Technical Bulletins

Access Control

AmanoNet

Nexxus220

Omnia

Omnia Lite

PM Tronics Hardware

Amano Readers and Credentials

Legacy Hardware

Partner Products

Partner Products

Video Management Systems

Cathexis Video (Amano Vision)

AmanoDVMS

Vision

Unlock on First Tag in AmanoNet

Setting up Unlock on First Tag in AmanoNet

Steps and Procedure to Configure a Valid Tag to Open and Keep a door unlocked for a specific amount of time in AmanoNet.

Unlock on First Tag feature in AmanoNet provides the facility of unlocking selected door(s) when the first valid Tag is presented during a specified time period. The door remains unlocked for that time period, but is locked outside that time period, opening only on presentation of a valid Tag.


Example
In the following example procedure, activate the Unlock on First Tag feature only on weekdays from 7 am to 5 pm. This means that you must create the following Device Time Patterns (in Access) for the Terminal(s) concerned:

  • A Device Time Pattern from 7 am until 5 pm on weekdays (Monday to Friday). This is the period for which the Unlock on First Tag feature must be enabled.
  • A Device Time Pattern from Sunday until Friday, 5 pm until 12 am. This is the remaining time on each of the above days during which the Unlock on First Tag feature must be disabled.
  • A Device Time Pattern from Sunday until Friday, 12 am until 7 am. The Sunday period covers the time from midnight to 7 am on Monday.
  • A Device Time Pattern called Deactivate Relay at 17:00. Set the start time to 5 pm and select Monday to Friday. This will End the Unlock on First Tag
  • A Device Time Pattern for Saturday, Sunday and public holidays for the full 24 hours. These are the days on which the Unlock on First Tag feature must be disabled.


Device Time Pattern Setup


1. In Access, in the Navigate Pane (from the Hierarchical Tree) select Device Time Patterns

2. In the Main Pane, click the Plus button.

In AmanoNet select "Device Time Patterns" from system menu located to the left. Then select the "+" symbol at the bottom of the window.

3. In the Description textbox, enter a name for the Device Time Pattern.

4. If required, complete the Start Date and Stop Date textboxes.

5. In the Start Time field, enter 0700.

6. In the Duration field, enter 1000.

7. Select the Monday through Friday checkboxes.

Set-up your time pattern.
Describe the pattern, set your dates and time durations, and select the days of the week required for this device time pattern.

8. Repeat the processes mentioned in steps 2 to 7 for the remaining Device Time Patterns. When are complete it should look similar to Below.

Follow steps 2 -7 for your remaining device time patterns, when you are finished your device time patterns will be displayed accordingly in AmanoNet.

Relay Action Setup

NOTE: This Action enables the relay for an indefinite period.

Create New Action – Mon-Fri 07:00-17:00 Device Time Pattern


1. Select the Actions tab, for the output relay on the Terminal controlling the door strike.

2. In the Main Pane, click the Plus Button.

3. In the Action Name textbox, assign your action the name Enable Relay Indefinitely.

4. Alongside the Time Pattern textbox, click the browse button.

5. From the list of displayed Device Time Patterns, select the Mon-Fri 07:00-17:00 record.

6. Click the button Save Button.

7. At the New Action dialog, click the save button.

8. In the Action Parameters dialog, set the Duration (0.1s) to 65535.

9. Click the Save Button.

Create New Action - Mon-Fri 07:00-17:00 Device Time Pattern.

Select the Actions tab, for the output relay on the Terminal controlling the door strike. Select the "+" symbol.
Displays how to Enable Relay in AmanoNet.
To activate indefinitely in AmanoNet set duration to 65535

Create New Action – Sat, Sun, Hol 24hrs Device Time Pattern


1. In the Main Pane, click the Plus Button.

2. In the Action Name textbox, assign the action a name (for example Drive Relay 4 Seconds).

3. Alongside the Time Pattern textbox, click the browse button.

4. From the list of displayed Device Time Patterns, select the Sat, Sun, Hol 24 Hrs record.

5. Click the Save Button.

6. At the New Action dialog, click the Save Button

7. In the Action Parameters dialog, set the Duration (0.1s) to 40 (4 seconds).

8. At the Action Parameters dialog, click the Save Button.

Create New Action - Sat, Sun, Hol 24hrs Device Time Pattern
Sat, Sun, Hol 24hrs Device Time Pattern duration 40


Edit Action – Sun-Fri 17:00-00:00 Device Time Pattern


1. In the Main Pane select the existing Relay – Allowed In Action.

2. Click the Gear button.

3. In the Action Name textbox, assign the action a new name (for example Sun-Fri 1700-0000).

4. Alongside the Time Pattern textbox, click the browse button.

5. From the list of displayed Device Time Patterns, select the Sun-Fri 17:00-00:00 record.

6. Click the Save Button.

7. At the Edit Action dialog, click the Save Button

Create New Action – Sun-Fri 00:00-07:00 Device Time Pattern


1. In the Main Pane, click the Plus Button.

2. In the Action Name textbox, assign your action a name (for example Sun-Fri 0000-0700).

3. Alongside the Time Pattern textbox, click the browse button.

4. From the list of displayed Device Time Patterns, select the Sun-Fri 00:00-07:00 record.

5. Click the Save Button.

6. At the New Action dialog, click the Save Button.

7. At the Action Parameters dialog, click the Save Button.

Create New Action – Deactivate Relay at 17:00 Device Time Pattern


1. In the Main Pane, click the Plus Button.

2. In the Action Name textbox, assign your action a name (for example Deactivate Relay).

3. Alongside the Time Pattern textbox, click the browse button.

4. From the list of displayed Device Time Patterns, select the Deactivate Relay at 17:00 record.

5. Click the Save Button.

6. At the New Action dialog, click the Save Button.

7. In the Action Parameters dialog, set the Duration (0.1s) to 65535.

8. At the Action Parameters dialog, click the Save button.

Create New Action - Deactivate Relay at 17:00 Device Time Pattern
To deactivate indefinitely set duration to 65535

AmanoNet New Action – All Relays


1. In the Main Pane, click the Plus Button.

2. From the Select Action Type drop-down list, select the Multiple Actions option.

3. In the Action Name textbox, assign your action a name (for example All Relays).

4. Click the Save Button

5. In the Action Parameter dialog, for the First Action, click the 1 button.

6. From the list of displayed actions, select the Sun-Fri 1700-0000 action created earlier.

7. For the Second Action, click the 2 button.

8. From the list of displayed actions, select the Sun-Fri 0000-0700 action created earlier.

9. For the Third Action, click the 3 button.

10. From the list of displayed actions, select the Enable Relay Indefinitely action created earlier.

11. For the Fourth Action, click the 4 button.

12. From the list of displayed actions, select the Drive Relay 4 Seconds action created earlier.

13. Click the Save button.

14. At the Action Parameters dialog, click the Save button.

NOTE: Steps 5 through 12 are shown all at once for clarity. The Action Selector window will close and open between each step after selecting the Save Button (13)

AmanoNet Active System Events Edit

1. In the Main Pane, click the Active System Events button.

On opening, under Actions for Allowed Events, the First Action appears as Sun-Fri 1700-0000,

add the remaining actions as follows:


2. Under Actions For Allowed Events, replace the First Action, by clicking the 1 button.

3. From the list of actions displayed, select the All Relays action you created earlier.

4. Click the Save Button.

5. At the Active System Events Editor dialog, click the Save Button.

6. At the Confirm Save dialog, click the Yes button.

AmanoNet Time Triggered Action Setup

1. In Access, in the Navigate Pane (from the Hierarchical Tree), select Time Triggered Actions.

2. In the Main Pane, click the Plus Button.

3. In the Action Name textbox, give your Time Triggered Action a meaningful name (for example

Deactivate Relay 1).

4. Click the Trigger Time’s associated browse button.

5. From the list of displayed Device Time Patterns, select the Deactivate Relay at 17:00 record.

6. Click the Save Button.

7. Click the Execute Action’s associated browse button.

8. From the list of displayed actions, select the Deactivate Relay action created earlier.

9. Click the Save Button.

10. At the Create Time Triggered Action dialog, click the Save Button

Need further assistance?

Submit a Support Ticket

Submit a Support Ticket

FAQ

General

Technical Bulletins

Access Control

AmanoNet

Nexxus220

Omnia

Omnia Lite

PM Tronics Hardware

Amano Readers and Credentials

Legacy Hardware

Partner Products

Partner Products

Video Management Systems

Cathexis Video (Amano Vision)

AmanoDVMS

Vision

ImproNet/AmanoNet Database Backup: SQL

ImproNet/AmanoNet Database Backup: SQL

How to make an ImproNet/AmanoNet SQL Database Backup

It is essential that regular backups are made and kept on removable media, or on a networked drive.

Storing backups on the local disk will not prevent data loss if the hard drive fails.

To Backup your ImproNet/AmanoNet SQL Database:

  • Open Sql Server Management Studio
  • Login using your Login Details

Windows Authentication should be sufficient unless the site has no allowed Windows Authentication
            Defaults: (Username: Sysdba, Password: masterkey). (Username: sa, Password:                                                    M@sterkey1)

  • Click on Connect
  • Expand the Database Folder by clicking on the + next to Databases
  • Right Click on the ImproNet/AmanoNet SQL Database, The Database name is DB400.                      DB400 > Tasks> Back Up…
  • Click on the Add… Button
  • Click on the … Button and Navigate to the following location: [Drive:] \ImproNet\database\Backups OR The location you want to store backups to
  • Enter a name for your backup with a suffix off: .Bak
  • Click on Ok,
  • Verify the Backup Name and Location. Click on the OK Button on Select Backup Destination Window
  • Select the Correct Path from above then Select OK.
  • The Backup will begin.
  • The backup is now complete and at the location you selected in a previous step.

Need further assistance?

Submit a Support Ticket

Submit a Support Ticket

FAQ

General

Technical Bulletins

Access Control

AmanoNet

Nexxus220

Omnia

Omnia Lite

PM Tronics Hardware

Amano Readers and Credentials

Legacy Hardware

Partner Products

Partner Products

Video Management Systems

Cathexis Video (Amano Vision)

AmanoDVMS

Vision

  • Page 1
  • Page 2
  • Page 3
  • Page 4
  • Go to Next Page »
  • Facebook
  • LinkedIn
  • Twitter

PMT Security

Copyright © 2026 PMT Security, Inc. | All Rights Reserved

  • Privacy Policy
  • Terms of Use
  • Cookie Policy
  • Accessibility
  • Contact Us