Setting up Unlock on First Tag in AmanoNet
Steps and Procedure to Configure a Valid Tag to Open and Keep a door unlocked for a specific amount of time in AmanoNet.
Unlock on First Tag feature in AmanoNet provides the facility of unlocking selected door(s) when the first valid Tag is presented during a specified time period. The door remains unlocked for that time period, but is locked outside that time period, opening only on presentation of a valid Tag.
Example
In the following example procedure, activate the Unlock on First Tag feature only on weekdays from 7 am to 5 pm. This means that you must create the following Device Time Patterns (in Access) for the Terminal(s) concerned:
- A Device Time Pattern from 7 am until 5 pm on weekdays (Monday to Friday). This is the period for which the Unlock on First Tag feature must be enabled.
- A Device Time Pattern from Sunday until Friday, 5 pm until 12 am. This is the remaining time on each of the above days during which the Unlock on First Tag feature must be disabled.
- A Device Time Pattern from Sunday until Friday, 12 am until 7 am. The Sunday period covers the time from midnight to 7 am on Monday.
- A Device Time Pattern called Deactivate Relay at 17:00. Set the start time to 5 pm and select Monday to Friday. This will End the Unlock on First Tag
- A Device Time Pattern for Saturday, Sunday and public holidays for the full 24 hours. These are the days on which the Unlock on First Tag feature must be disabled.
Device Time Pattern Setup
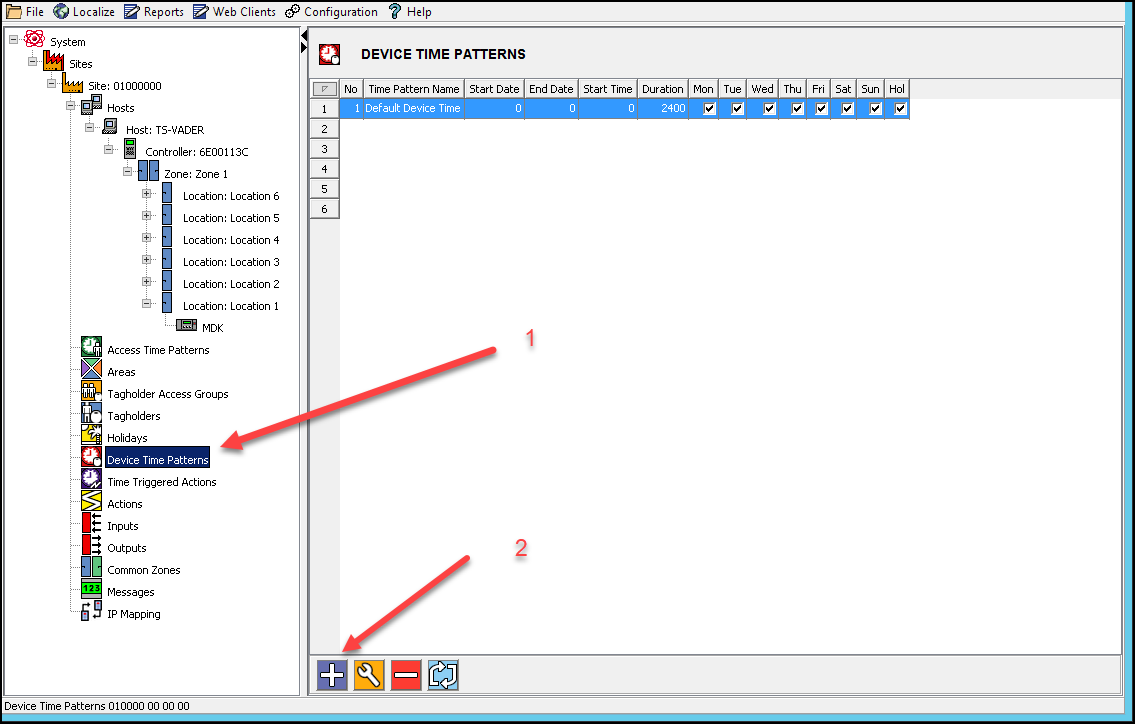
1. In Access, in the Navigate Pane (from the Hierarchical Tree) select Device Time Patterns
2. In the Main Pane, click the Plus button.
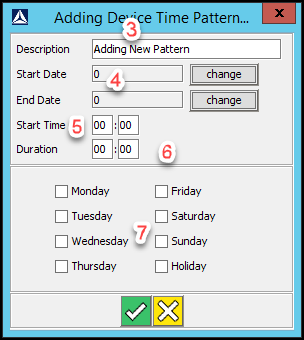
3. In the Description textbox, enter a name for the Device Time Pattern.
4. If required, complete the Start Date and Stop Date textboxes.
5. In the Start Time field, enter 0700.
6. In the Duration field, enter 1000.
7. Select the Monday through Friday checkboxes.
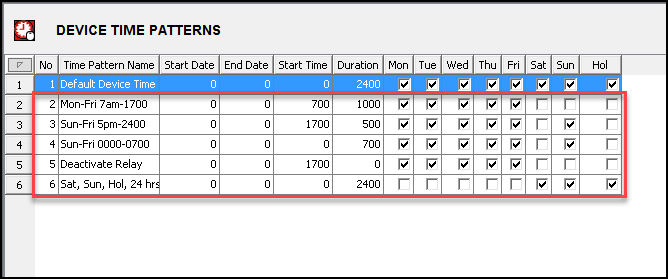
8. Repeat the processes mentioned in steps 2 to 7 for the remaining Device Time Patterns. When are complete it should look similar to Below.
Relay Action Setup
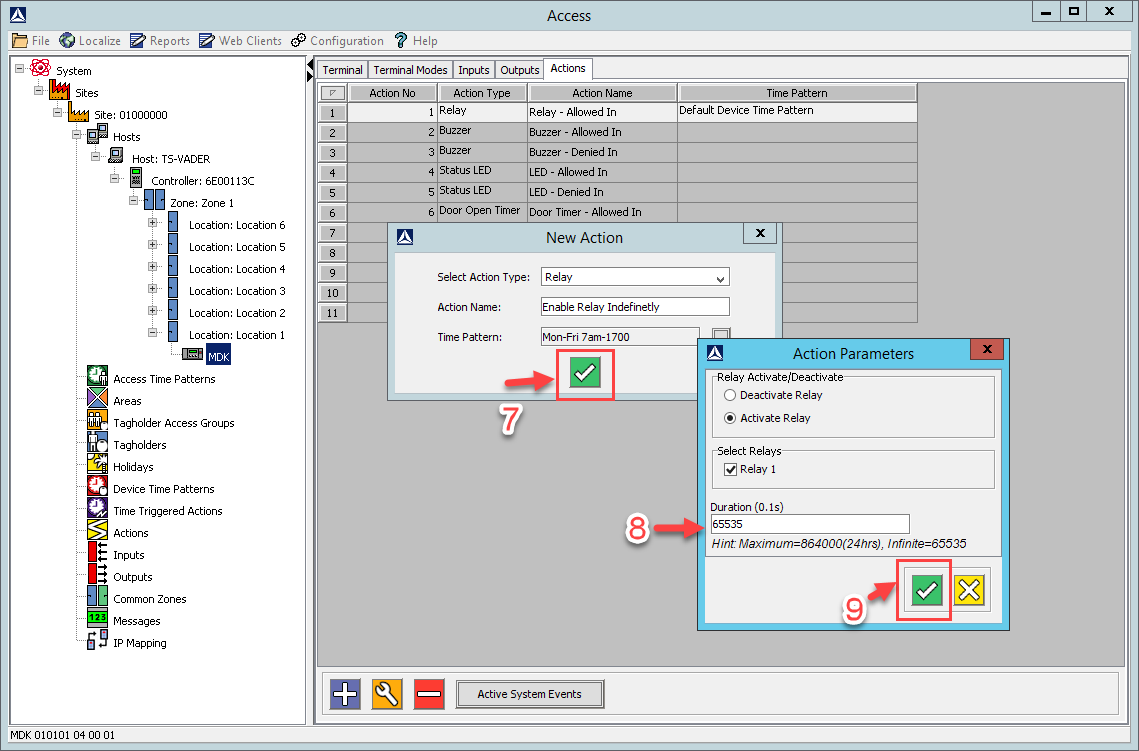
NOTE: This Action enables the relay for an indefinite period.
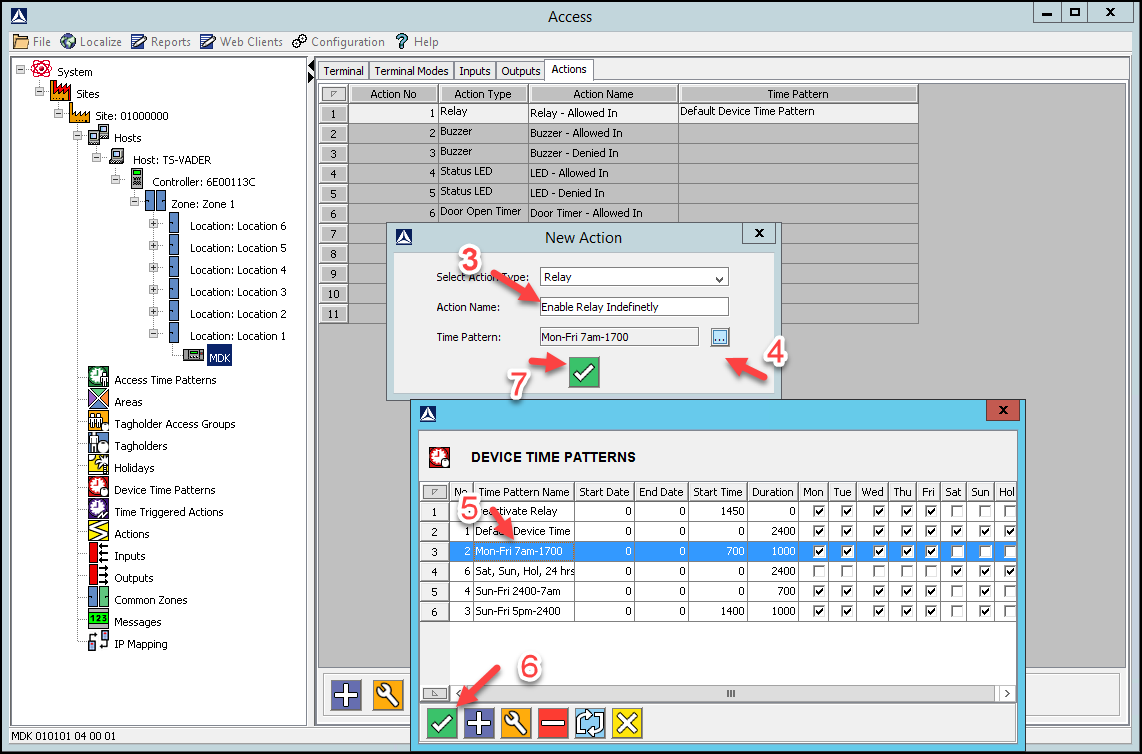
Create New Action – Mon-Fri 07:00-17:00 Device Time Pattern
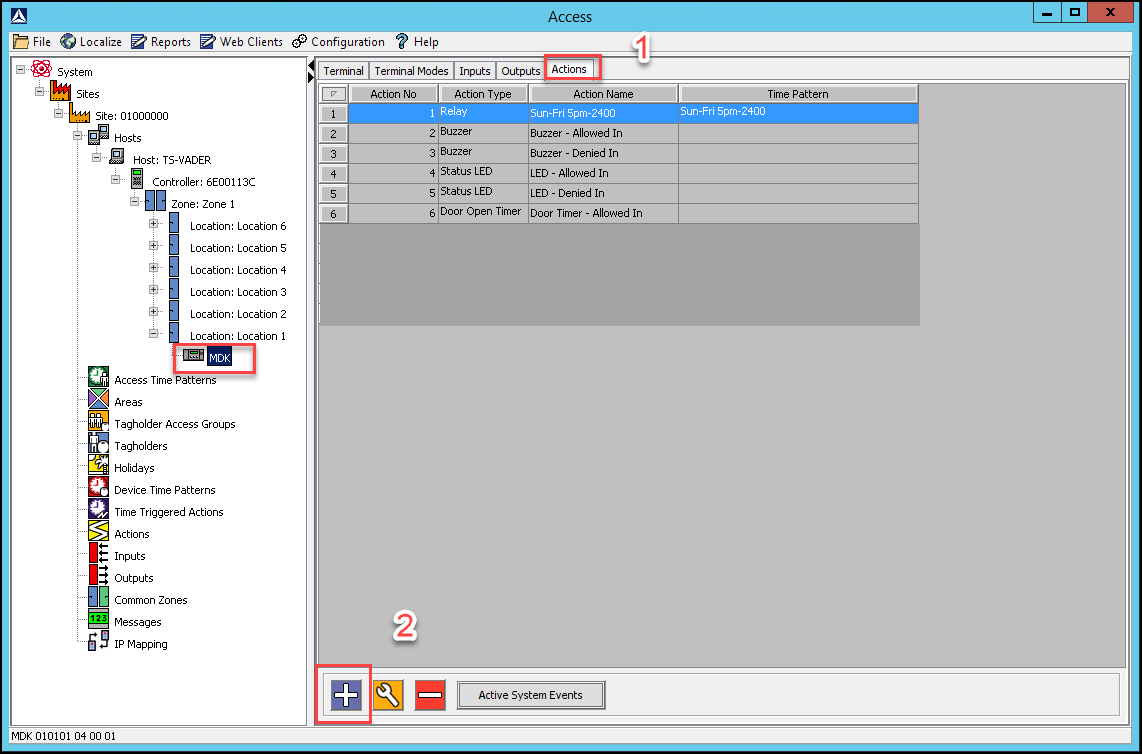
1. Select the Actions tab, for the output relay on the Terminal controlling the door strike.
2. In the Main Pane, click the Plus Button.
3. In the Action Name textbox, assign your action the name Enable Relay Indefinitely.
4. Alongside the Time Pattern textbox, click the browse button.
5. From the list of displayed Device Time Patterns, select the Mon-Fri 07:00-17:00 record.
6. Click the button Save Button.
7. At the New Action dialog, click the save button.
8. In the Action Parameters dialog, set the Duration (0.1s) to 65535.
9. Click the Save Button.
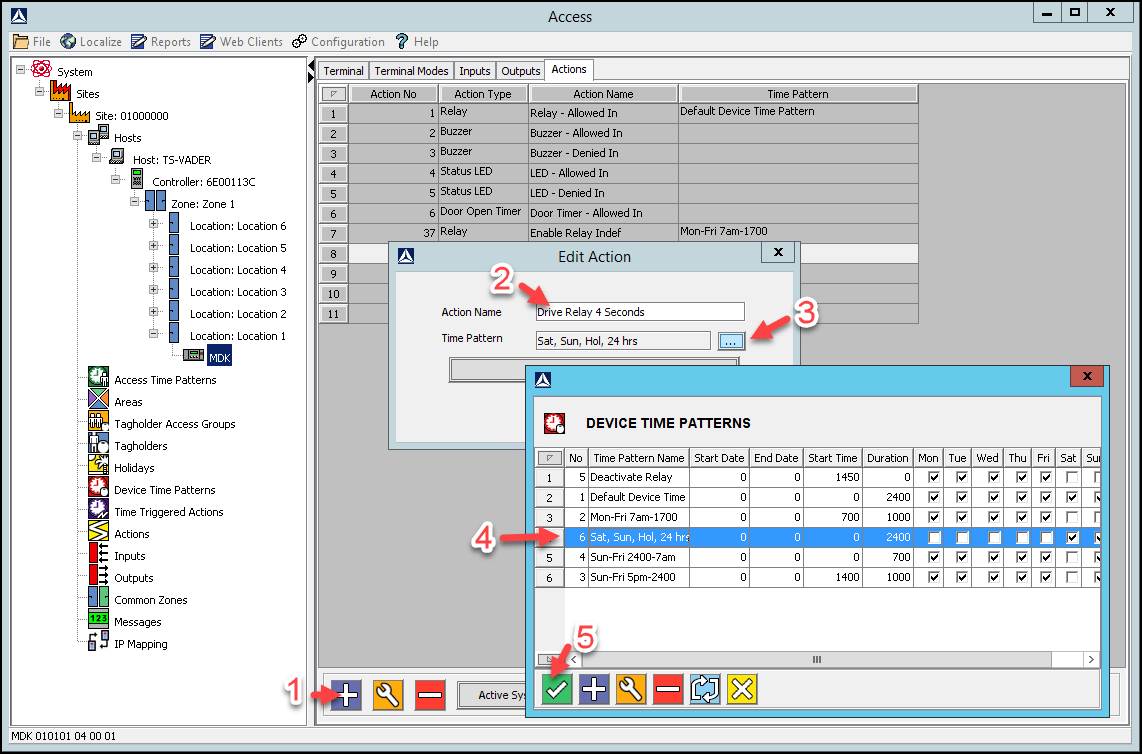
Create New Action – Sat, Sun, Hol 24hrs Device Time Pattern
1. In the Main Pane, click the Plus Button.
2. In the Action Name textbox, assign the action a name (for example Drive Relay 4 Seconds).
3. Alongside the Time Pattern textbox, click the browse button.
4. From the list of displayed Device Time Patterns, select the Sat, Sun, Hol 24 Hrs record.
5. Click the Save Button.
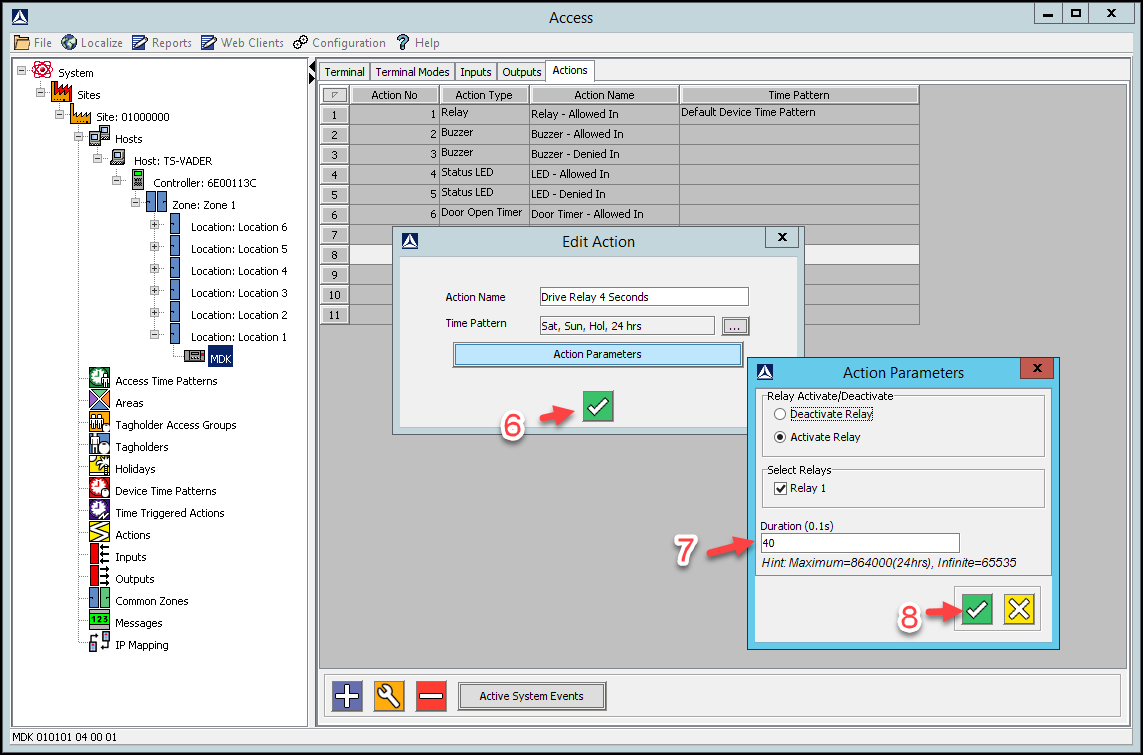
6. At the New Action dialog, click the Save Button
7. In the Action Parameters dialog, set the Duration (0.1s) to 40 (4 seconds).
8. At the Action Parameters dialog, click the Save Button.
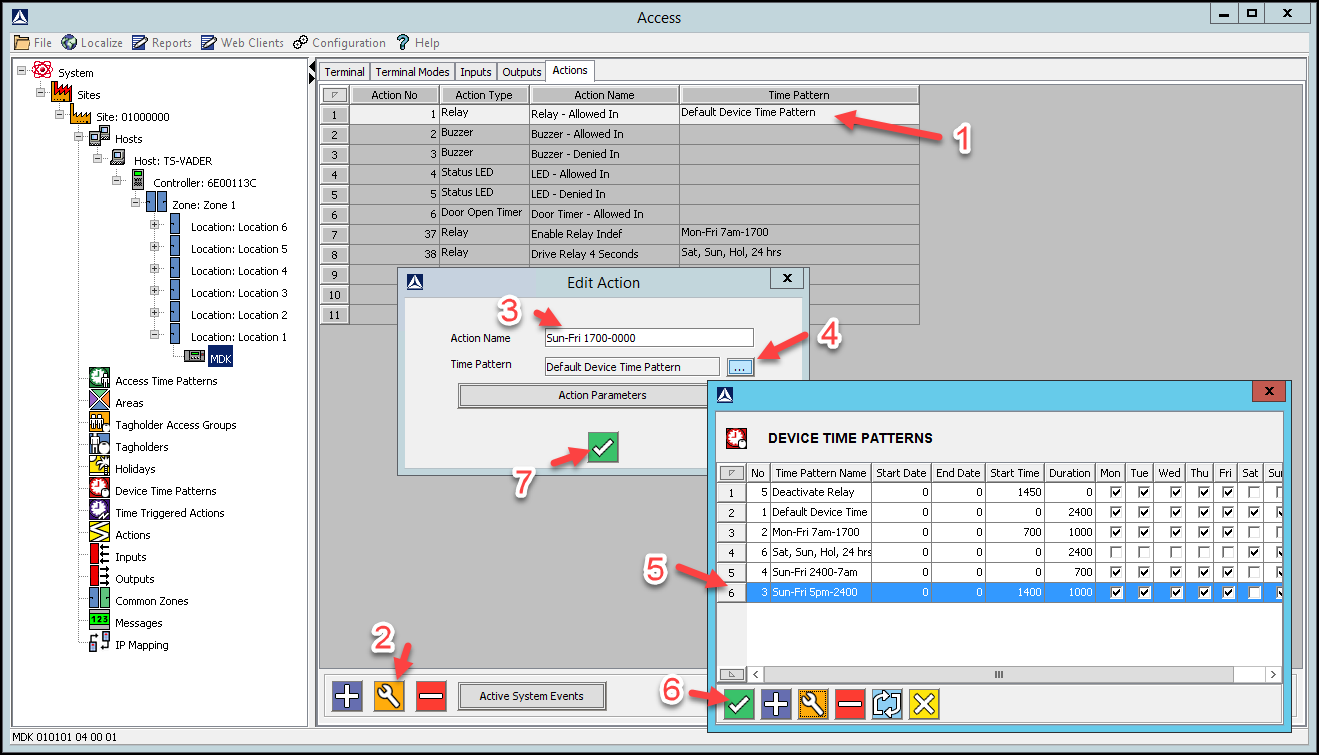
Edit Action – Sun-Fri 17:00-00:00 Device Time Pattern
1. In the Main Pane select the existing Relay – Allowed In Action.
2. Click the Gear button.
3. In the Action Name textbox, assign the action a new name (for example Sun-Fri 1700-0000).
4. Alongside the Time Pattern textbox, click the browse button.
5. From the list of displayed Device Time Patterns, select the Sun-Fri 17:00-00:00 record.
6. Click the Save Button.
7. At the Edit Action dialog, click the Save Button
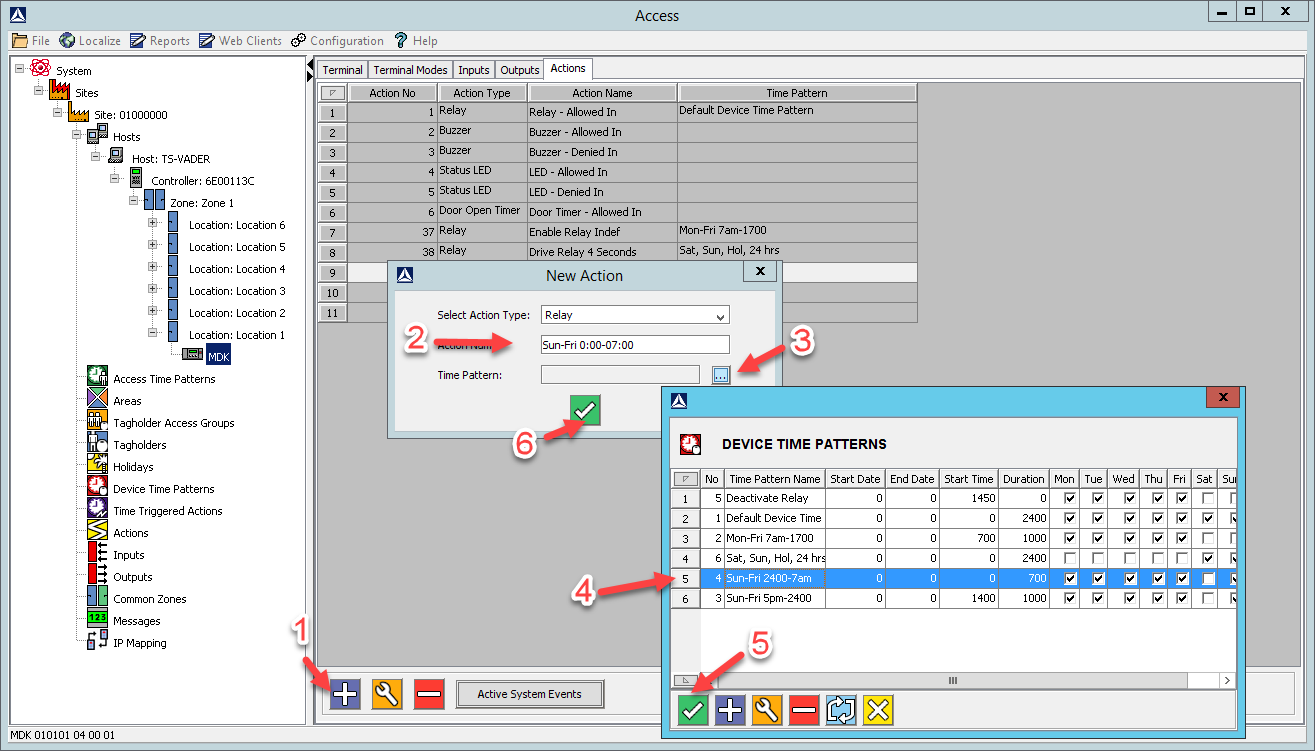
Create New Action – Sun-Fri 00:00-07:00 Device Time Pattern
1. In the Main Pane, click the Plus Button.
2. In the Action Name textbox, assign your action a name (for example Sun-Fri 0000-0700).
3. Alongside the Time Pattern textbox, click the browse button.
4. From the list of displayed Device Time Patterns, select the Sun-Fri 00:00-07:00 record.
5. Click the Save Button.
6. At the New Action dialog, click the Save Button.
7. At the Action Parameters dialog, click the Save Button.

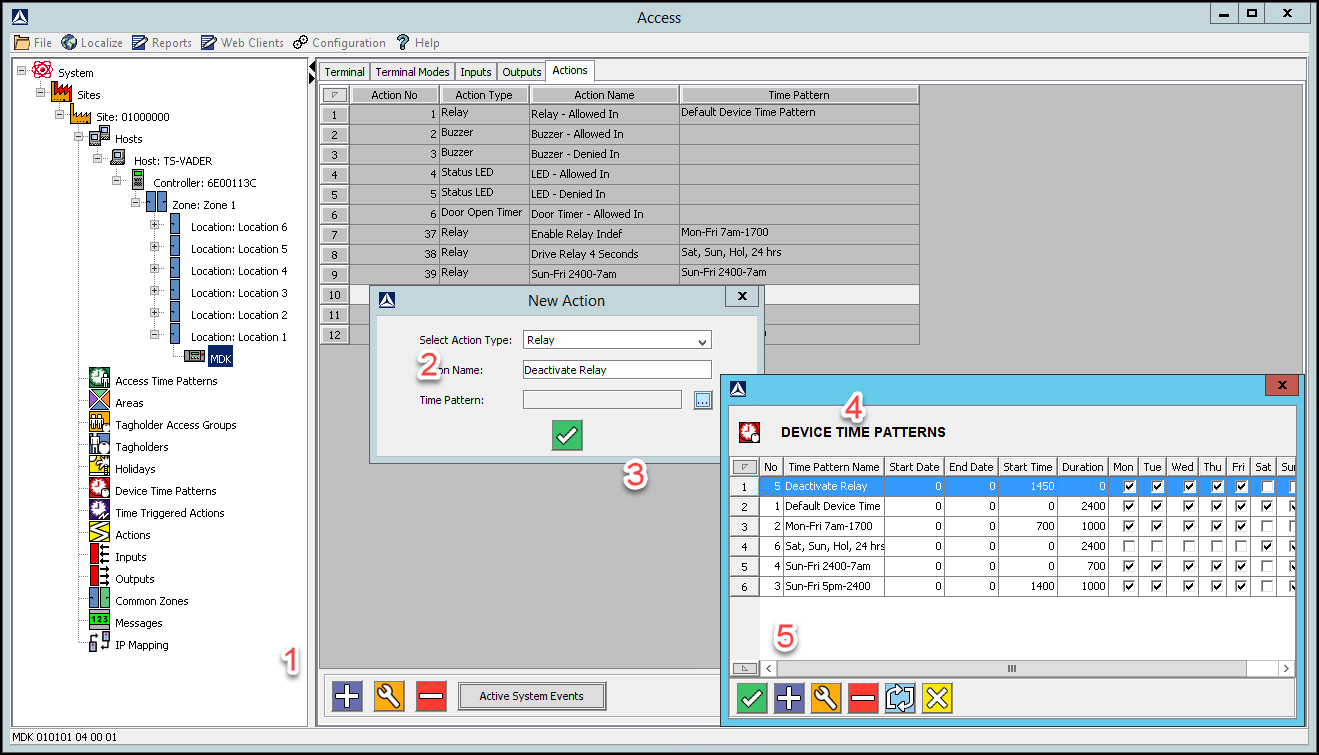
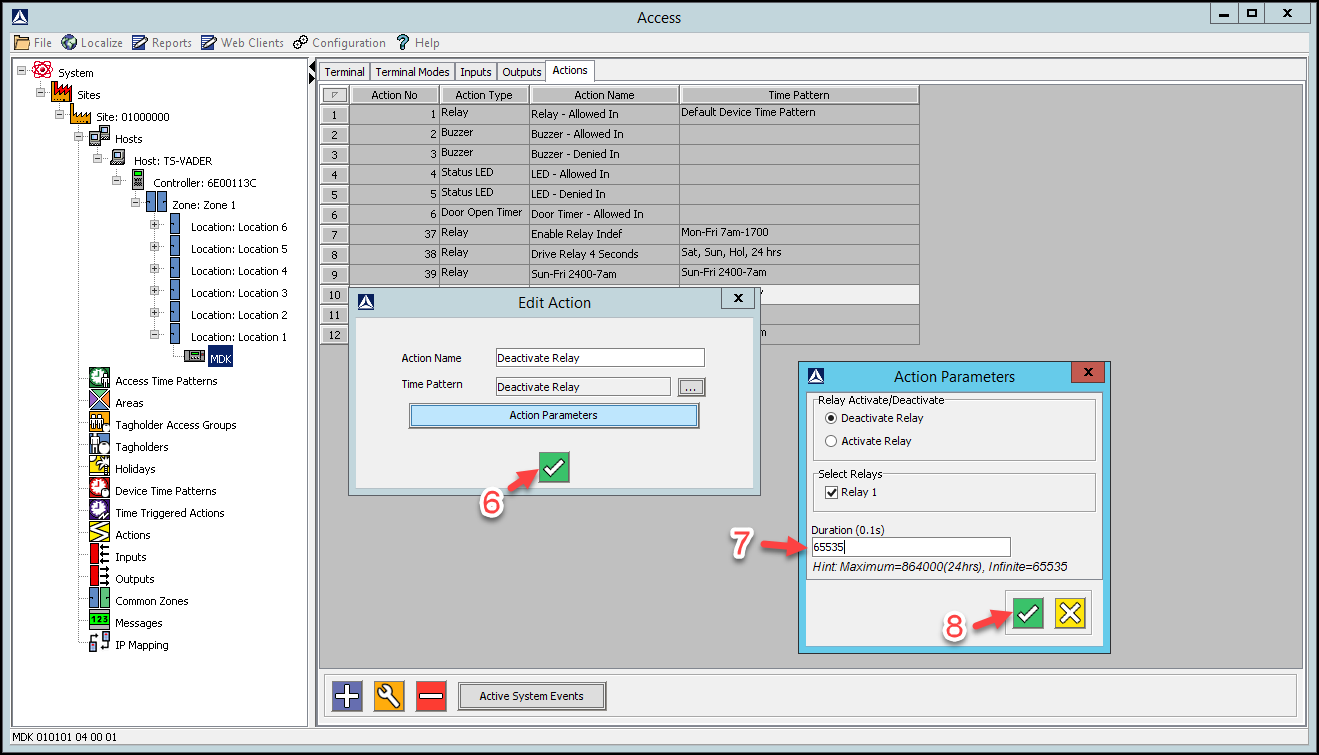
Create New Action – Deactivate Relay at 17:00 Device Time Pattern
1. In the Main Pane, click the Plus Button.
2. In the Action Name textbox, assign your action a name (for example Deactivate Relay).
3. Alongside the Time Pattern textbox, click the browse button.
4. From the list of displayed Device Time Patterns, select the Deactivate Relay at 17:00 record.
5. Click the Save Button.
6. At the New Action dialog, click the Save Button.
7. In the Action Parameters dialog, set the Duration (0.1s) to 65535.
8. At the Action Parameters dialog, click the Save button.
AmanoNet New Action – All Relays
1. In the Main Pane, click the Plus Button.
2. From the Select Action Type drop-down list, select the Multiple Actions option.
3. In the Action Name textbox, assign your action a name (for example All Relays).
4. Click the Save Button
5. In the Action Parameter dialog, for the First Action, click the 1 button.
6. From the list of displayed actions, select the Sun-Fri 1700-0000 action created earlier.
7. For the Second Action, click the 2 button.
8. From the list of displayed actions, select the Sun-Fri 0000-0700 action created earlier.
9. For the Third Action, click the 3 button.
10. From the list of displayed actions, select the Enable Relay Indefinitely action created earlier.
11. For the Fourth Action, click the 4 button.
12. From the list of displayed actions, select the Drive Relay 4 Seconds action created earlier.
13. Click the Save button.
14. At the Action Parameters dialog, click the Save button.
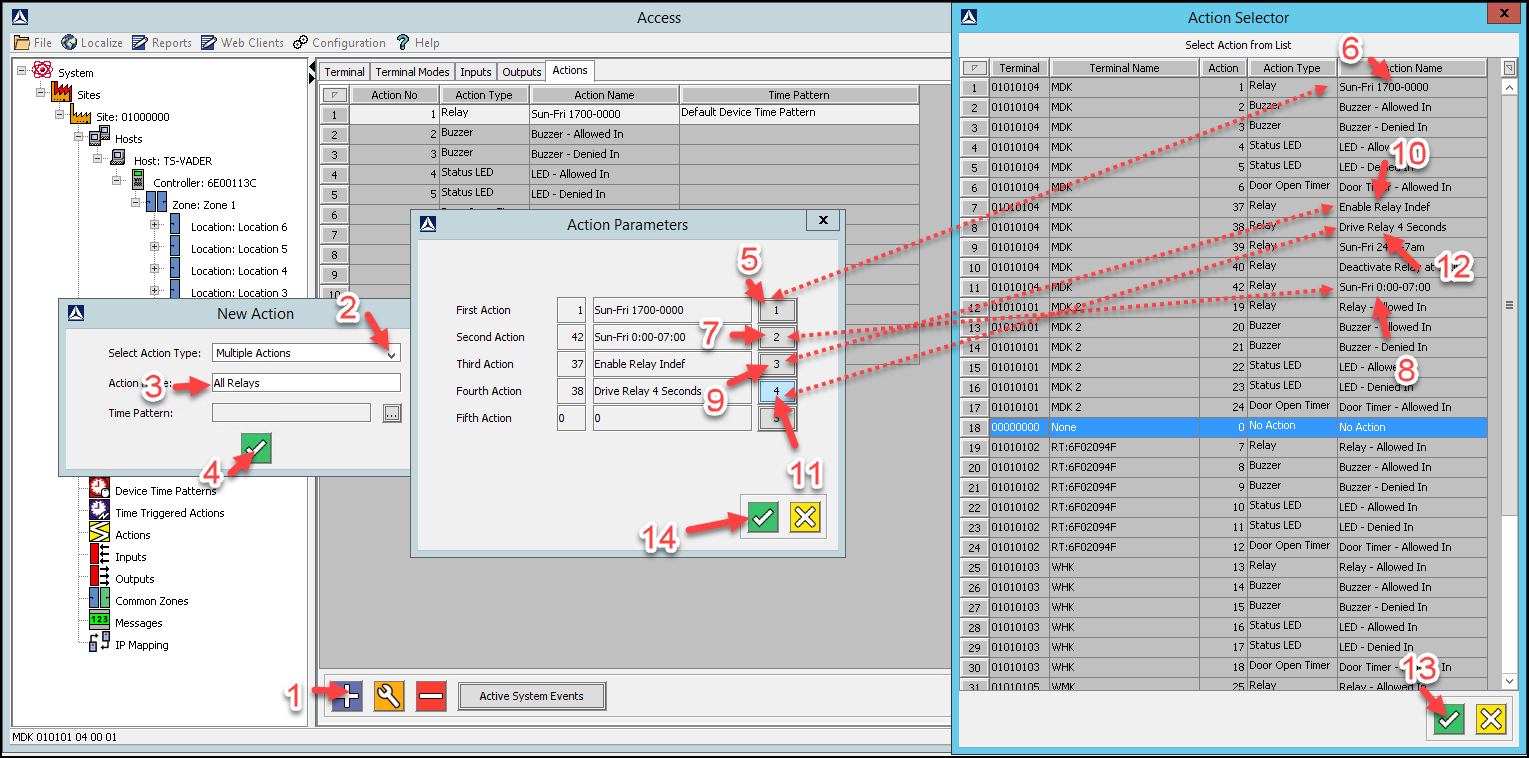
NOTE: Steps 5 through 12 are shown all at once for clarity. The Action Selector window will close and open between each step after selecting the Save Button (13)
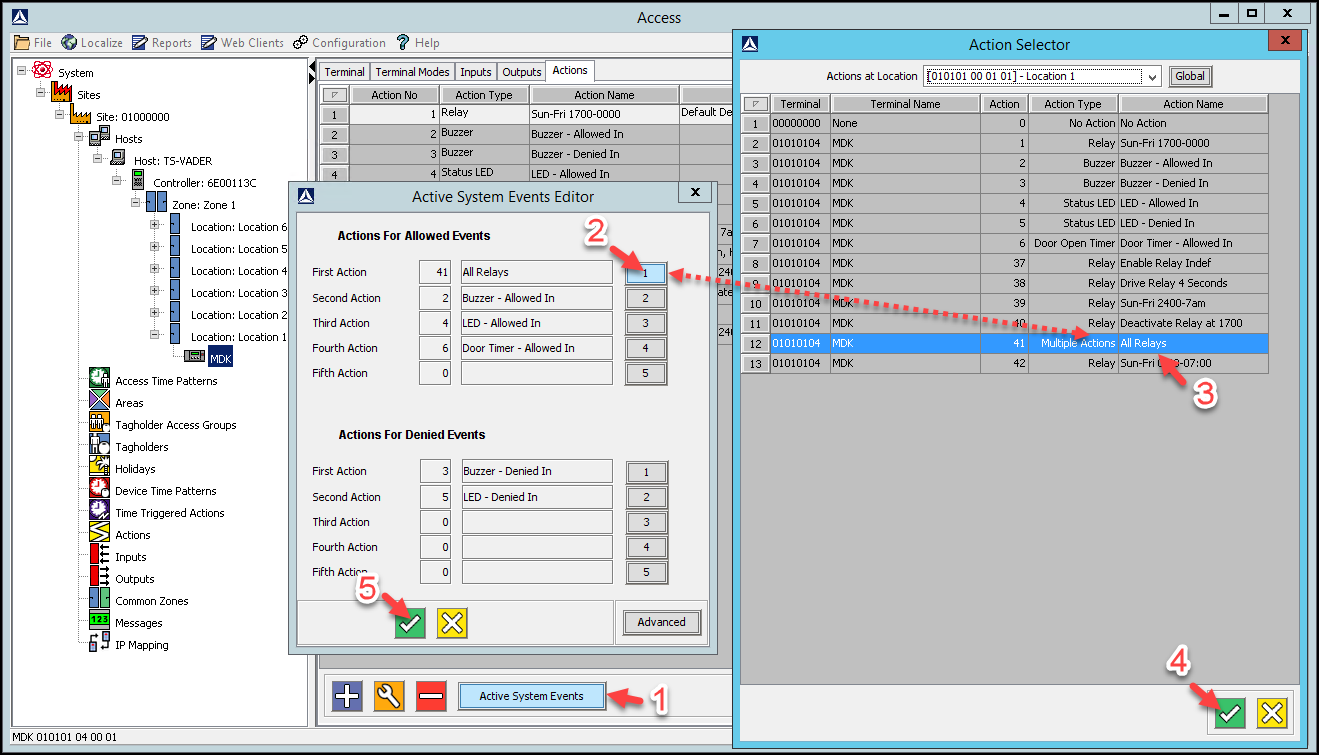
AmanoNet Active System Events Edit
1. In the Main Pane, click the Active System Events button.
On opening, under Actions for Allowed Events, the First Action appears as Sun-Fri 1700-0000,
add the remaining actions as follows:
2. Under Actions For Allowed Events, replace the First Action, by clicking the 1 button.
3. From the list of actions displayed, select the All Relays action you created earlier.
4. Click the Save Button.
5. At the Active System Events Editor dialog, click the Save Button.
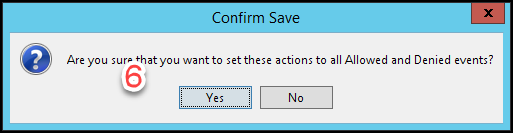
6. At the Confirm Save dialog, click the Yes button.
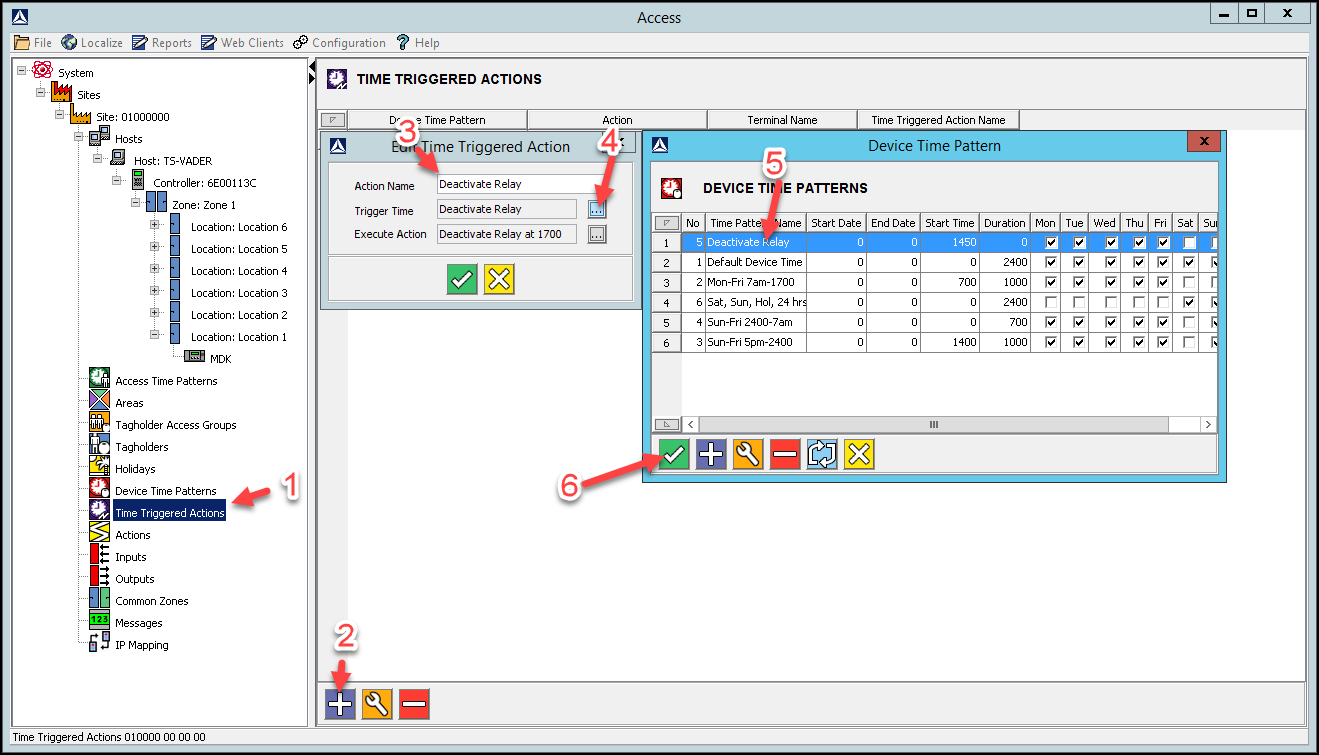
AmanoNet Time Triggered Action Setup
1. In Access, in the Navigate Pane (from the Hierarchical Tree), select Time Triggered Actions.
2. In the Main Pane, click the Plus Button.
3. In the Action Name textbox, give your Time Triggered Action a meaningful name (for example
Deactivate Relay 1).
4. Click the Trigger Time’s associated browse button.
5. From the list of displayed Device Time Patterns, select the Deactivate Relay at 17:00 record.
6. Click the Save Button.
7. Click the Execute Action’s associated browse button.
8. From the list of displayed actions, select the Deactivate Relay action created earlier.
9. Click the Save Button.
10. At the Create Time Triggered Action dialog, click the Save Button

Need further assistance?