• Skip to primary navigation
  • Skip to main content
PMT Security Logo

PMT Security

Advanced Access Control

  • Home
  • About Us
    • Security and Trust
    • Our Partners
    • Our Integrators
  • Solutions
    • Education
    • Retirement & Healthcare
    • Manufacturing
    • Government Facilities
    • Residential
    • Retail Businesses
    • Campgrounds & Outdoor Resorts
  • Products
    • Access Control
      • Control Features
      • Reporting & Monitoring
      • Control Module
      • Digital IO Module
      • Reader Module
      • Readers
    • Video Management
    • Visitor Management
    • Intercom
    • Live Guard Video Monitoring
    • Housings & Pedestals
  • Support
    • Knowledgebase
    • Download Center
    • License Request
    • RMA Request Form
  • Blog
  • Contact Us

Security Best Practices & Support

Create a Reader Profile in OMNIA

Create a Reader Profile in OMNIA

How to Create a Reader Profile

How to Create a Reader Profile

Before stating make sure your new hardware is installed.

Open OMNIA in a web browser

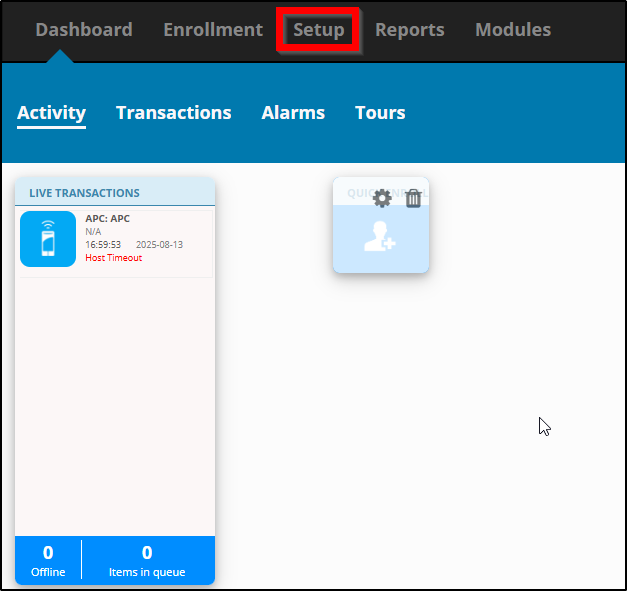
Select Setup tab to open the drop down menu.

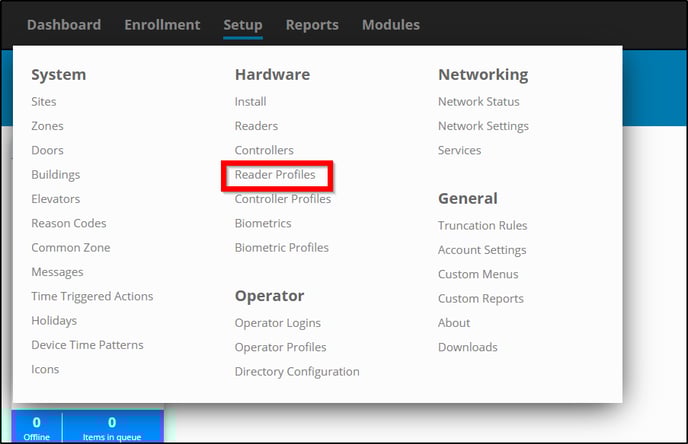
Under Hardware select Reader Profiles.

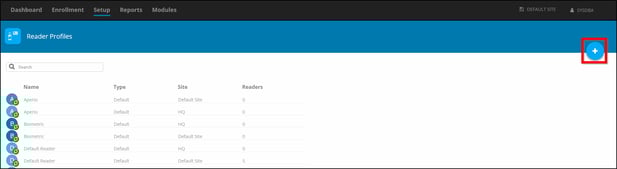
Click Add in the top right. A blue circle with a white +.


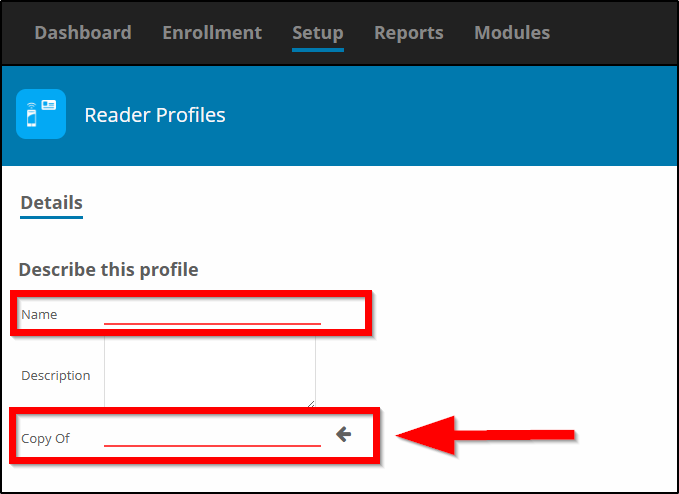
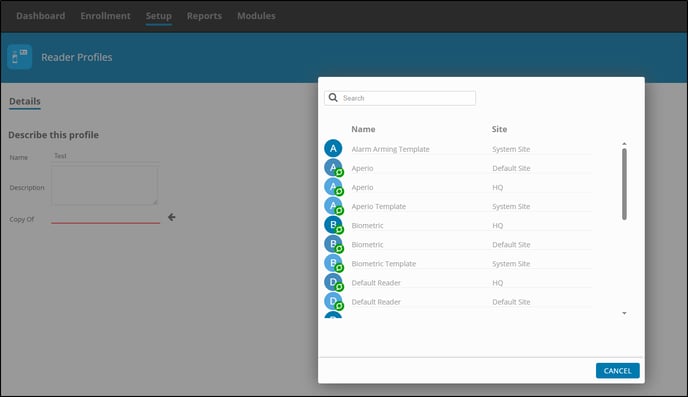
Name your new Reader Profile and Select the profile you would like to make a Copy Of.

*The Copy Of  sets the parameters for what kind of reader profile is preferred.


*Notice how you can select the copy from different sites* 


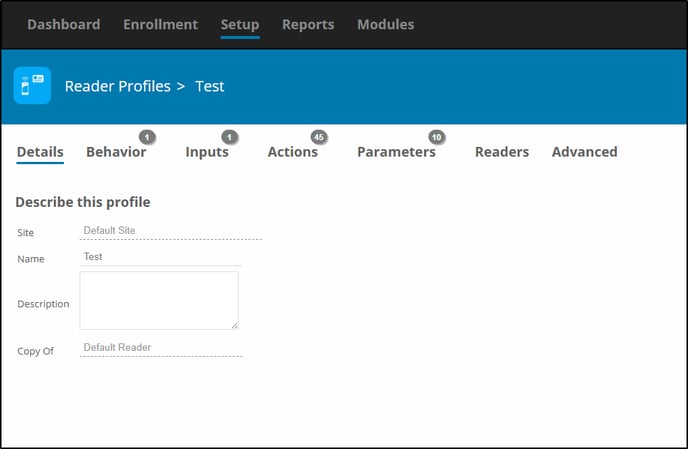
Once Created, you can verify the Details. If this is incorrect you can delete and start over by selecting reader profiles and clicking the trashcan. 

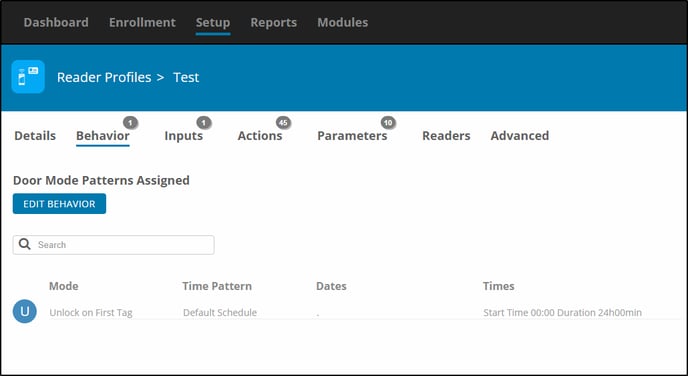
You can change or Edit Behaviors. Example- Unlock on First Tag.

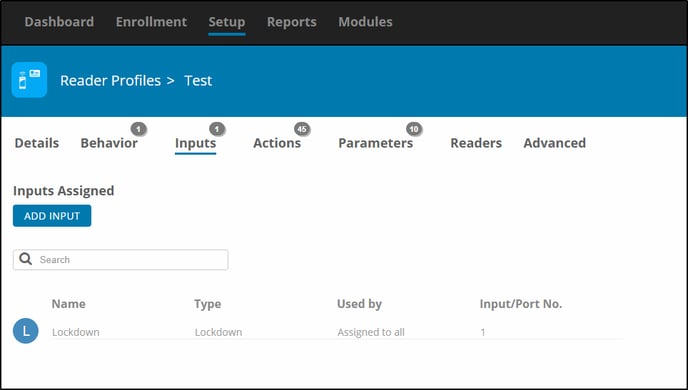
Adding or changing inputs. 

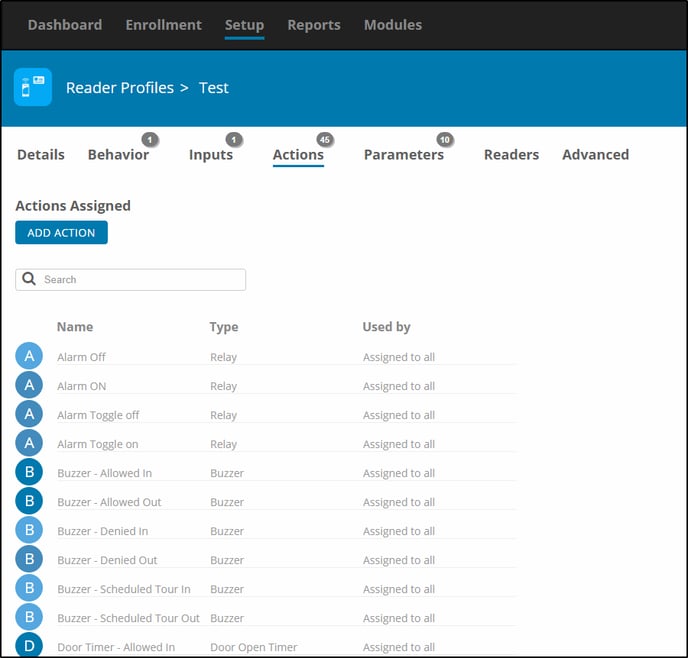
Add Actions (if required, defaults are usually fine)


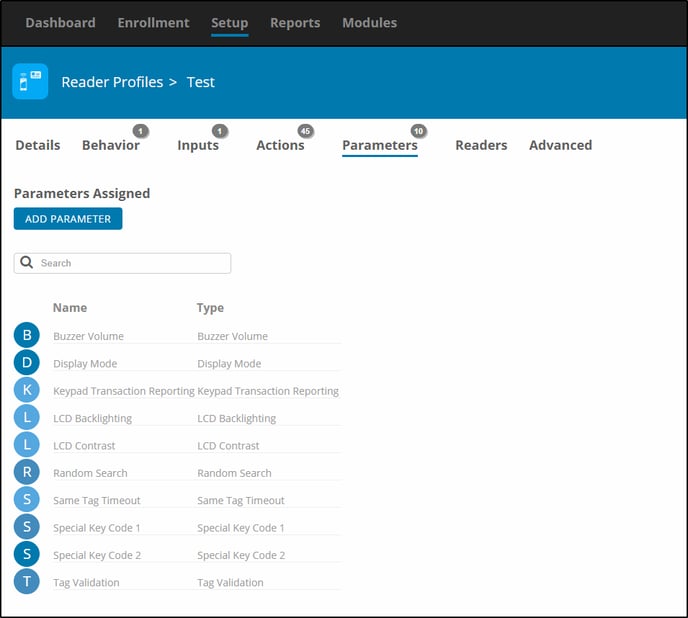
Add Parameters (if required, defaults are usually fine)


Selecting Readers for the Profile.
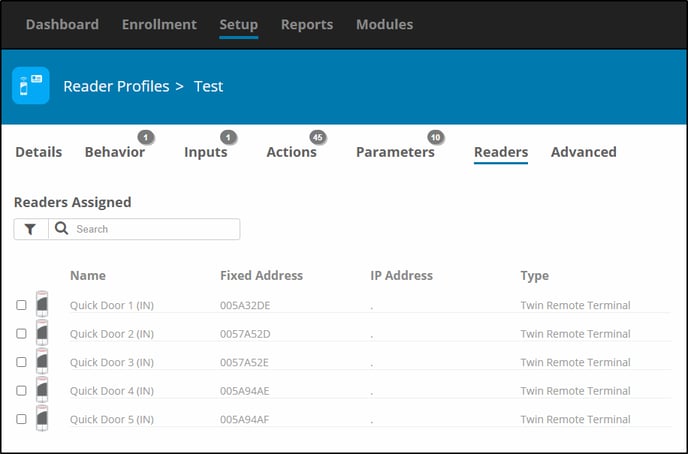
*Note: Once a reader has been assigned to a READER PROFILE, it can only be removed by adding it to another profile. It can not be removed from within its current profile.

Need further assistance?
Submit a Support Ticket

Submit a Support Ticket

FAQ

General

Technical Bulletins

Access Control

AmanoNet

Nexxus220

Omnia

Omnia Lite

PM Tronics Hardware

Amano Readers and Credentials

Legacy Hardware

Partner Products

Partner Products

Video Management Systems

Cathexis Video (Amano Vision)

AmanoDVMS

Vision

Replacing an Antenna Reader Terminal with an iTRT or iTRT2 in AmanoNet

Replacing an Antenna Reader Terminal with an iTRT or iTRT2 in AmanoNet

Upgrading older Antenna Reader Terminals to an iTRT or iTRT2 can improve long-term reliability, compatibility, and supportability within an AmanoNet access control environment. This guide walks through the replacement process and explains how to correctly identify and assign the new hardware inside AmanoNet.

Before starting, ensure the new hardware has already been physically installed and properly wired. When replacing an Antenna Reader Terminal with an iTRT or iTRT2, the reader itself must also be replaced.

Before You Begin

Before making software changes:

  • Confirm the iTRT or iTRT2 hardware is installed
  • Verify power and communication wiring
  • Replace the existing reader with a compatible reader
  • Ensure you have access to the AmanoNet server and software

The iTRT2 platform supports modern access control features including OSDP support, legacy Wiegand compatibility, offline validation, and expanded controller functionality. Before stating make sure your new hardware is installed.

Note: When replacing an Antenna reader terminal with an iTRT or iTRT2 you must replace the reader

Step 1: Stop the Engine Service

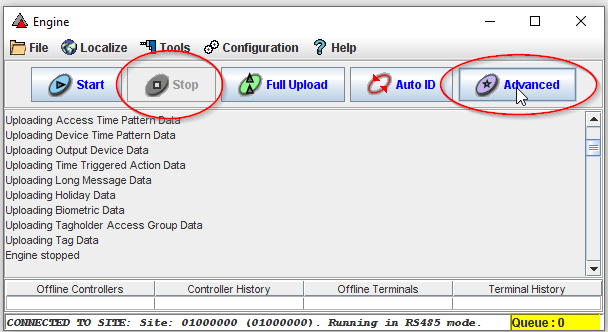
Open Engine.exe and select:

  1. Stop
  2. Advanced

This allows AmanoNet to detect and reassign replacement hardware correctly.

Step 2: Identify the Existing Terminal

Locate the controller and terminal you are replacing:

  1. Open Access.exe
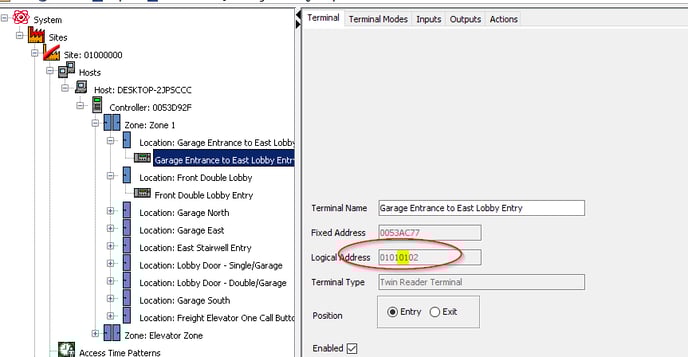
  2. Find the existing Reader Terminal
  3. Select the terminal
  4. Note the Logical Address shown in the configuration

This address will be used during the AutoID process.

Step 3: Start AutoID

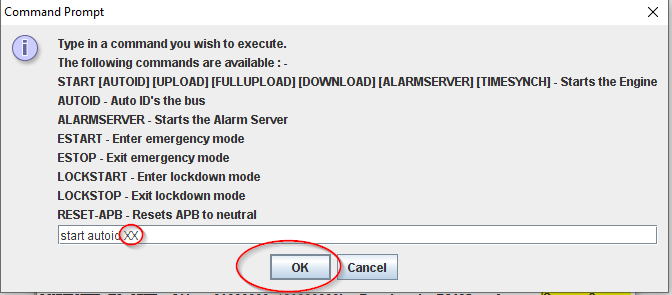
Using the command field, enter:

START AUTOID 01

Replace 01 with the Logical Address of your controller. See Step 2 above.

Press Enter to begin the AutoID process.

Step 4: Refresh Access.exe

To display newly detected hardware:

  1. Close Access.exe
  2. Reopen the application

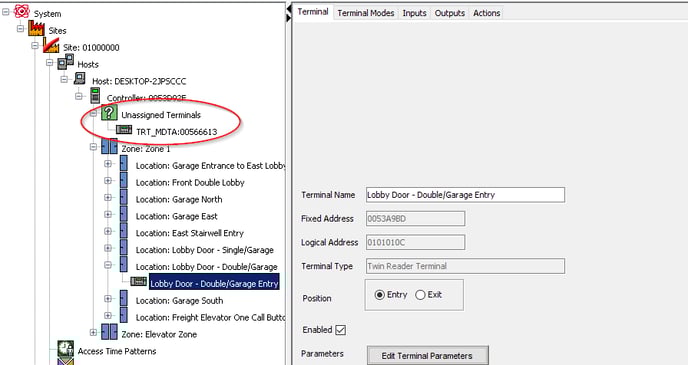
The replacement iTRT or iTRT2 should now appear under Unassigned Terminals.

Step 5: Assign the New Terminal

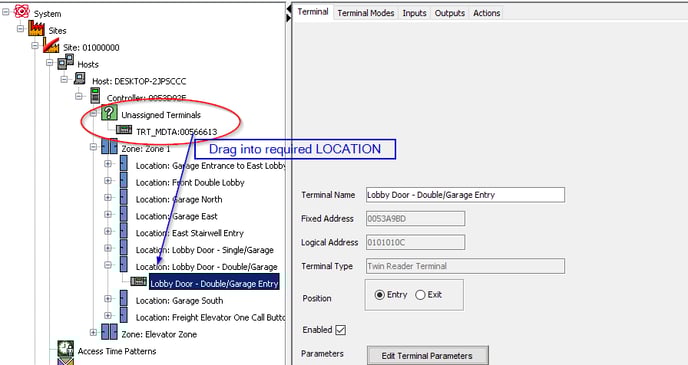
Drag and drop the unassigned terminal into the correct location within the system tree.

Once assigned, verify:

  • Event reporting
  • Reader communication
  • Credential reads
  • Door operation

Important Notes

  • Replacing an Antenna Reader Terminal requires replacing the connected reader hardware as well.
  • Legacy Antenna Readers have cable distance and interference limitations that should be reviewed during upgrades.
  • iTRT2 controllers support both modern OSDP readers and legacy Wiegand readers for easier retrofit deployments.
  • Always verify controller synchronization and device status after commissioning new hardware.

Why Upgrade to an iTRT or iTRT2?

Modern distributed controllers offer several advantages over legacy Antenna Reader Terminal hardware, including:

  • Improved scalability
  • Better diagnostics
  • Enhanced communication options
  • Support for modern credential technologies
  • OSDP compatibility
  • Remote firmware upgrades
  • Expanded offline validation capabilities

The iTRT2 platform was designed to support both retrofit projects and new installations while maintaining compatibility with existing Impro and Amano ecosystems.

Need Assistance?

If you require help replacing legacy AmanoNet hardware, configuring AutoID, or troubleshooting reader communication issues, contact PMT Security support for assistance.

Submit a Support Ticket

Creating Mappable Import User Fields in OMNIA

Creating Mappable Import User Fields

When Importing Tagholder information into OMNIA and you want to import information that is not currently into OMINA

Site is importing Tagholders to OMNIA as has .CSV file with tagholder information.

The information currently in the .CSV file has information that is not currently available to map during the import.

For example the site has a column of information called Permit ID, the site would like this permit ID to be visible for tagholders in OMINA.

A User Field will need to be created in OMINA, this user Field will be available for import mapping after the creation.

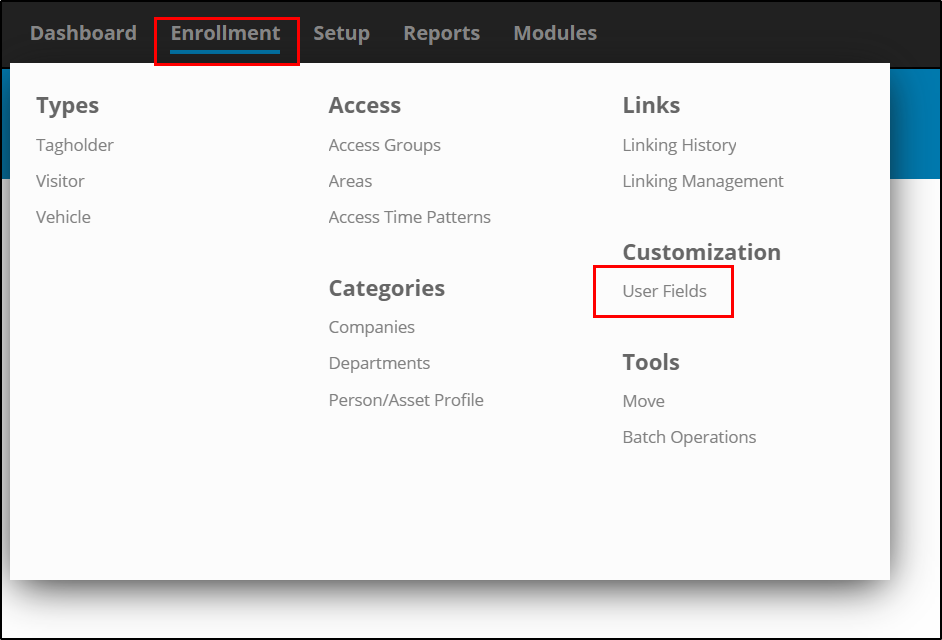
Go to Enrollment, then Select User Fields.

Select the Plus to add a new User Fields

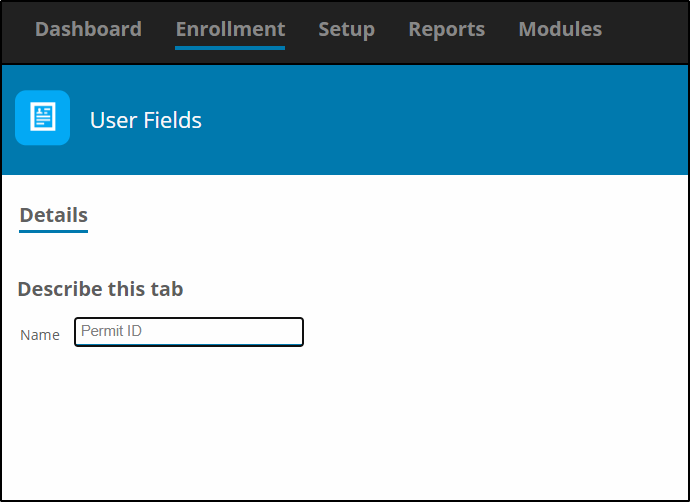
Name the User Field and Select Save

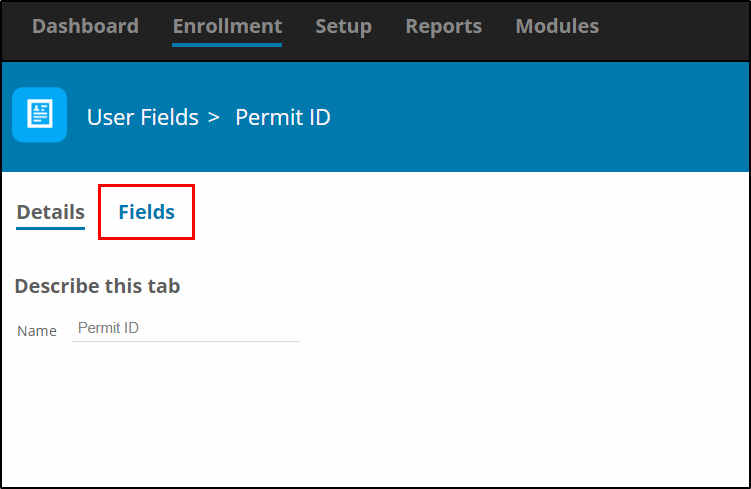
After you save the User Field you will see a Fields Tab, Select the Fields Tab

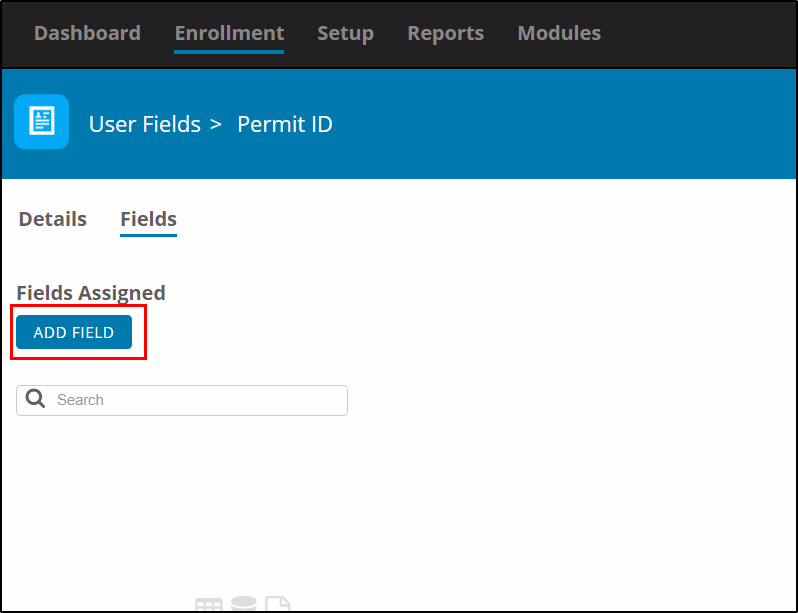
Select Add Field

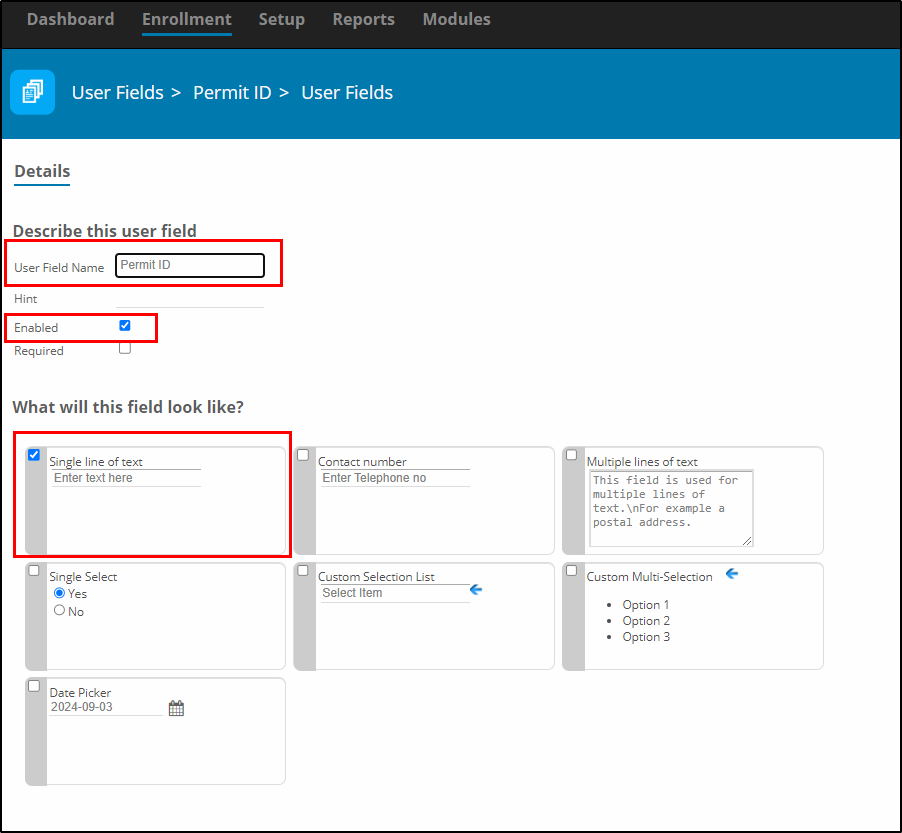
Here you will be able to customize what and how information is entered for this Field.

Name the Field, the Name to be displayed for the User Field for Tagholder.

Select Enabled, 

Select the type of field. In this example we are using Single Line of text for the Permit ID number.

Select Save

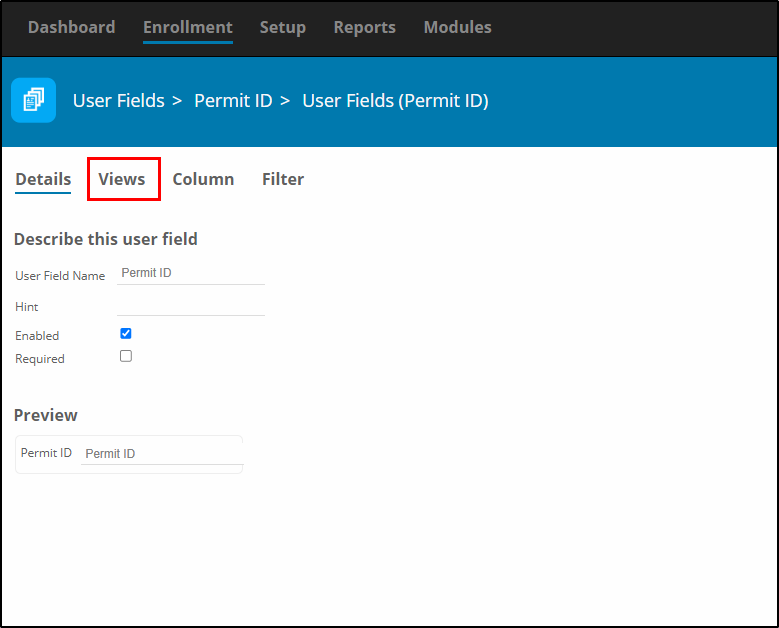
After you select Save, more Options become available. You must now configure where the User Field will be visible and to whom.

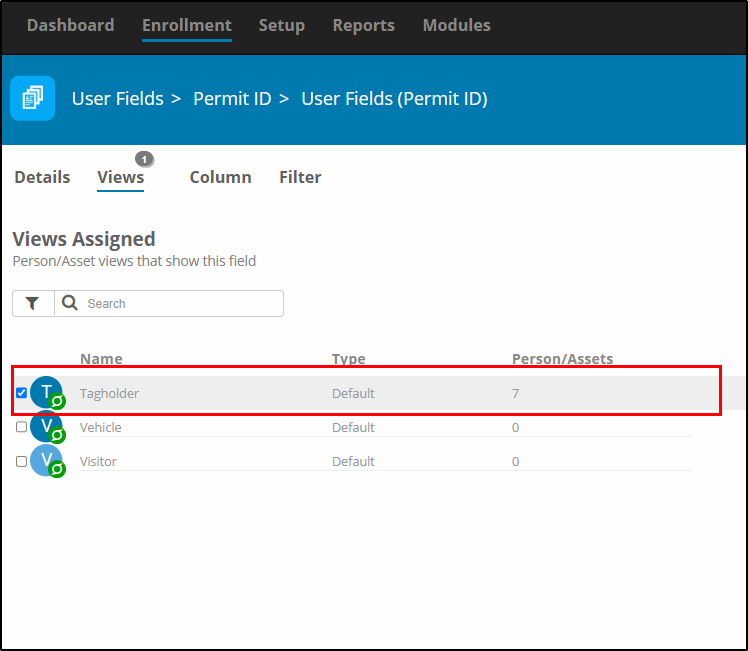
Select Views

For this example, we only want the Permit ID to be viewable for Tagholders.


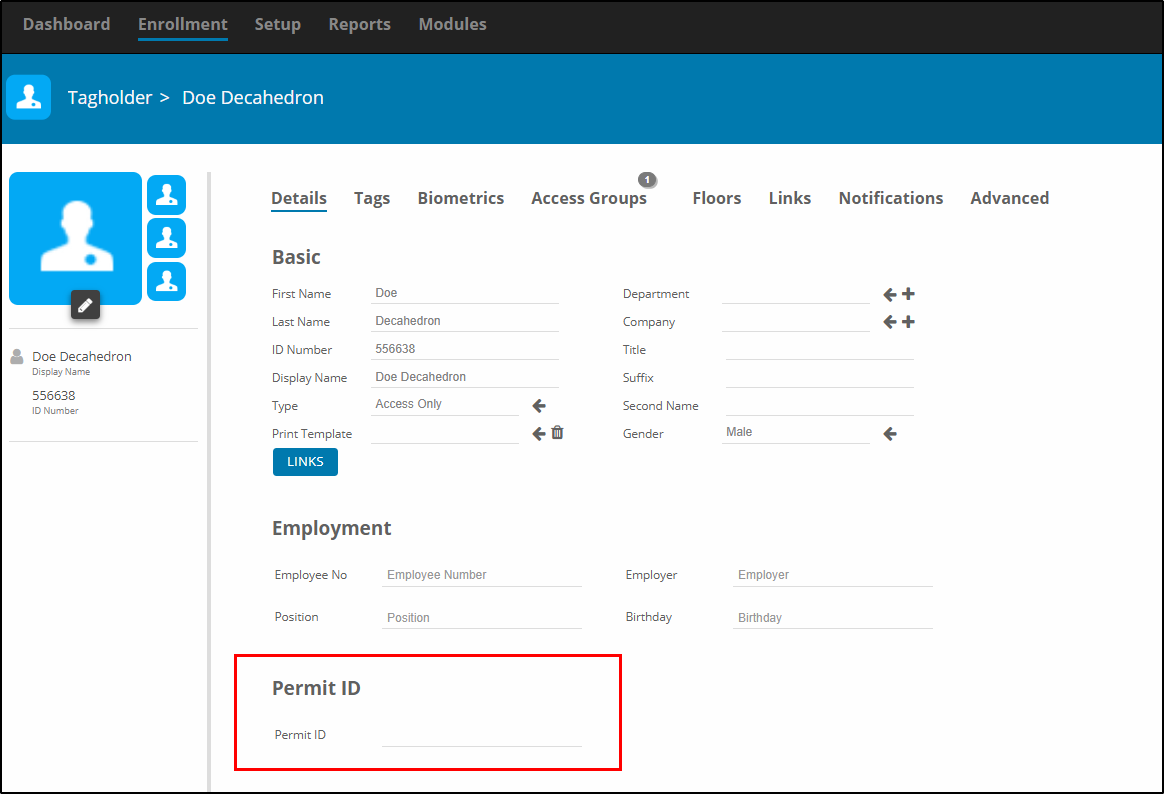
When you view a Tagholder, you will now see the User Field.

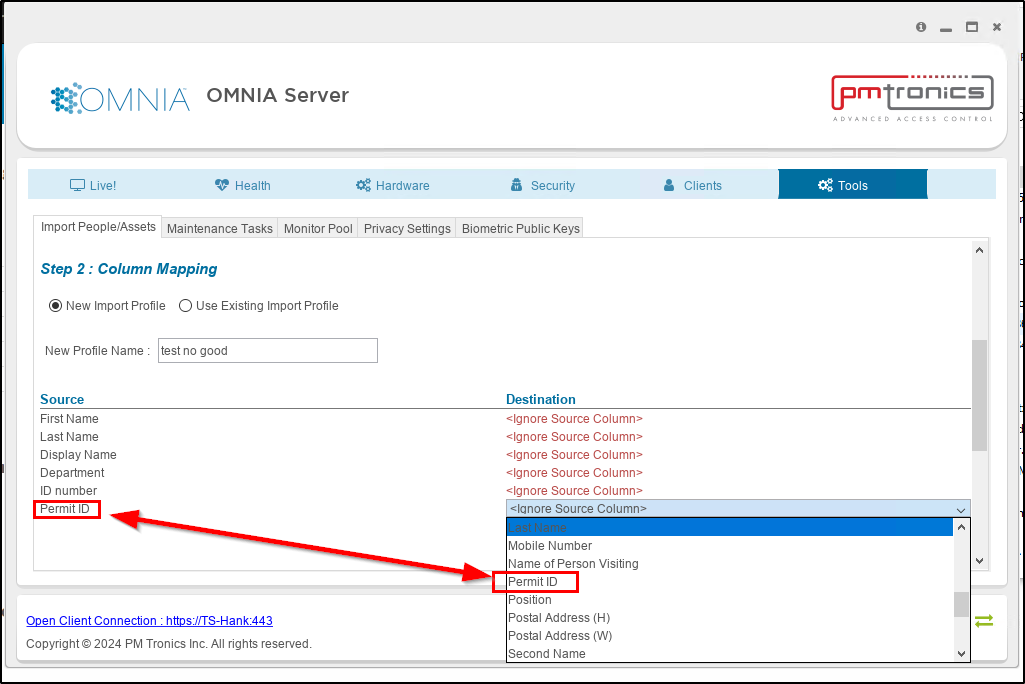
When you import the .CSV file, select the Destination, Permit ID will be available to select as a destination.

Please call 727-786-1900 if you have any questions on this procedure.

Need further assistance?
Submit a Support Ticket

Submit a Support Ticket

FAQ

General

Technical Bulletins

Access Control

AmanoNet

Nexxus220

Omnia

Omnia Lite

PM Tronics Hardware

Amano Readers and Credentials

Legacy Hardware

Partner Products

Partner Products

Video Management Systems

Cathexis Video (Amano Vision)

AmanoDVMS

Vision

Adding Cameras into Cathexis

Adding Cameras into Cathexis

Adding Cameras into Cathexis, creating Database, setting motion recording, analytics, and schedules

Setting up your Cameras

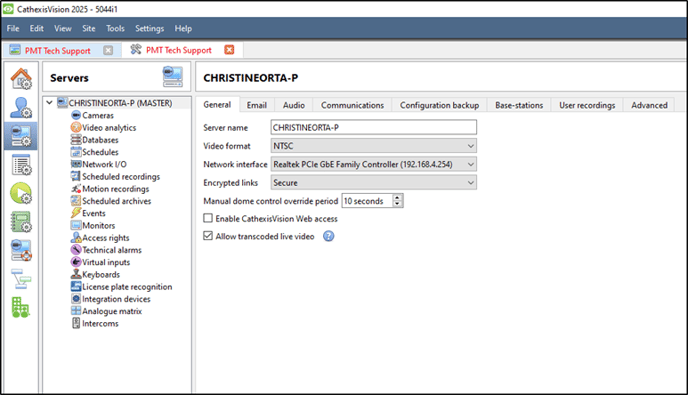
-Open application for CathexisVision

(1-1)

-Login in using:
Name: admin
Password: admin

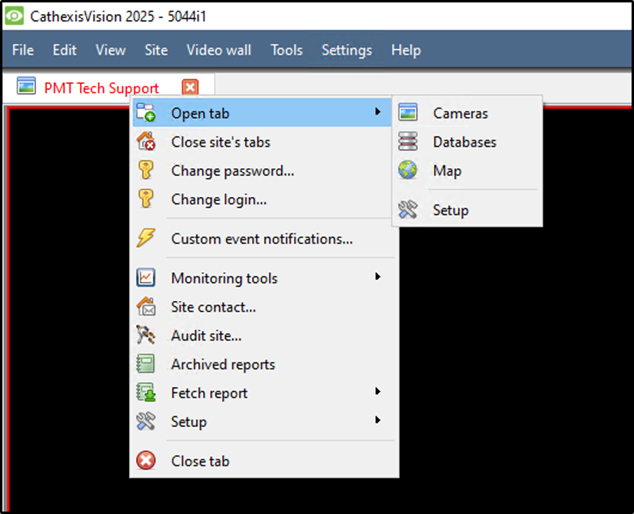
Right Click on the tab Open tab>Setup
or select Site>Open Tab>Setup

(1-2)

Look for the Icon (1-3)


(1-3)


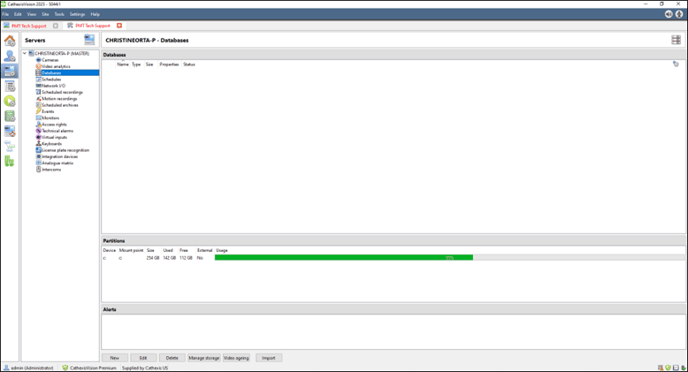
Setting up your Database
Select Database from the tree. Select New


(2-1)

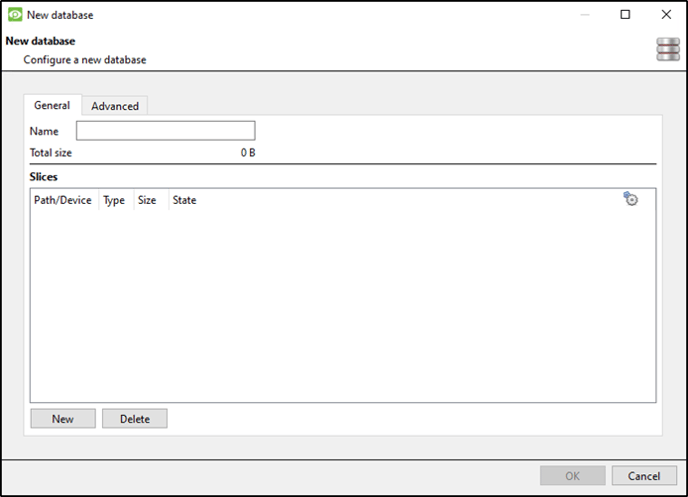
Select New

(2-2)

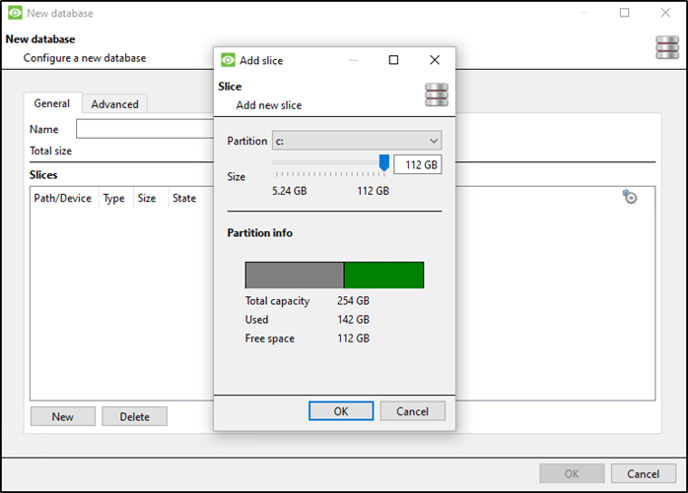
Choose Size and Select OK


(2-3)

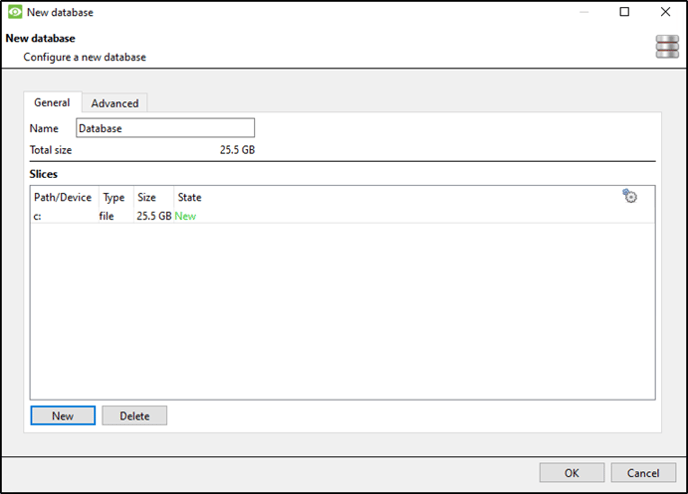
Select OK

(2-4)

Setting up Cameras 
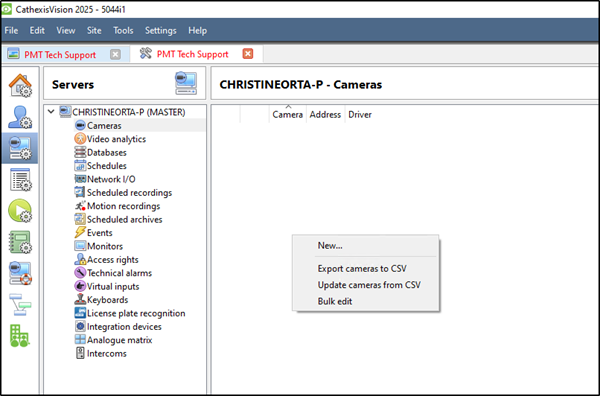
In the drop tree select Cameras

(3-1)

Right Click on the right side or select new at the bottom of the page.

(3-2)

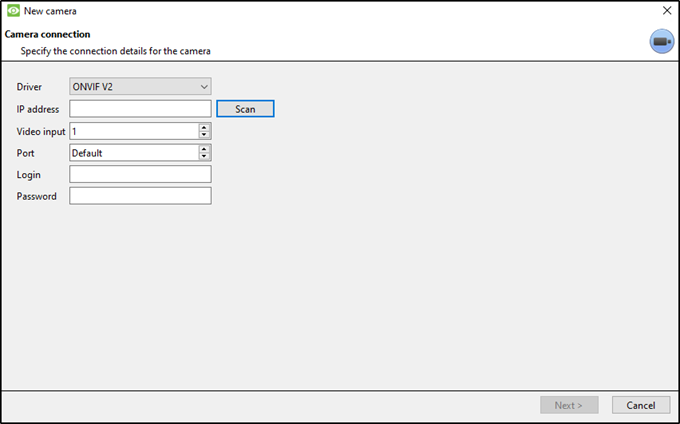
Scan for the cameras IP


(3-3)

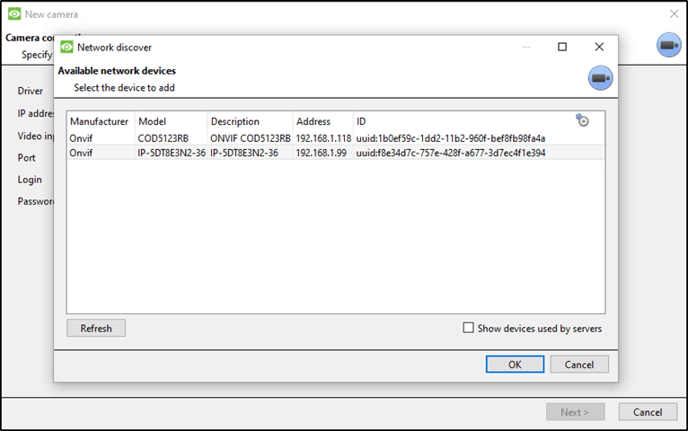
Select which camera you would like to use.

(3-4)

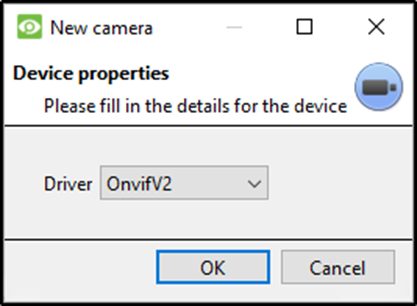
Select the driver that your specific camera uses.

(3-5)

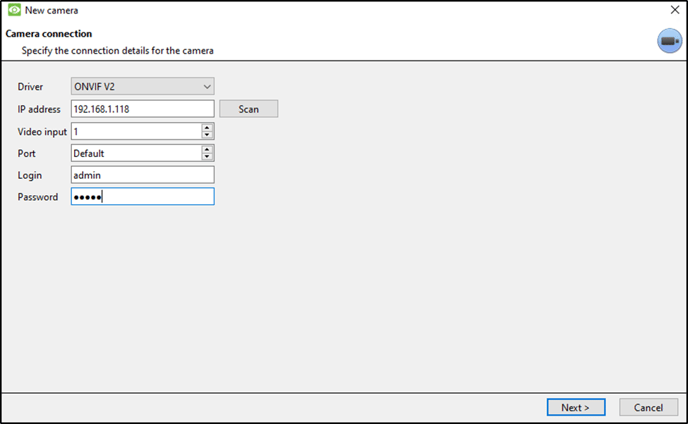
Enter the cameras Login and Password. Select Next >

(3-6)

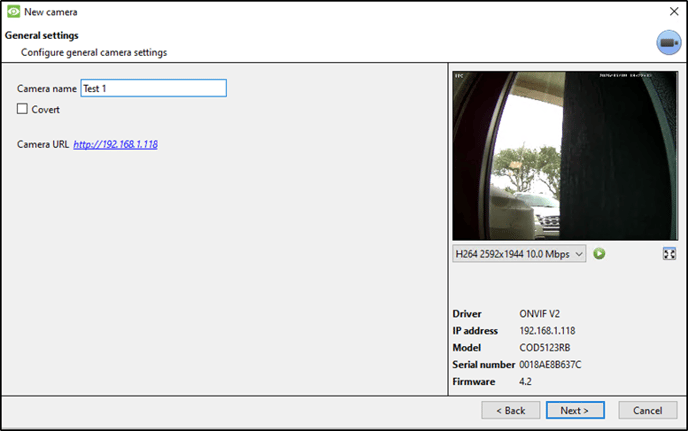
Name your camera. Select Next >

(3-7)

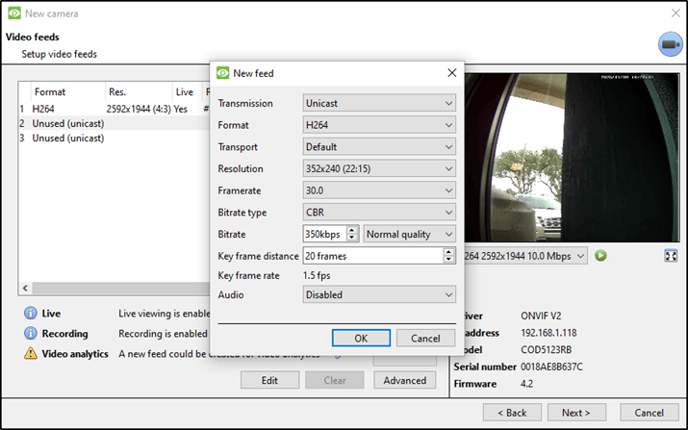
Select 2 Unused (unicast) to create a second feed for analytics. Then select Yes to enable.

(13-8)

Select Next >

(3-9)

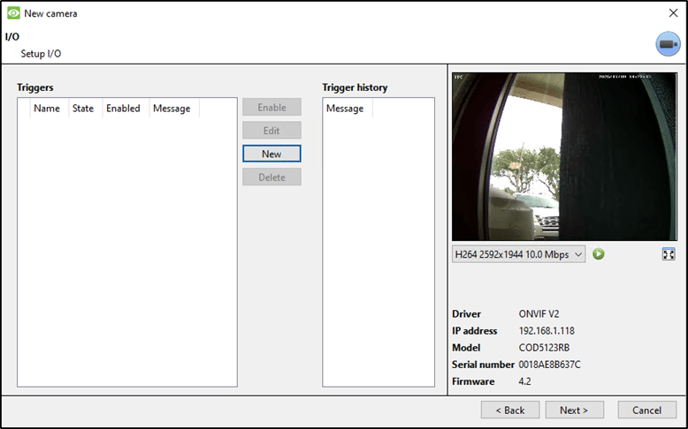
Choose Yes or No and select Next >

(3-10)

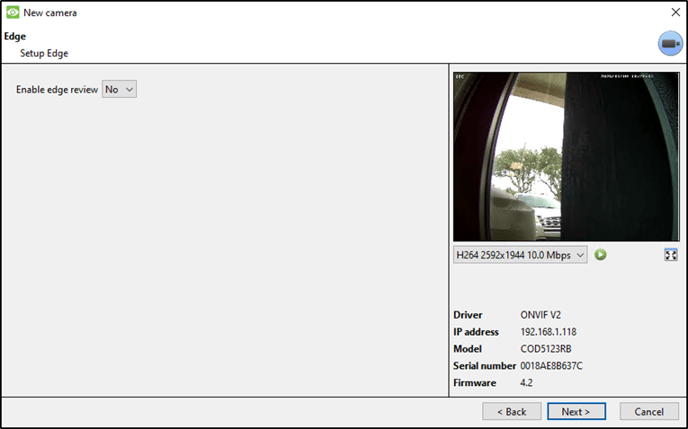
Select Enable PTZ if you have a PTZ camera. Select Next >

(3-11)

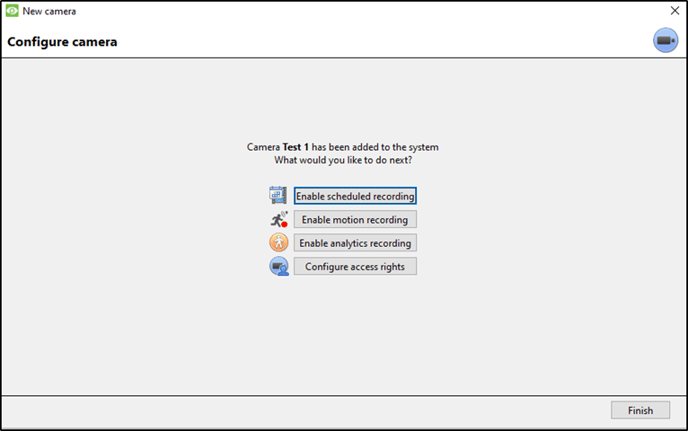
CAMERA CONFIGURATION

(3-12)

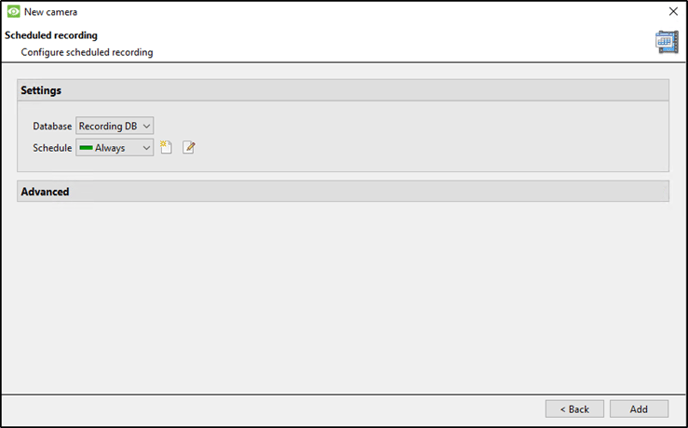
Scheduled Recording

(3-13)

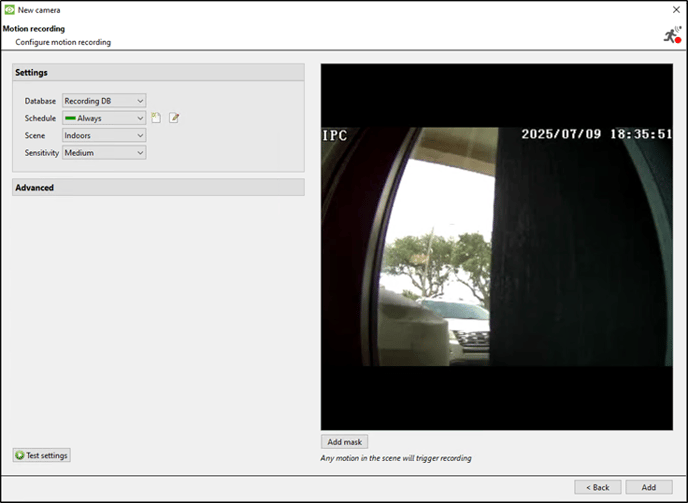
Motion Recording

(3-14)

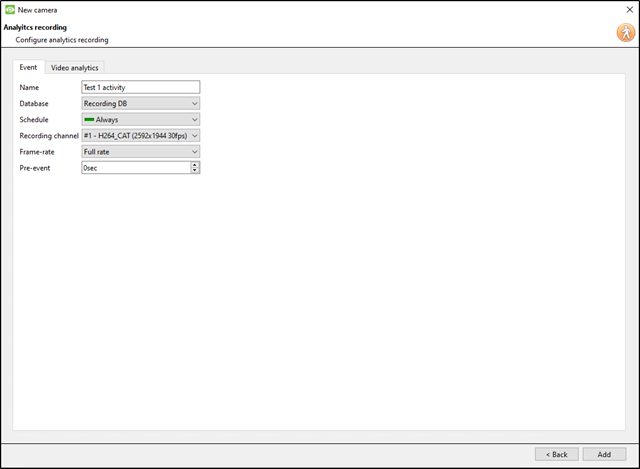
Analytics Recording

(3-15)

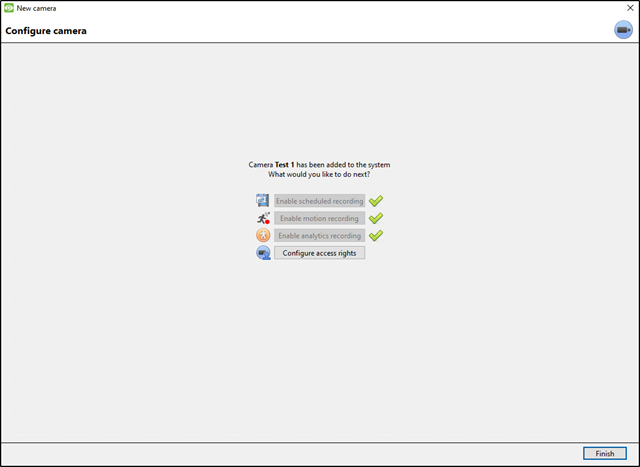
Select Finish

(3-16)

Video Analytics 

Select Video analytics from tree. Select New

(4-1)

New video analytics select Camera, Type, and Algorithm.


(4-2)

Create Zones, Advanced settings, Day/Night, and Triggers. Click OK.

(4-3)

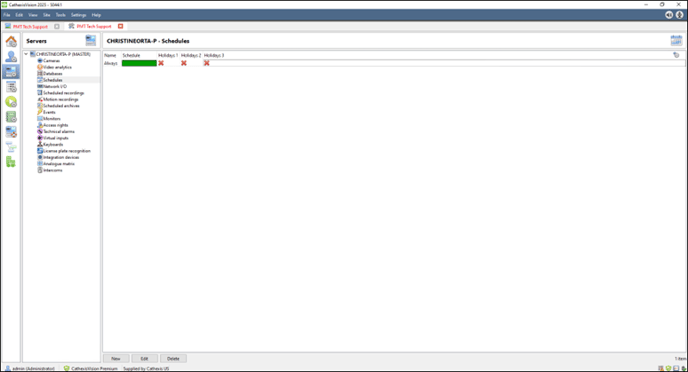
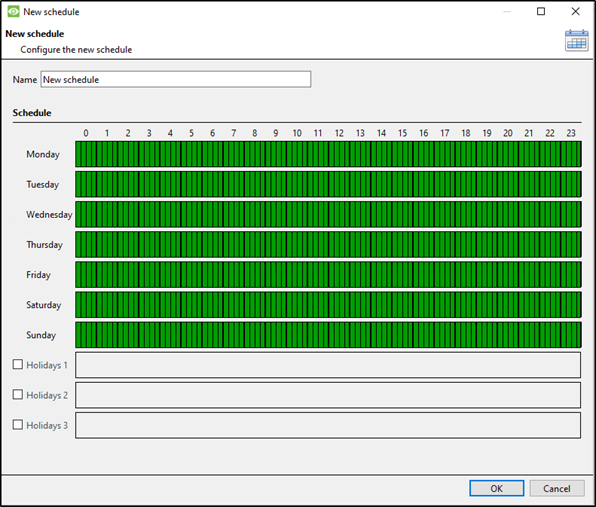
SCHEDULES
Select New

(5-1)

Highlight the day and times you would like to record.

Please call 727-786-1900 if you have any questions on this procedure.

Need further assistance?
Submit a Support Ticket

Submit a Support Ticket

FAQ

General

Technical Bulletins

Access Control

AmanoNet

Nexxus220

Omnia

Omnia Lite

PM Tronics Hardware

Amano Readers and Credentials

Legacy Hardware

Partner Products

Partner Products

Video Management Systems

Cathexis Video (Amano Vision)

AmanoDVMS

Vision

How to change the IP Address of a installed Controller in OMNIA

Changing the IP Address of a Previously Installed Controller in OMNIA

There are situations where a controller’s IP address needs to be updated after installation — whether due to network changes, hardware replacement, VLAN restructuring, or system standardization.

If OMNIA is running as a service and the Discovery Tool is not available on the workstation or server, the controller IP can still be changed directly through the OMNIA software interface.

This guide explains how to safely change the IP address of an existing controller using the built-in OMNIA networking tools.

Before You Begin

Before modifying controller network settings:

  • Confirm you have administrator access to OMNIA
  • Verify the new IP address is available on the network
  • Ensure you know the correct subnet mask and gateway information
  • Confirm communication with the controller before making changes

Incorrect network settings can result in communication loss between the controller and server.

Open Network Settings in OMNIA

Inside OMNIA:

  1. Open the software
  2. Navigate to:
Setup > Networking > Network Settings

This section allows you to manage controller communication and network configuration directly from the OMNIA platform.

Select the Correct Controller

Choose the controller you want to modify from the available list.

Before applying changes, confirm you are working with the correct device and verify the existing IP information.

Verify the New IP Address Is Available

Before assigning a new address, verify the IP is not already in use on the network.

Using Command Prompt:

ping 192.168.100.1 -t

Replace the example IP above with the address you plan to assign.

This performs a continuous ping test to help determine whether another device is responding on that address. To stop the test:

CTRL + C

Verifying availability first helps prevent network conflicts and controller communication issues.


Apply the New Network Settings

Enter the following information:

  • IP Address
  • Subnet Mask
  • Gateway

Then:

  • Check the box to make the address static
  • Enter the controller password

Default password:

masterkey

Select the check mark to save the configuration.

Important Configuration Note

When configuring the controller:

  • Do NOT select “Safe IP”

Using the incorrect option may prevent the desired network settings from applying correctly.

After Saving Changes

Once the configuration is saved:

  • Allow the controller time to update
  • Verify communication is restored
  • Confirm events and transactions are reporting normally
  • Test reader and door functionality if applicable

If communication does not resume, verify routing, subnet configuration, firewall rules, and physical network connectivity.

Why Proper IP Management Matters in Access Control

Access control systems rely heavily on stable network communication between controllers, servers, readers, and integrated systems.

Improper IP management can lead to:

  • Controller communication failures
  • Delayed transactions
  • Lost event reporting
  • Integration interruptions
  • Troubleshooting complexity

Using static addressing and documented network standards helps improve long-term system reliability and maintainability across multi-site or enterprise deployments.

Need further assistance? If you require support changing controller network settings, troubleshooting communication issues, or managing OMNIA system infrastructure, contact PMT Security for technical assistance.
Submit a Support Ticket
  • « Go to Previous Page
  • Page 1
  • Page 2
  • Page 3
  • Page 4
  • Page 5
  • Page 6
  • Interim pages omitted …
  • Page 23
  • Go to Next Page »
  • Facebook
  • LinkedIn
  • Twitter

PMT Security

Copyright © 2026 PMT Security, Inc. | All Rights Reserved

  • Privacy Policy
  • Terms of Use
  • Cookie Policy
  • Accessibility
  • Contact Us