• Skip to primary navigation
  • Skip to main content
PMT Security Logo

PMT Security

Advanced Access Control

  • Home
  • About Us
    • Our Partners
    • Our Integrators
  • Solutions
    • Education
    • Retirement & Healthcare
    • Manufacturing
    • Government Facilities
    • Residential
    • Retail Businesses
    • Campgrounds & Outdoor Resorts
  • Products
    • Access Control
      • Control Features
      • Reporting & Monitoring
      • Control Module
      • Digital IO Module
      • Reader Module
      • Readers
    • Video Management
      • Integration
      • Analytics
      • Search & Export
    • Visitor Management
    • Intercom
    • Live Guard Video Monitoring
    • Housings & Pedestals
  • Support
    • Knowledgebase
    • Download Center
    • License Request
    • RMA Request Form
  • Blog
  • Contact Us

Security Best Practices & Support

Updating OMNIA Printer Persistence File

Updating OMNIA Printer Persistence File

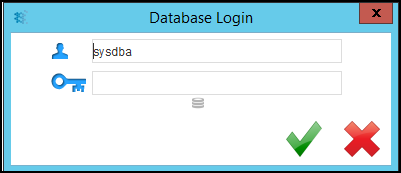
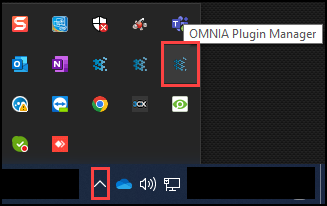
If the Card Designer Program does not connect to the OMNIA Database.

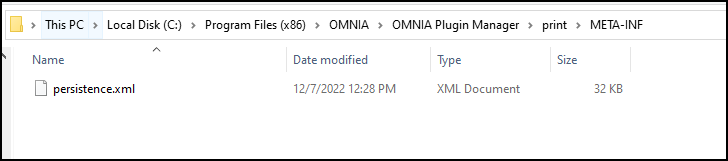
After the OMNIA Plugin Mgr has been installed, you may have to update the Printer Persistence.xml file. er the OMNIA Plugin Mgr has been installed, you may have to update the Printer Persistence.xml file.

          Update the Printer Persistence.xml file located at:

          C:\Program Files (x86)\OMNIA\OMNIA Plugin Manager\print\META-INF.

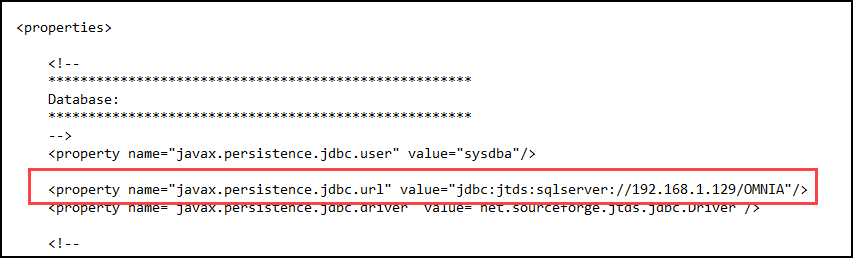
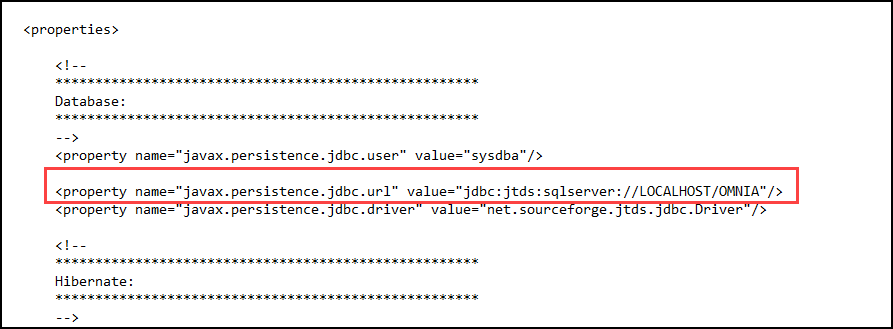
Open the file in Notepad to edit the path and the name of the Database.

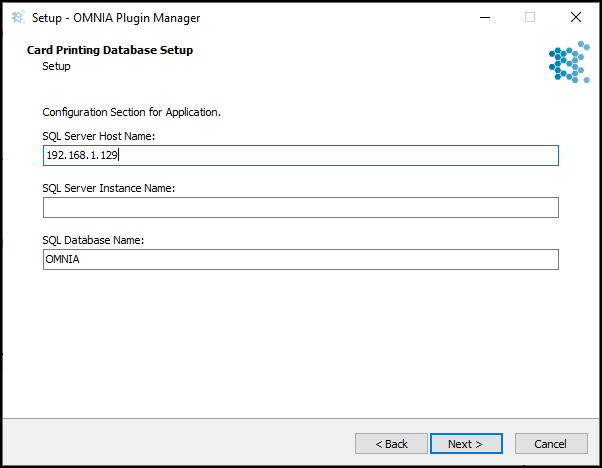
Use the IP address of the Database or localhost if the Database resides on the PC you are wanting to print tags from.

Change the Database Name from Portal to OMNIA

NOTE: There are two (2) Locations on the Printing Persistence File that need to be updated.

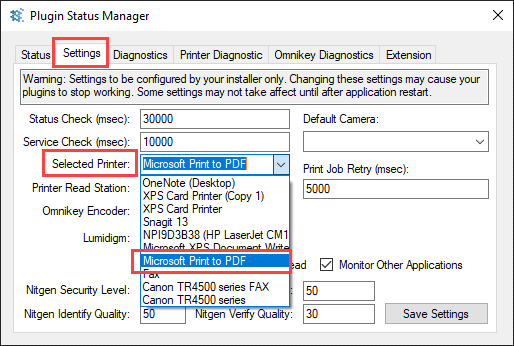
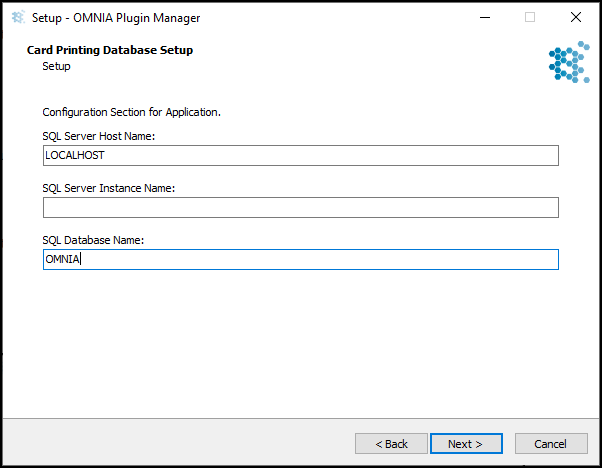
Using IP of SQL Server

Using LOCALHOST

Need further assistance?

Submit a Support Ticket

Submit a Support Ticket

FAQ

General

Technical Bulletins

Access Control

AmanoNet

Nexxus220

Omnia

Omnia Lite

PM Tronics Hardware

Amano Readers and Credentials

Legacy Hardware

Partner Products

Partner Products

Video Management Systems

Cathexis Video (Amano Vision)

AmanoDVMS

Vision

How to Use The OMNIA Card Designer

How to Use the OMNIA Card Designer

Card Designer

OMNIA has a built-in card designer that automates the process of printing personal information on access cards.

Card designer is an easy to use graphical interface to design different card templates.

Find the Card Designer at C:\OMNIA\Bin64\Card Designer.exe

Run Card Designer as Administrator

Card Designer may ask you to log in.

After launching the Card Designer, The Card Designer Icon will appear in the Task Bar or in the Show Hidden Icons.

Right Click the Card Designer Icon and Select Designer

After Selecting Designer, create a design template by entering a template name, choosing orientation, and selecting save

If you have already Created Templates, select the template you want to edit.

The template will open in the Card Designer Window, this is where you will create your design template.

Data field
Select tool will select elements to work on
Line tool will print static lines
Square shape tool will print static shapes
Round shape tool will print static shapes
Text element will print static text
Picture tool will print static pictures
Database field will print various fields from the database
Barcode tool will create a barcode from a selected database field

The Picture Field will pull information from the PC

The Database Field will pull information from the OMNIA Database

Each Field is customizable:

Alignment: Left, Right, Center, and Horizontal and Vertical

Rotation: 0, 90, 180, and 270

Font Type: Bold, Italic, and Size

Border Position: Horizontal, Vertical

To delete a field:

Select it, then select the Trash Can

There is not a save button, any changes/updates made are saved Automatically, you can close the Card Designer Window


The Newly Created Template will not be available in the OMNIA URL until you Stop and Exit the OMNIA Server App and Restart it and log back into the OMNIA URL

We recommend Printing to PDF to verify if you like the positioning of the data fields, this will prevent using up tags/cards and using the printing ribbon. 

The printer can be changed in the Plugin Manager. Plugin Manager Icon can be found in Show Hidden Icons in task bar.

Select the Settings Tab, then use the Select Printer dropdown to select Print to PDF

Save the Settings.

    Need further assistance?

    Submit a Support Ticket

    Submit a Support Ticket

    FAQ

    General

    Technical Bulletins

    Access Control

    AmanoNet

    Nexxus220

    Omnia

    Omnia Lite

    PM Tronics Hardware

    Amano Readers and Credentials

    Legacy Hardware

    Partner Products

    Partner Products

    Video Management Systems

    Cathexis Video (Amano Vision)

    AmanoDVMS

    Vision

    ImproNet/AmanoNet Database Backup: SQL

    ImproNet/AmanoNet Database Backup: SQL

    How to make an ImproNet/AmanoNet SQL Database Backup

    It is essential that regular backups are made and kept on removable media, or on a networked drive.

    Storing backups on the local disk will not prevent data loss if the hard drive fails.

    To Backup your ImproNet/AmanoNet SQL Database:

    • Open Sql Server Management Studio
    • Login using your Login Details

    Windows Authentication should be sufficient unless the site has no allowed Windows Authentication
                Defaults: (Username: Sysdba, Password: masterkey). (Username: sa, Password:                                                    M@sterkey1)

    • Click on Connect
    • Expand the Database Folder by clicking on the + next to Databases
    • Right Click on the ImproNet/AmanoNet SQL Database, The Database name is DB400.                      DB400 > Tasks> Back Up…
    • Click on the Add… Button
    • Click on the … Button and Navigate to the following location: [Drive:] \ImproNet\database\Backups OR The location you want to store backups to
    • Enter a name for your backup with a suffix off: .Bak
    • Click on Ok,
    • Verify the Backup Name and Location. Click on the OK Button on Select Backup Destination Window
    • Select the Correct Path from above then Select OK.
    • The Backup will begin.
    • The backup is now complete and at the location you selected in a previous step.

    Need further assistance?

    Submit a Support Ticket

    Submit a Support Ticket

    FAQ

    General

    Technical Bulletins

    Access Control

    AmanoNet

    Nexxus220

    Omnia

    Omnia Lite

    PM Tronics Hardware

    Amano Readers and Credentials

    Legacy Hardware

    Partner Products

    Partner Products

    Video Management Systems

    Cathexis Video (Amano Vision)

    AmanoDVMS

    Vision

    How to Install The OMNIA Plugin Manager

    How to Install The OMNIA Plugin Manager

    OMNIA Plugin Manager will allow the Multi Discipline Enrollment Reader (MDE) to be used to Enroll Tags for Tagholders into OMNIA.

    To install the OMNIA Plugin Manager.

    In the OMNIA URL go to Setup/Downloads

    Select the Plugin Manager Installer

    The Plugin Manager installation files will download

    Once Download Completes, Run the installer as administrator

    Enter the SQL Server Host Name, Localhost if SQL server is running on same PC the Plugin Mgr is being installed IP Address where OMNIA Server App is running or PC Name of where OMNIA Server App is running.

    Leave the SQL Server Instance Name Blank:

    Enter SQL Database Name: OMNIA

    Accept the License Agreement

    Select the Components to be installed, Click Next

    Click Install

    Installation begins

    When Installation Completes, Click Finish

    To Launch the Plugin Manager

    •  Go to C:\ProgramFiles(x86)\OMNIA\OMNIA Plugin Manager\OMNIA Plugin Manager.exe
    •  Run OMNIA Plugin Manager.exe as Administrator

    OMNIA Plugin Manager will appear in task bar under show hidden Icons

    Need further assistance?

    Submit a Support Ticket

    Submit a Support Ticket

    FAQ

    General

    Technical Bulletins

    Access Control

    AmanoNet

    Nexxus220

    Omnia

    Omnia Lite

    PM Tronics Hardware

    Amano Readers and Credentials

    Legacy Hardware

    Partner Products

    Partner Products

    Video Management Systems

    Cathexis Video (Amano Vision)

    AmanoDVMS

    Vision

    Email Notifications In OMNIA

    Email Notifications In OMNIA

    In order for Email Notifications to work in OMNIA,  The Integration Server must be downloaded and Installed.

    After Integration Server installation Actions and Rules will need to be configured for Email Notifications.

    In the OMNIA URL, go to Setup/downloads/Addons 

    The addons installer will download.

    Launch the Client Install

    Accept the Agreement

    Select which Options you want to install, click Next

    This will place an Addons Folder in the root of OMNIA

    Inside the Addon Folder there will be a Bin Folder

    Launch the Integration Server

    Integration Server

    To Create Actions and Rules,  Click on Integration, Select Either Actions or Rules

    Creating Actions

    Select Integration, from the drop down select Actions

    Click on the Plus to add an Action

    The Action Wizard Launches

    Give the Action a Name, Give a Description if needed.

    From the Action Type Drop Down Select Email

    After Selecting Email, you will see areas that need the Email Server Information

    After entering the Email Server Information, Click the Next Arrow

    Enter a Valid Email address in the To: 

    You can Enter any Value you would like in the from.

    In this example we are using a Mailgun Email Server but chose to use OMNIA@OMNIA.com for the From email address

    Right Click inside the box below the subject line to select what details will be included in the email.

    For This example, Event Name, First Name, Last Name, and Time were selected for details in the Email Notification

    Click Next

    A summary of the Action created displays

    Click the Next button

    An Action is now created and will display. If this is your first action created the number will be 1, for this example this was the 9th Action Created.

    Click the X to close the Actions Window

    Creating a Rule

    On the Integration Server, Select Integration, from the drop down select Rules

    Select the Plus Button to create a New Rule

    The Rule Wizard will Launch, Click Next

    Give the Rule a Name, Give the Rule a Description if needed.

    Always Select IXP400 as the Rule Type

    In this example , we are setting up a rule to Email when a tagholder uses a specific Door

    For this example , we selected Events, Tags, Terminals, and Tagholders.

    Click Next

    The Events Page Displays

    We will now need to choose the Event for the Rule

    Scroll to Find the Event, Highlight it, 

    Click Next

    The Tags Page Displays

    We will now need to choose which tag for the rule

    Scroll to find the Correct Tagholders Tag. 

    Click Next

    The Tagholders Page Displays

    We will need to choose the Correct Tagholders Name

    Click Next

    The Terminal Page Displays

    We will need to select the Terminal for the Rule

    Click Next

    The Active Time Page will Display

    This will allow you to choose, if needed, an Active Time Period for the Rule to be Enforced

    By Default the Active Time is 24/7 and Holidays.

    Click Next

    You may Edit the Active Time Period by clicking on the Wrench

    You may Edit the Active Time, 

    When Finished Editing the Active Time, click the Green Check Box

    The Action Selection Page will Display

    You will choose the Action you want to take place for this rule. In this example we have only created One Action.

    Select the Action, Press the Arrow Left Button to move the Action to the Selected Actions

    Click Next

    You will get a notification of Completed, and will be able to scroll in the message listing the details of the Rule and Action Associated with the Rule

    Click Next to Finish

    A Rules page Displays

    Click the X to Finish

    Click on the Integration Server Tab to view the current rules and actions taking place

    Need further assistance?

    Submit a Support Ticket

    Submit a Support Ticket

    FAQ

    General

    Technical Bulletins

    Access Control

    AmanoNet

    Nexxus220

    Omnia

    Omnia Lite

    PM Tronics Hardware

    Amano Readers and Credentials

    Legacy Hardware

    Partner Products

    Partner Products

    Video Management Systems

    Cathexis Video (Amano Vision)

    AmanoDVMS

    Vision

    • « Go to Previous Page
    • Page 1
    • Interim pages omitted …
    • Page 8
    • Page 9
    • Page 10
    • Page 11
    • Page 12
    • Interim pages omitted …
    • Page 23
    • Go to Next Page »
    • Facebook
    • LinkedIn
    • Twitter

    PMT Security

    Copyright © 2026 PMT Security, Inc. | All Rights Reserved