• Skip to primary navigation
  • Skip to main content
PMT Security Logo

PMT Security

Advanced Access Control

  • Home
  • About Us
    • Our Partners
    • Our Integrators
  • Solutions
    • Residential
    • Government Facilities
    • Education
    • Retirement
    • Manufacturing
    • Retail Businesses
    • Campgrounds & Outdoor Resorts
  • Products
    • Access Control
      • Control Features
      • Reporting & Monitoring
      • Control Module
      • Digital IO Module
      • Reader Module
      • Readers
    • Video Management
      • Integration
      • Analytics
      • Search & Export
      • Camera Hardware
    • Visitor Management
  • Support
    • Knowledgebase
    • Download Center
    • License Request
    • RMA Request Form
  • Blog
  • Contact Us

Cathexis

Quick Start Guide for Cathexis Vision Version 2025

Cathexis Quick Start Guide

Quick Start Guide for Cathexis Vision Version 2025

Cathexis Quick Start Guide

  1. Log In
  • Username: admin                                    
  • Password: admin

2. Licensing

        A. Trial License

  • Automatically applied: 2 IP cameras, 48-hour review limit.

    B. Full License Activation
  • Online: Use product key via Tools > Local server licenses.
  • Offline: Generate .rqst file → email to support → upload .pack file.
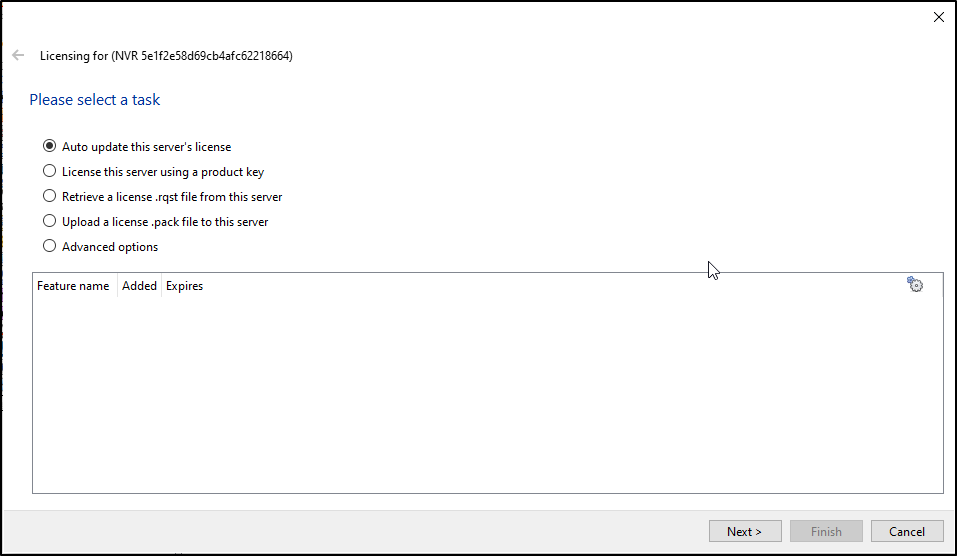
         If the unit from which the user is performing the licensing does not have internet connection, a .pack file needs to be uploaded. A .pack file is a file that contains all the licensing information for a unit. Getting a .pack file requires 3 steps, outlined below, and covered in more detail in the following sections.
    →    Retrieve a .rqst (request) file from the unit being licensed.
    →    Email the .rqst to support@cathexisvideo.com.
    →    Upload the .pack file once is has been sent.
         To upload the .pack file go to: Tools / Local server licenses / Upload a license .pack file from this server
    →    Select the .pack file from the dialogue that appears.
    →    Click Next.
    The server will now be licensed. For further assistance, contact support@cathexisvideo.com.
3. Create & Connect to a Site

  • Open File> Enterprise Manager:
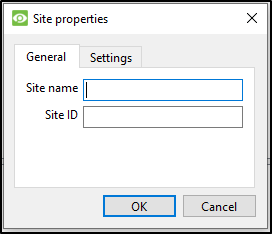
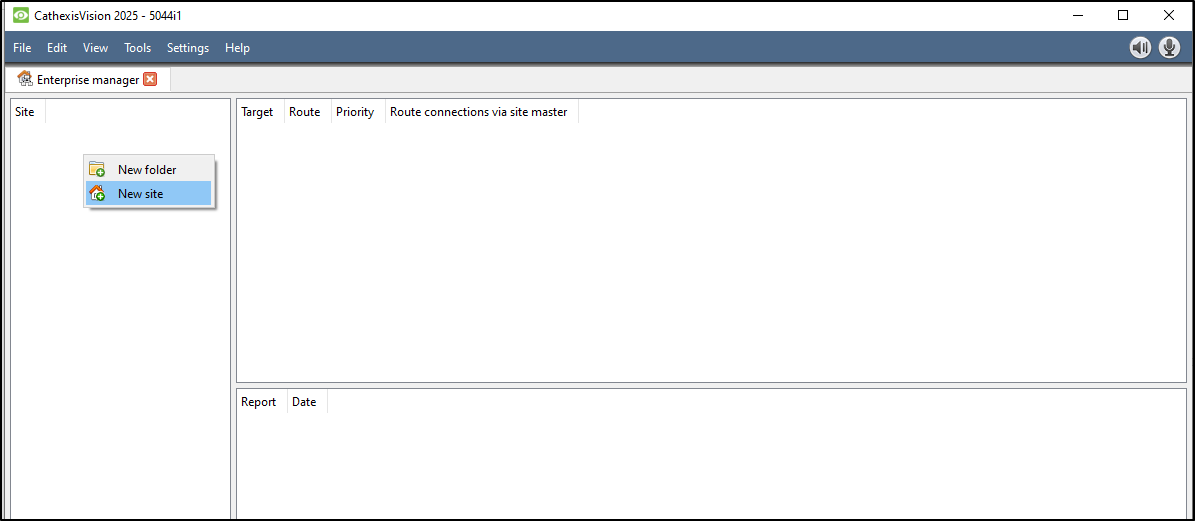
  • Add Site Name by right clicking in Site, Selecting New Site and Giving the Site a Name, disregarding entering a Site ID
       
       
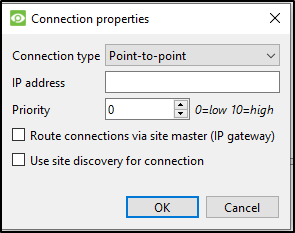
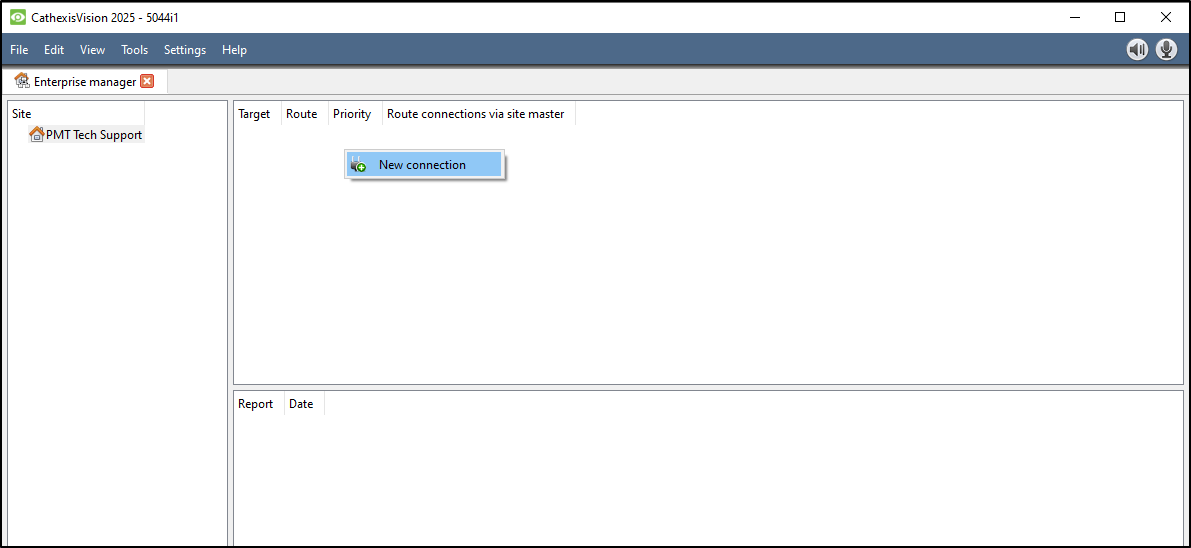
  • Add Connection (IP of Master NVR) by right clicking in |Target| Route| Priority| Route connection via site master| window and selecting New connection. Use Point-to-Point as Connection Type and Enter the IP address of the Master Server 
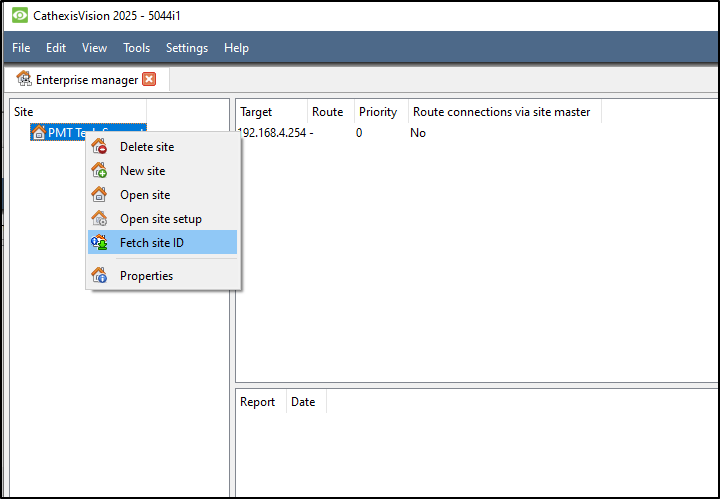
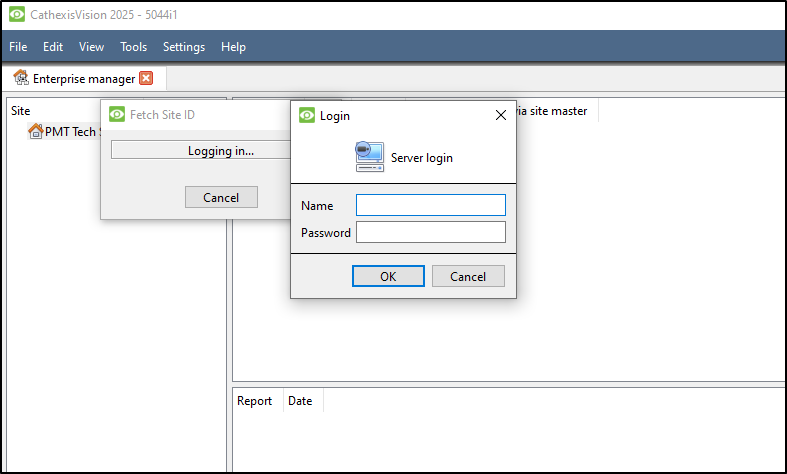
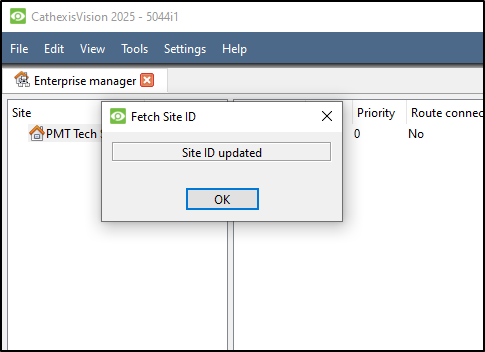
  • Fetch Site ID
    Right Click the Site Name and Select Fetch site ID

    Enter User Name and Password 

4. Add & Configure Cameras

  • Go to File> Open site> (Select site you made)
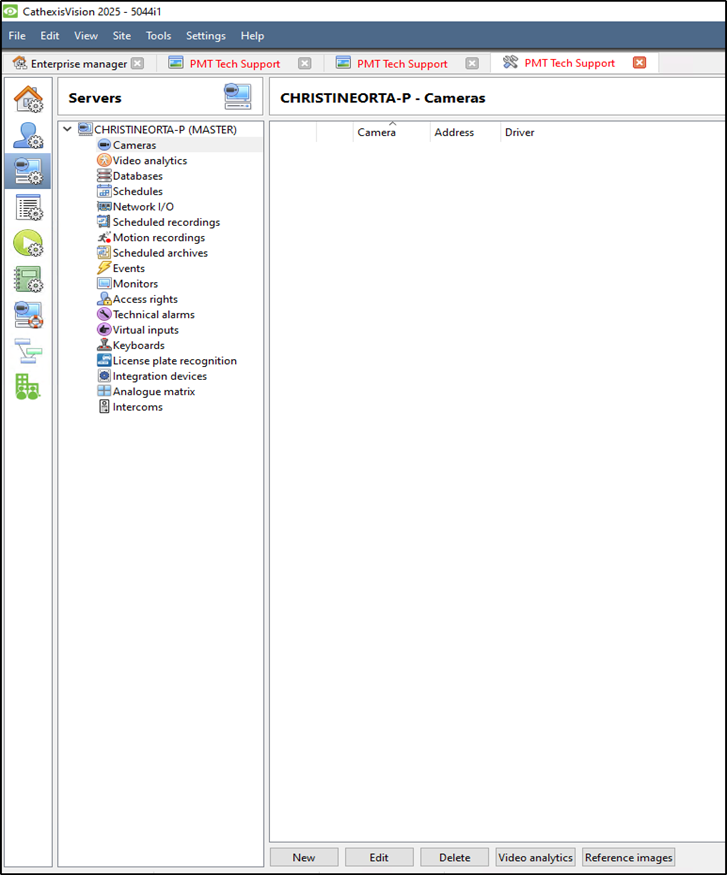
  • Go to Site> Open tab> Setup > Configure Servers > Cameras
  • Use Select new

5. User Management

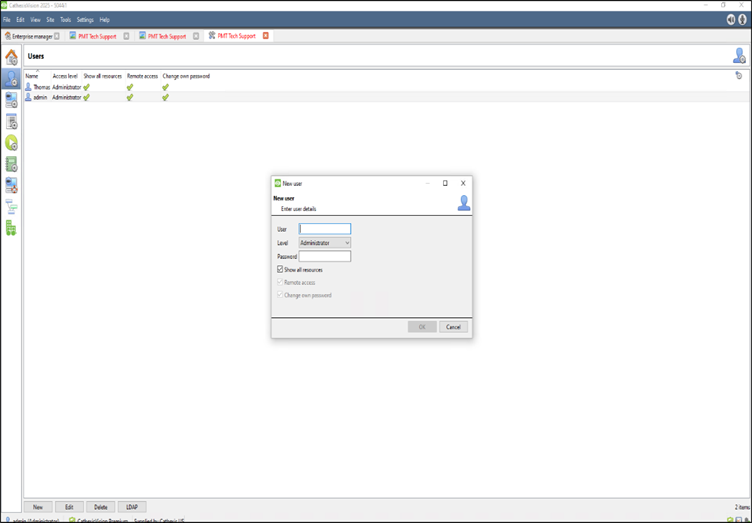
  • Go to Setup > Users
  • Add users with access levels (1–30)
  • Optional: Enable LDAP integration

6. Recording Setup
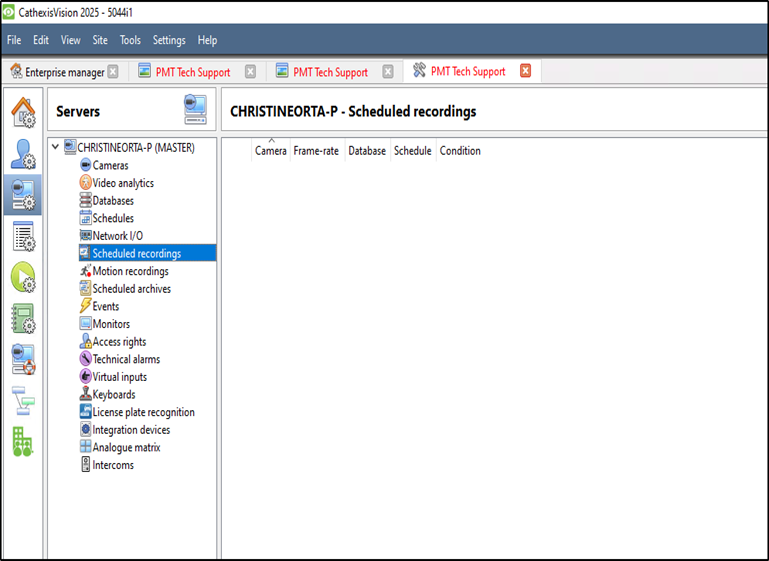
        A. Scheduled Recording

  • Setup > Configure Servers > Scheduled Recordings
  • Define schedule, database, framerate
    B. Motion-Based Recording
  • Setup > Configure Servers > Motion Recordings
  • Configure scene type, sensitivity, masks
7. Video Analytics

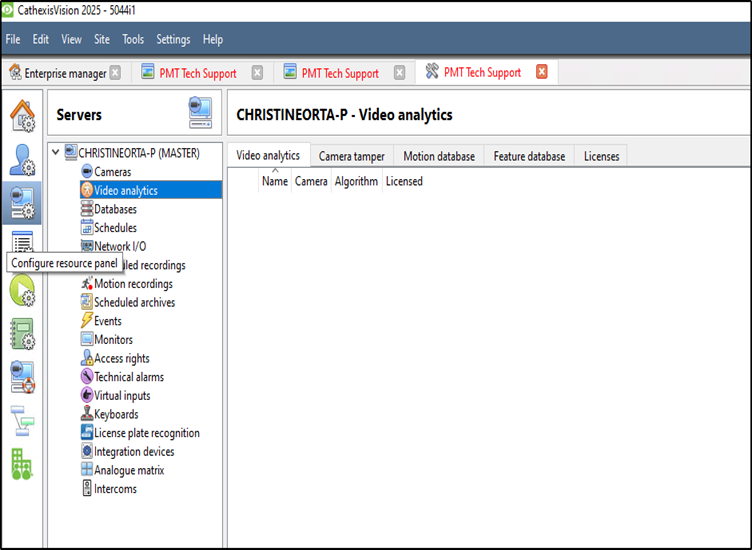
  • Access via Setup > Configure Servers > Video Analytics
  • Add analytics per camera:
    • Basic, Intermediate, Advanced
    • Object detection, queue length, mask detection, etc.
  • Configure zones, triggers, day/night settings
8. Events & Actions

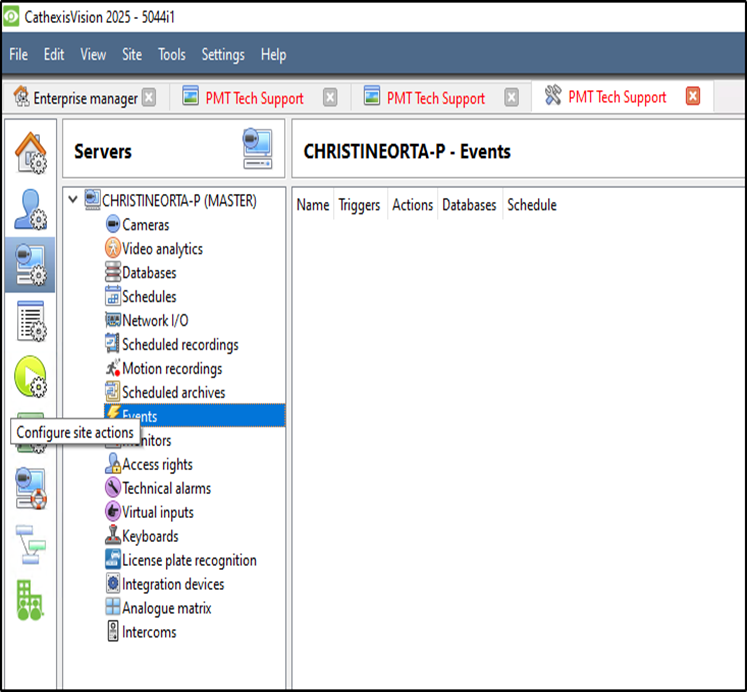
  • Go to Setup > Configure Servers > Events
Need further assistance?

Submit a Support Ticket

Submit a Support Ticket

FAQ

General

Can I initiate RS485 comms to a terminal from an existing IP terminal?

How to Select the Right Cable for the job

IDEMIA Sigma Lite Readers NOT compatible for use in AmanoNet or Nexus220

Network Configuration – Best Practices

Technical Bulletins

How to upgrade OMNIA hardware firmware using the OMNIA Firmware Upgrade Tool

OMNIA Run as a Service fix for v4.x

Upgrading To OMNIA 4.6.5 and 2019 SQL Express With Tools

Access Control

AmanoNet

AmanoNet Back up using IB Console

AmanoNet Minimum PC Requirements and Specifications

AmanoNet System Migration Notes

Archive Tagholders in AmanoNet

Archive Transactions in AmanoNet

AutoID IP Hardware in AmanoNet

How to move AmanoNet Access Control System from one PC to another (Firebird)

IDEMIA Sigma Lite Readers NOT compatible for use in AmanoNet or Nexus220

ImproNet/AmanoNet Database Backup: SQL

NOTICE! UPGRADE TO AMANONET 7.74 – EC2/400i NO LONGER AVAILABLE

Nexxus220

Change Default Password in Nexus220
Database Migration from Nexus220/IXP220 to OMNIA
How to fix a Java SE Binary Error in Nexus220 Software
How to get a copy of a database from Nexus220 Software
How to move Nexus220 to a different PC
IDEMIA Sigma Lite Readers NOT compatible for use in AmanoNet or Nexus220
Move Nexus220 Access Control System from one PC to another (Firebird)
Nexus220 Firmware Upgrade
Nexus220 Notifications Configuration/Email Configuration
Nexus220 The number of doors for this license has been exceeded
Nexus220 Web Reports Using Microsoft Edge
Reduce length of time on buzzer for readers in Nexus220

Omnia

Adding Widgets to the OMNIA Dashboard

Basic Trouble Shooting OMNIA

Batch Operations OMNIA

Change SYSDBA Password in OMNIA

Configuring Web Session Timeouts in OMINA

Create a Database for OMNIA 4.5 After Running the .iso

Create a Site Lockdown Input for OMNIA

Creating an Input on a Wiegand Reader Module to Generate a Lockdown/Emergency Mode For a Single APC Controller In OMNIA

Creating Operator Profiles

Creating Relay Actions I/O in OMNIA

Omnia Lite

Convert a Nexus Lite Database into OMNIA Lite Database

OMNIA LiTE Backup

PM Tronics Hardware

Amano Readers and Credentials

Change Modulation mode on XQT904 Quad Transmitter
How do I change Wiegand Output Mode on Amano readers?

Legacy Hardware

Factory Reset legacy Amano IP Cameras (sold prior to 2018)

Factory Reset Nexus220 controller

How do I factory reset the EC2 (400i) controller?

Setting IP on PMTronics Inc. Access Control Hardware

Partner Products

Partner Products

IDEMIA Sigma Lite Readers NOT compatible for use in AmanoNet or Nexus220

Setting Read Range on a Conekt Reader

Video Management Systems

Cathexis Video (Amano Vision)

Cathexis Video AV (AntiVirus Exceptions)

AmanoDVMS

Which AmanoDVMS ports need to be open on my firewall?

Vision

AmanoVision web access user name case sensitivity usage

6 ways Security & Access Control Systems Increase School Safety

6 ways Security & Access Control Systems Increase School Safety

School safety and security is a top priority. As students head back to class this fall, administrators and educators are faced with the evolving challenge of providing secure access to authorized personnel and guests, while keeping unauthorized people out of the building.

Maintaining security has never been simpler with today’s access control systems for schools.

1) Simple, secure access for teachers and staff

There’s no longer a need to constantly redistribute keys or spend resources on complicated key management. Today’s access control systems for schools allow your teachers and staff to enter the building with electronic key fobs, key cards/badges or even their smartphones. With some systems, you don’t even have to remove your phone from your pocket. This makes entry a lot smoother, more efficient and more secure.

2) Track who’s in the school

Access control systems make it easy to monitor who is entering the building and when. This is especially valuable for situations in which you need to know who was in the school during an incident such as theft, whether it happens during the school day or after hours. In emergency lockdown situations, it also helps to make sure all personnel are accounted for.

3) Safe access for parents and guests

During the school day, most schools are locked to prevent access from the outside. This is also true for many preschools and daycare centers, which remain locked at all times for even greater security and school safety. So how do parents enter to drop off or pick up their kids? With access control systems in place, parents can enter the same way as other authorized personnel: with keyless fobs, cards or by entering their personal code on the keypad.

4) 2-way communication for school safety

Access control systems can also be integrated with intercom systems and video cameras to allow for easy 2-way communication between guests and personnel inside the school. This is useful for deliveries or other situations in which parents or guests do not have a key fob or code.

5) Track attendance

If desired, your entire student body can have key cards to ensure that no unauthorized persons are entering the school. In addition to the enhanced security, this also provides a simpler means of tracking attendance and having record of who was in the building at any given time.

6) Multi-room / building management for school safety

Access control isn’t limited to a single exterior door. These systems can be used to control access through the entire building or even the entire district. For example, science teachers may need special access to rooms where chemicals are stored. Approved personnel can use the same key fob, card or device to access these rooms as they use to enter the school. The same goes for administrators who need to travel to different schools during the day. Managing access is simple, allowing personnel to be granted approval for different buildings or rooms with just a few clicks.

Learn more about our Security and Access Control Solutions for Educational Institutions by visiting www.pmtsecurity.com/security-and-access-solutions-for-educational-institutions/

PMT Security

Copyright © 2025 PMT Security, Inc. | All Rights Reserved