• Skip to primary navigation
  • Skip to main content
PMT Security Logo

PMT Security

Advanced Access Control

  • Home
  • About Us
    • Our Partners
    • Our Integrators
  • Solutions
    • Residential
    • Government Facilities
    • Education
    • Retirement
    • Manufacturing
    • Retail Businesses
    • Campgrounds & Outdoor Resorts
  • Products
    • Access Control
      • Control Features
      • Reporting & Monitoring
      • Control Module
      • Digital IO Module
      • Reader Module
      • Readers
    • Video Management
      • Analytics
      • Security Cameras
    • Visitor Management
  • Support
    • Knowledgebase
    • Download Center
    • License Request
    • RMA Request Form
  • Blog
  • Contact Us

How to set OMNIA Access Groups, Areas, and Device Time Patterns

OMNIA Access Groups, Areas, and Device Time Patterns

OMNIA Access groups is the feature that determines where and when people have access.

OMNIA Access groups are made up of three main components;

  1. Areas (Where people have access)
  2. Time Patterns (When people have access)
  3. Holidays (Control access on public holidays)
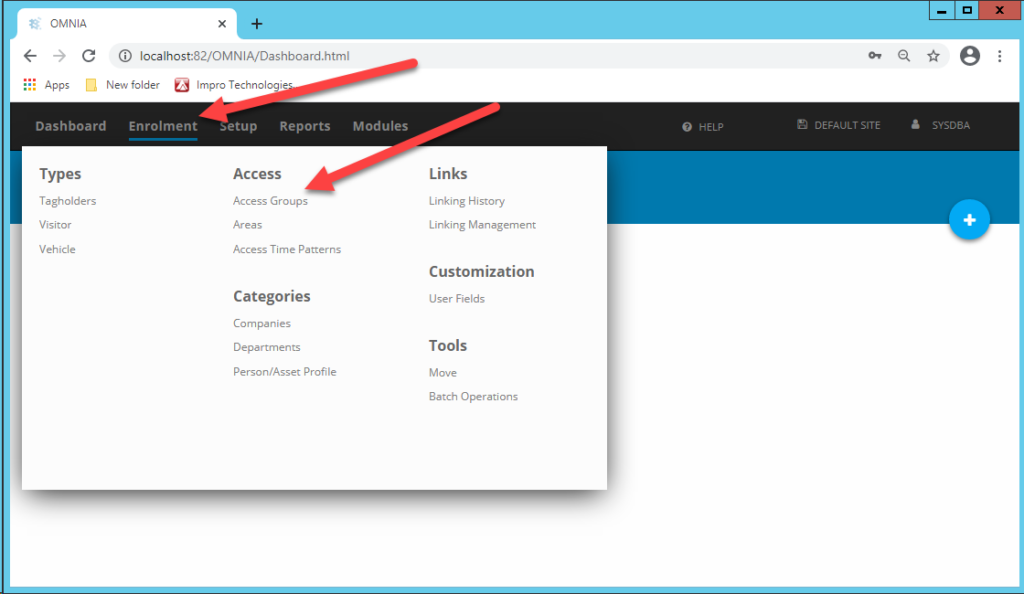
OMNIA - Enrolment - Access Groups

Creating Access Groups in OMNIA

  • Set up different Areas according to your requirements
  • Set up Access Time Patterns according to your requirements
  • Enter any relevant public holidays
  • Create Access Groups by linking Areas with Access Time Patterns

Area + Time Pattern = Access Group

Areas in OMNIA

Areas determine the doors people have access to. Create different areas for each department in your facility and select the doors that will be available to that Area

How to create a new Area

  • Navigate to Enrollment > Access > Areas
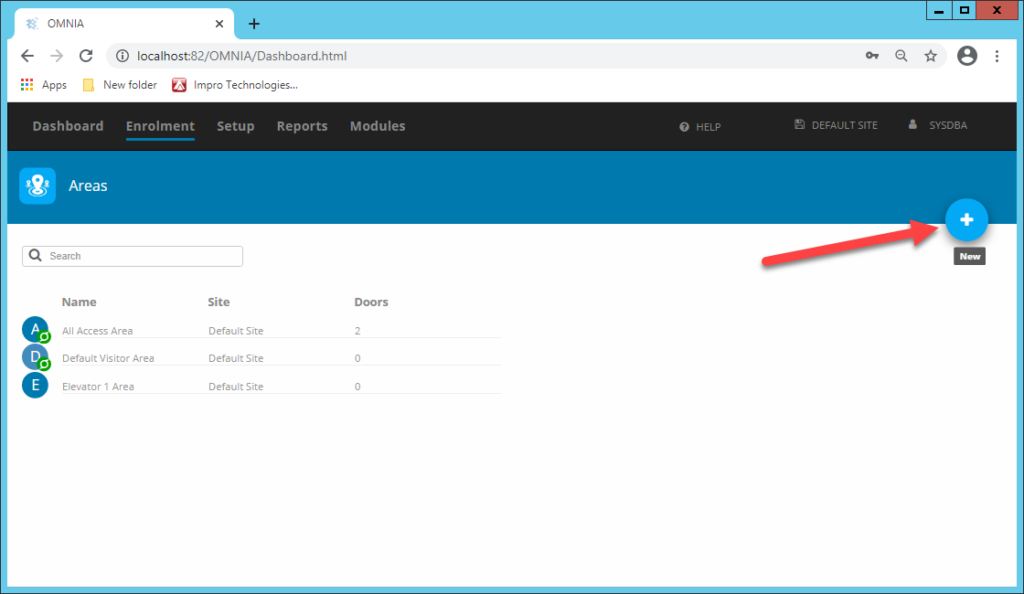
  • Click on the blue + to create a new Area
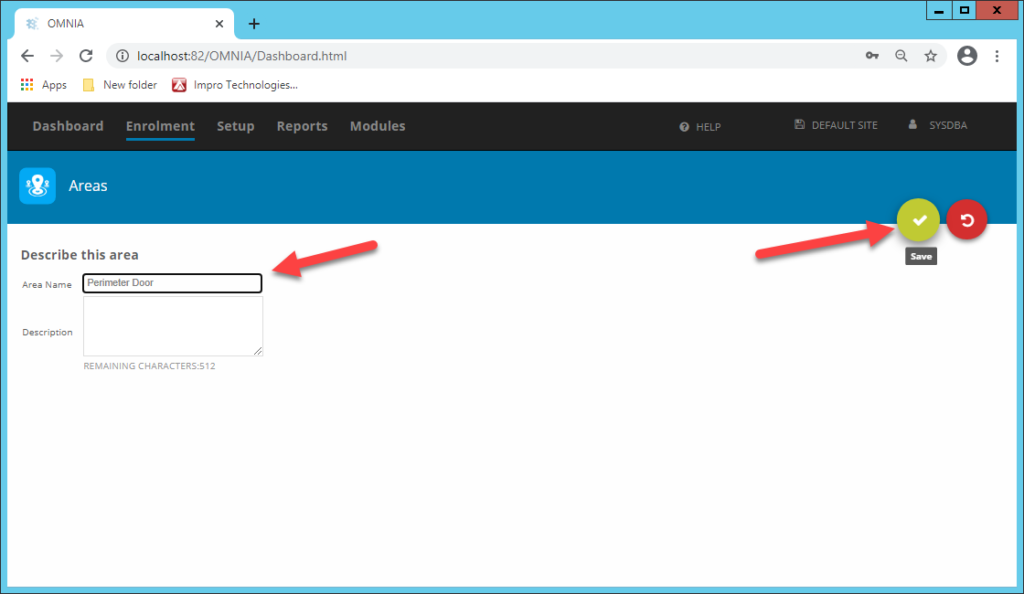
  • Give the area a descriptive name
  • Save by clicking Green Check
In OMNIA navigated to Enrollment, select Access, then select Areas, click the blue '+' symbol to create a new Area.
Describe the Area and Save
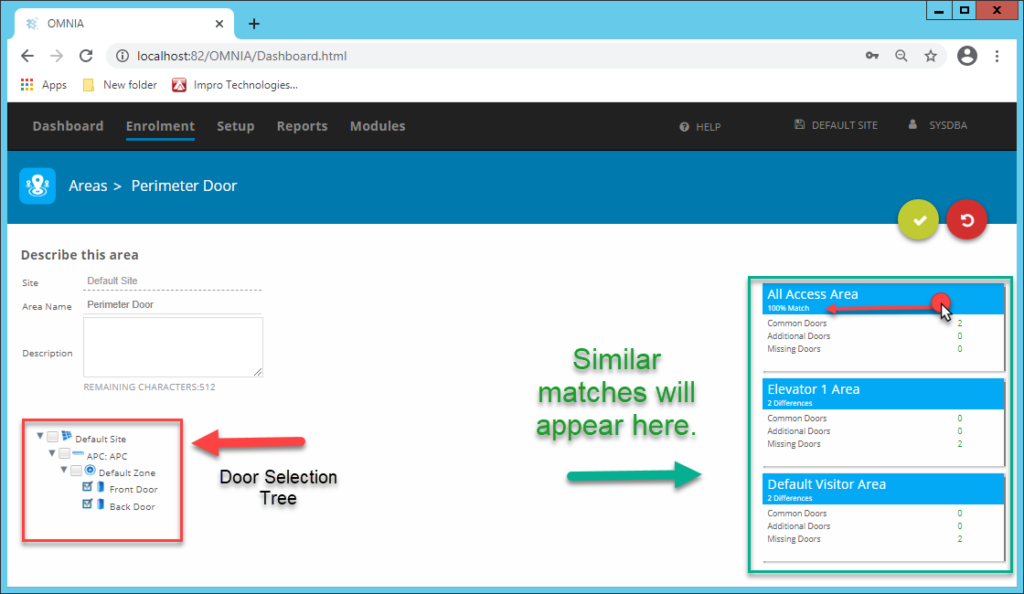
  • Expand the Door Selection Tree
  • Select the doors that will be accessed
  • Save
Expand the Door Selection Tree, Select the doors that will be accessed in this area and save again.

Similar matches

Avoid creating duplicate areas by looking at Similar Matches. Duplicate areas in the database would create an untidy system.

If you have a 100% match with an existing area, consider using that Area instead of creating a new one.

Access Time Patterns

Access Time Patterns determine the times when people have access. Create different time patterns for each department in your facility.

How to create a new Access Time Pattern

Navigate to Enrollment > Access Time Patterns

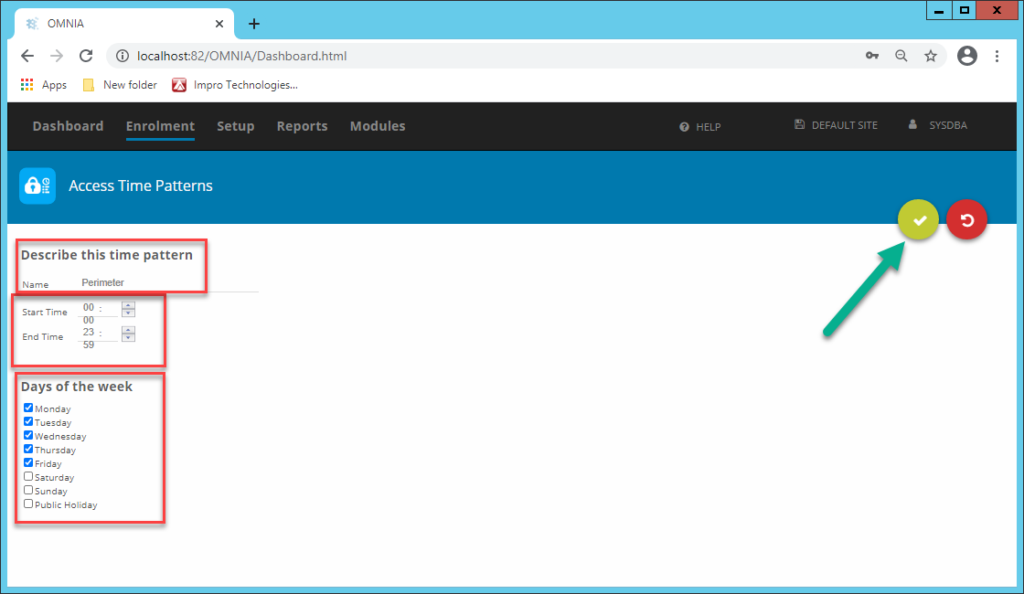
  • Click on the blue + to create a new Access Time Pattern
  • Give the pattern a descriptive name
  • Choose the start time
  • Choose the end time
  • Select the days of the week
  • Save
In OMNIA to create a new Access Time Pattern, navigate to Enrollment, Select Access Time Patterns, select the blue '+' to create a new Access Time Pattern. Describe the time pattern, select your start and end times, select the days of the week and then save using the green check mark button.

Holidays can be used to control access on public holidays.

Holidays are not set up automatically. Enter all relevant public holidays during the beginning of each year.

How to set up holidays in OMNIA

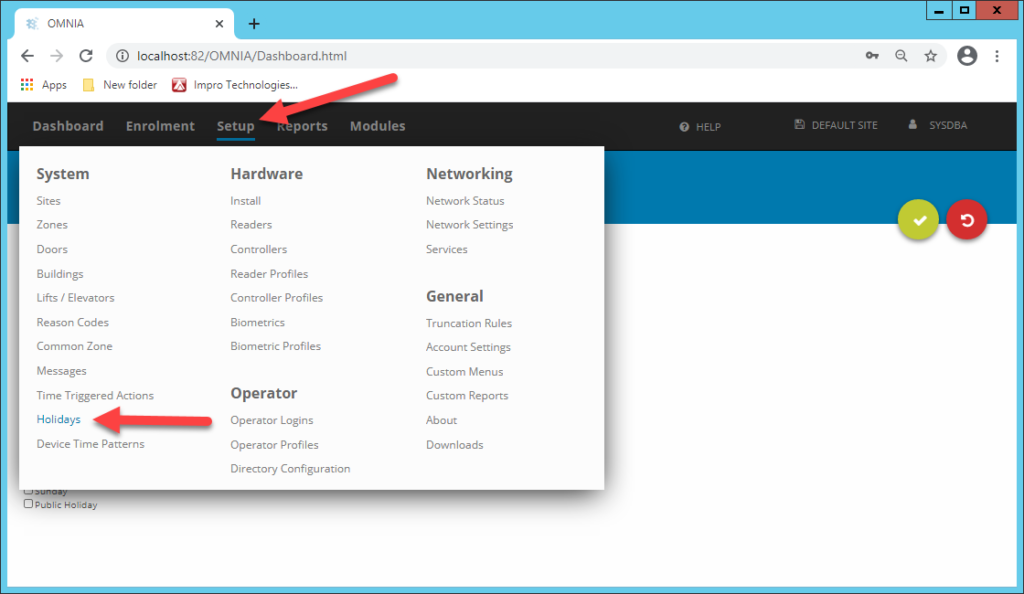
  • Navigate to Setup > System > Holidays
How to set-up holidays in OMNIA, navigate Setup > Systems > Holidays
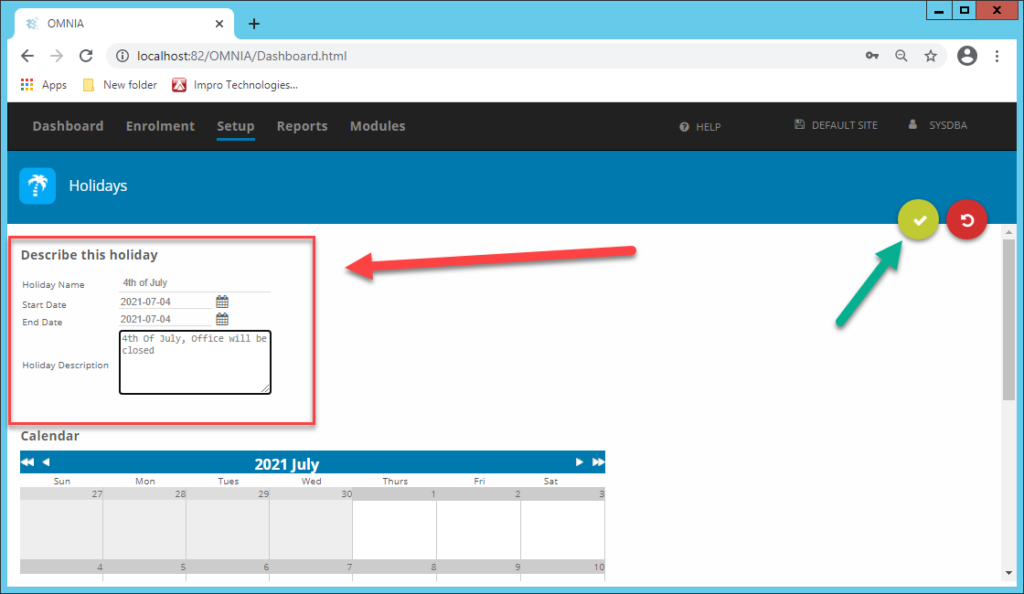
Select '+' to create a new entry.
  • Click on + to create a new entry
  • Give the holiday a descriptive name
  • Choose the start date
  • Choose the end date
  • Enter a description (Optional)
  • Save
Describe the holiday, select start and end date, and save using green check mark button.

To control access on holidays, use the Public Holiday tick found in Access Time Patterns
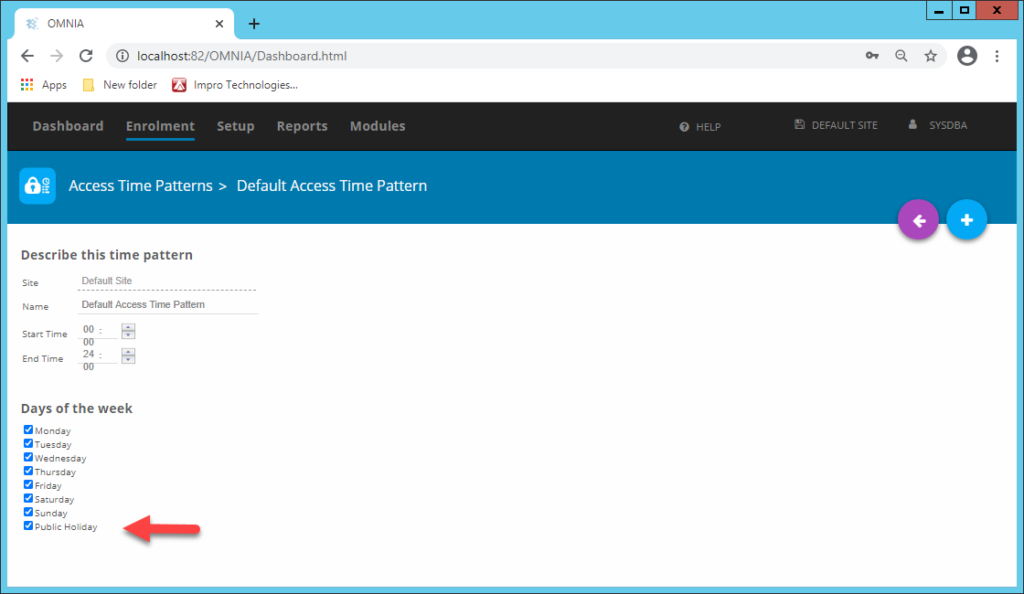
To control access on holidays, use the Public Holiday tick found in Access Time Patterns.

Holiday Report

For a quick report on which holidays have been set up, run a holiday report under Reports

Enrollment

Enrolment is the process of creating ‘Tagholders’ and assigning access credentials like; Tags or fingerprints.

Tagholders need to be assigned at least one Access Group in order to access specific doors.
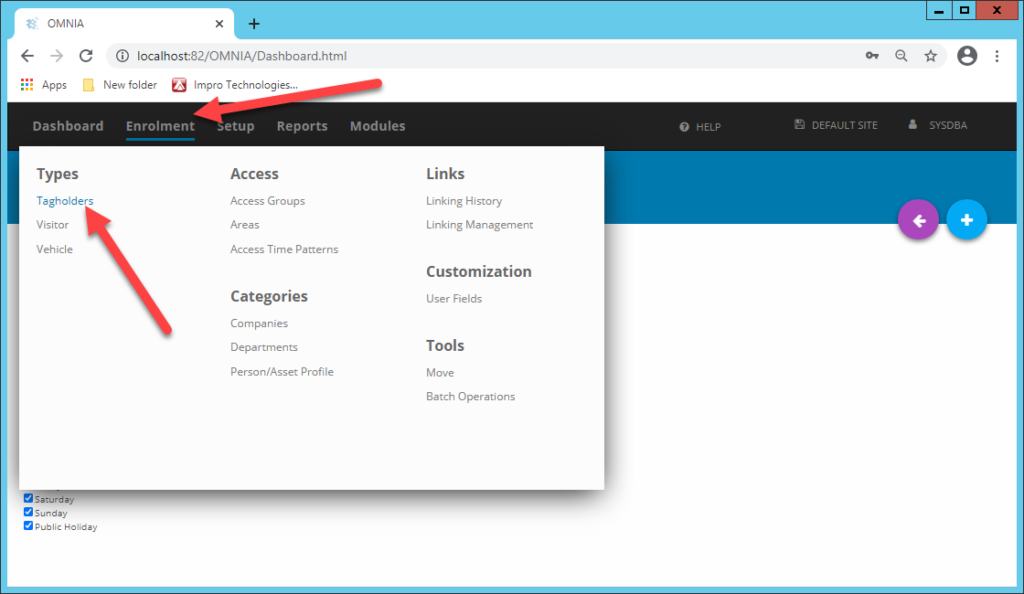
Tagholders need to be assigned at least one Access Group in order to access specific doors. To create a new Tagholder, navigate to Enrolment > Tagholders
  1. Create new Tagholder (Save)
  2. Add Image (Optional, but recommended)
  3. Add Tags
  4. Assign Access Groups

Adding a new Tagholder in OMNIA

A Tagholder is any person who uses a Tag or Fingerprint to access your site. 

OMNIA licensing will determine the maximum amount of Tagholders allowed per site. 

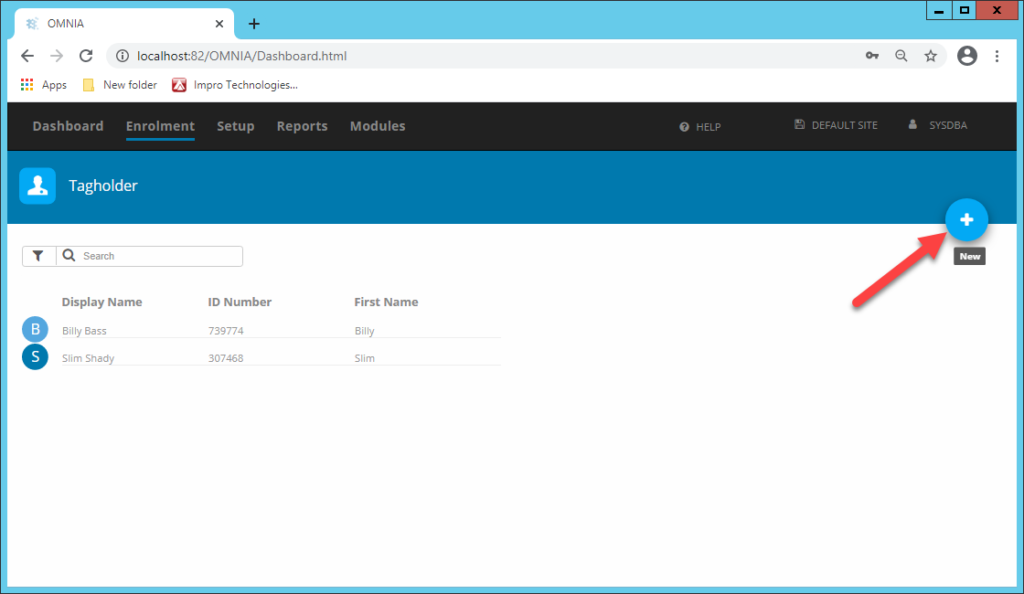
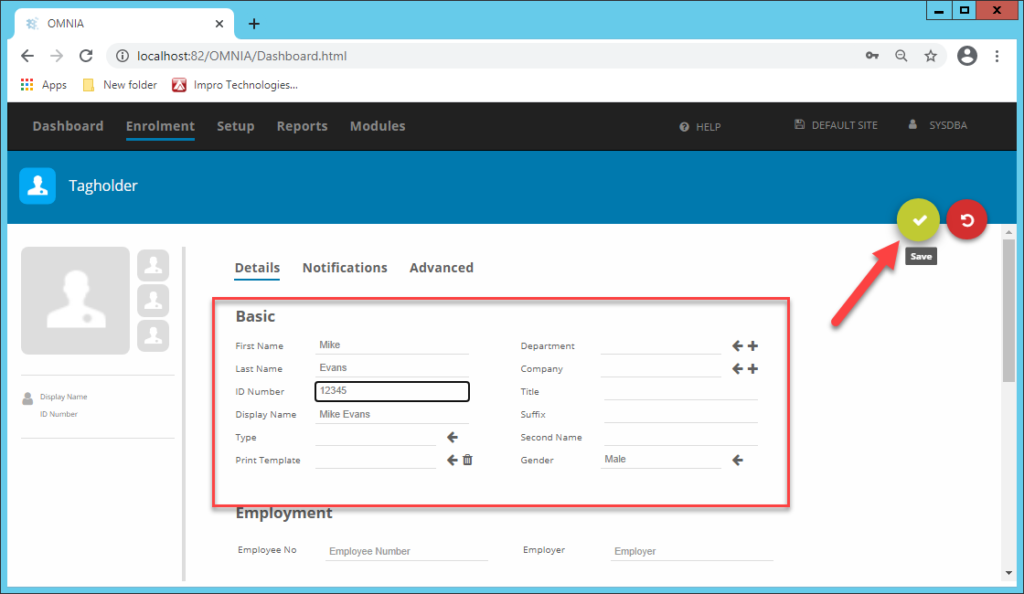
To add a new Tagholder

  • Navigate to Enrollment > Tagholders
  • Click on New
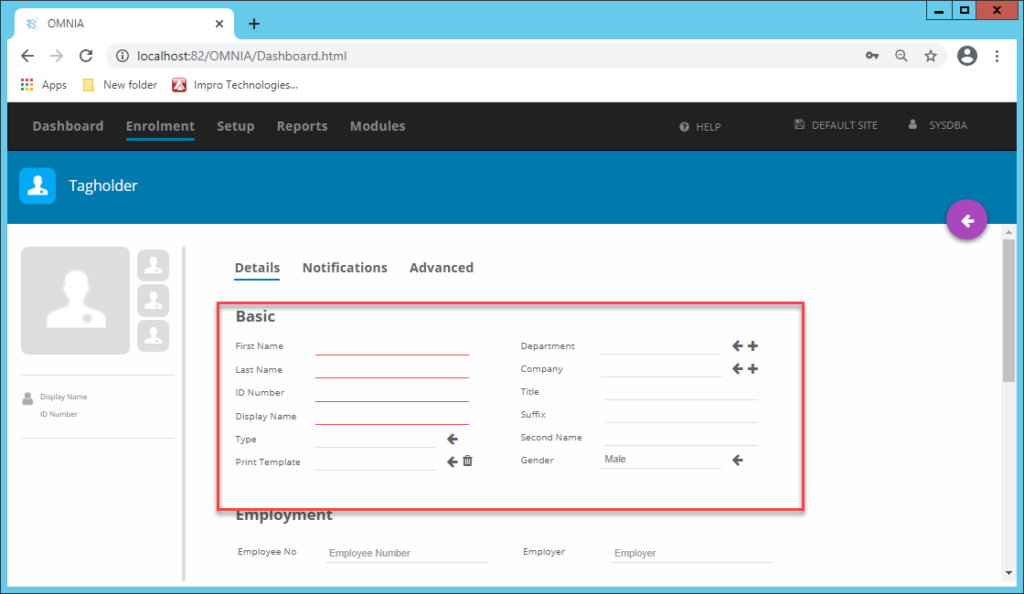
  • Fill in the compulsory fields ( First Name, Last Name, ID, Display Name)
  • Fill in any additional information (Contact info, Department, Company)
  • Save
To add a new Tagholder select the blue '+' button.
Fill in Tagholder information, only after saving will tags, access groups and photo options become available.
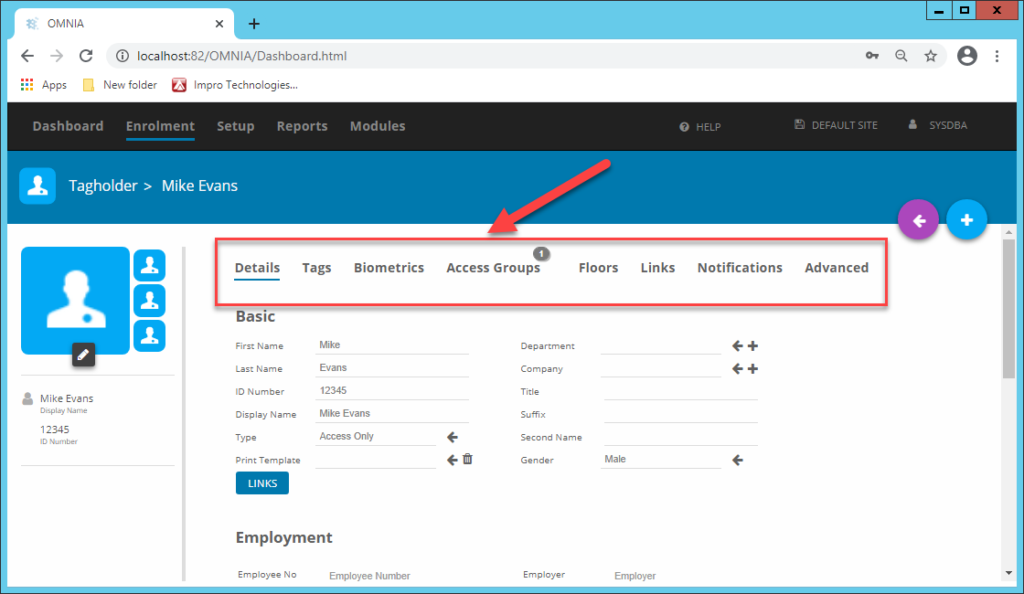
Note: Only after saving will the Tags, access groups and photo options become available.

OMNIA features available after initial tagholder setup and save.

Adding Images

You will only be able to add pictures after saving a new Tagholder. Portal allows for 3 Images per person. These could include ID/Passport images

  • Click on the pencil icon
  • You can either browse to a saved picture or take new picture using a webcam
  • You can edit the image rotation and color settings by clicking on Edit Picture
Click on the pencil icon to edit tagholder image.

Adding Tags

‘Tags’ are the credentials used by Tagholders to gain access to your site. Tags can be cards, keyring-fobs or fingerprints.

Note: The Tags option will only appear after you save the Tagholder’s compulsory fields.

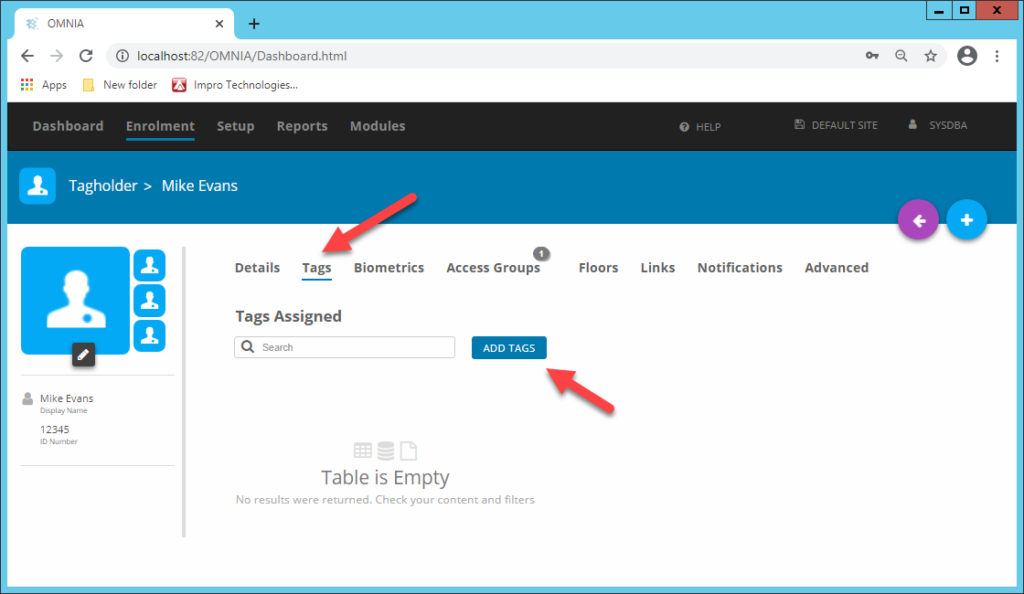
Adding a new Tag:

  • Select the Tagholder and go to Tags
    • Click on ADD TAGS
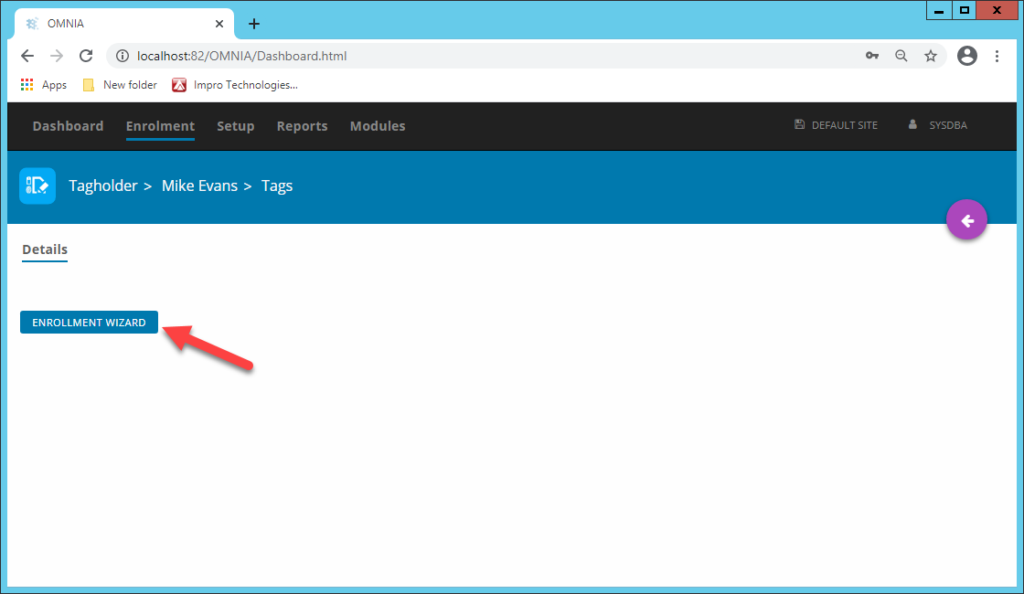
  • Click on ENROLLMENT WIZARD
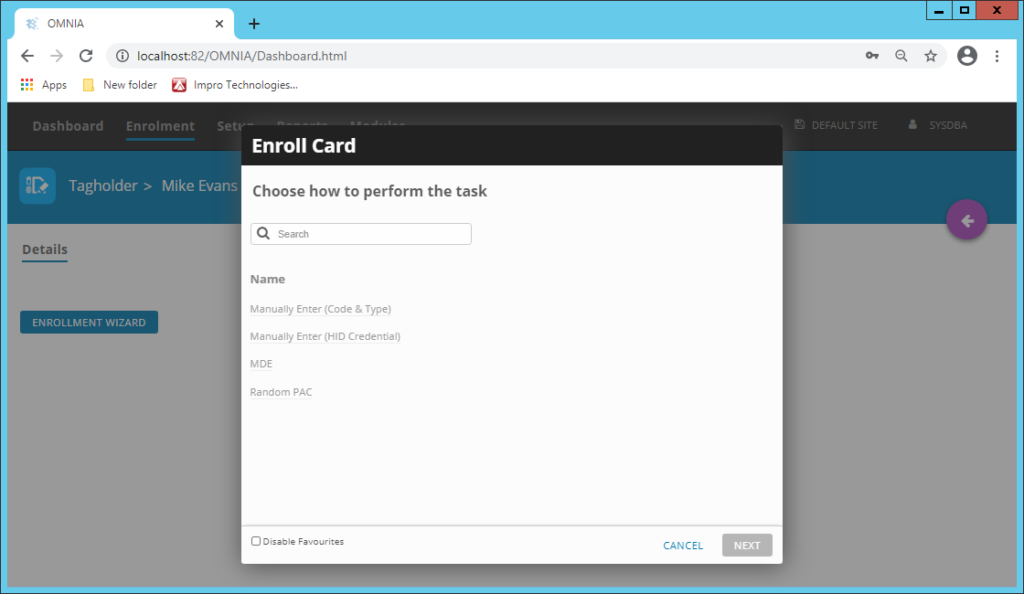
  • Click on Enroll Card
  • Choose Enrollment Option
Adding New Tag 
Select the Tagholder and go to Tags
Click on ADD TAGS
Click on ENROLLMENT WIZARD
Click on Enroll Card
Choose Enrollment Option

Add start and end dates (Optional) Save. 

NOTE: You MUST have a start date to set an expiration date.
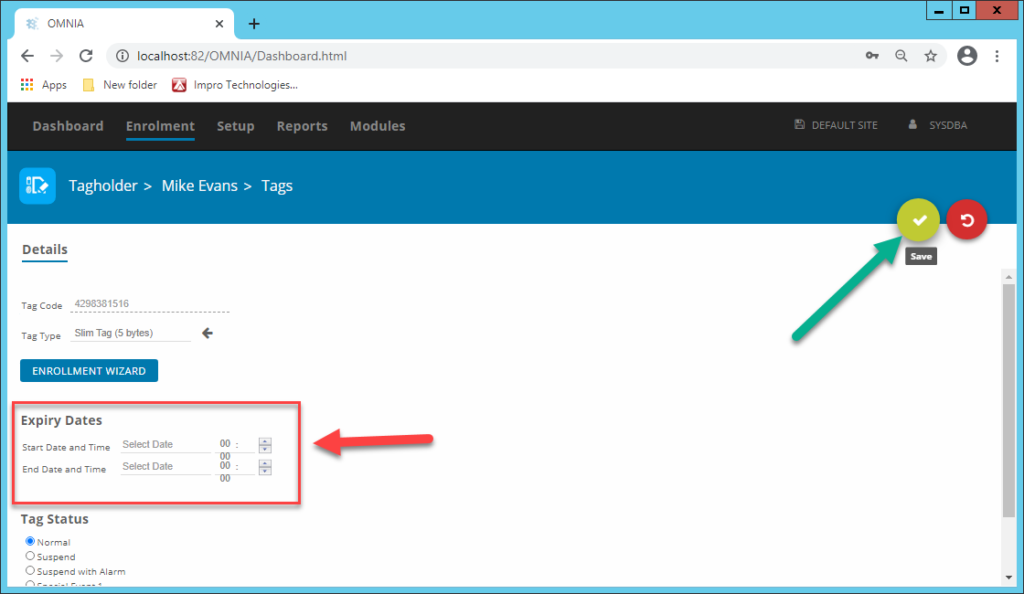
Add Start and End Dates

Assigning Access Groups

Access Groups determine where and when Tagholders have access, select the applicable Access Groups in their Tagholder configuration.

Select the Access groups applicable to the Tagholder.
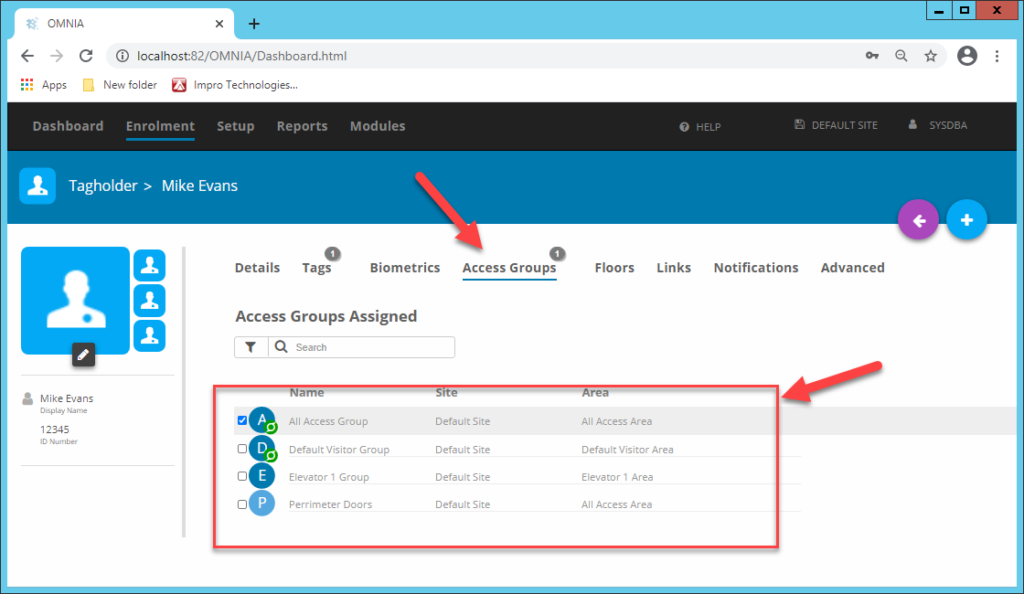
Select OMNIA Access groups applicable to the Tagholder.

Temporary access

To grant temporary access to a specific area, use the area expiry feature. This will disable the selected Access Group according to the end date
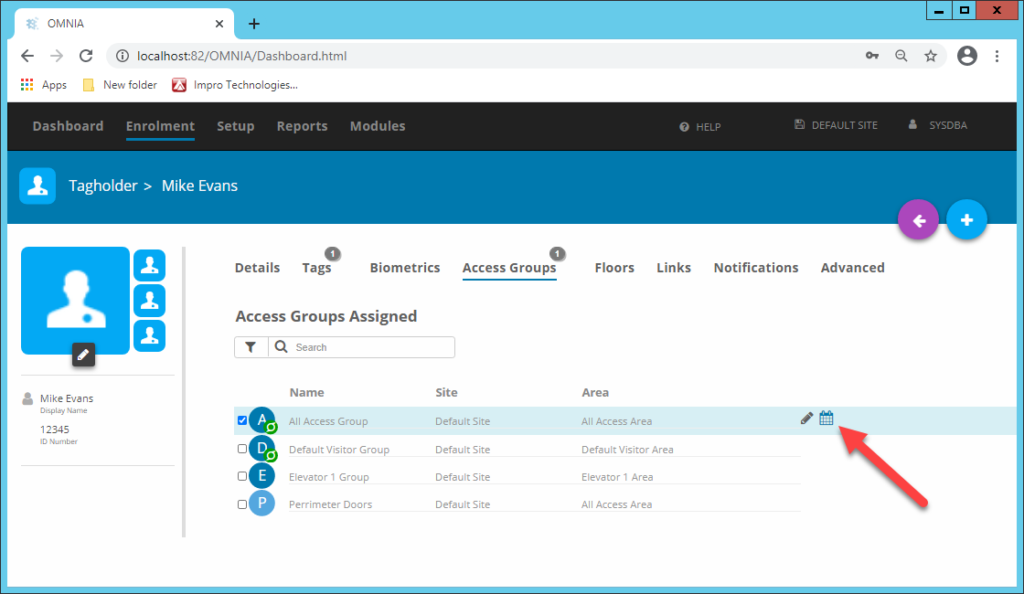
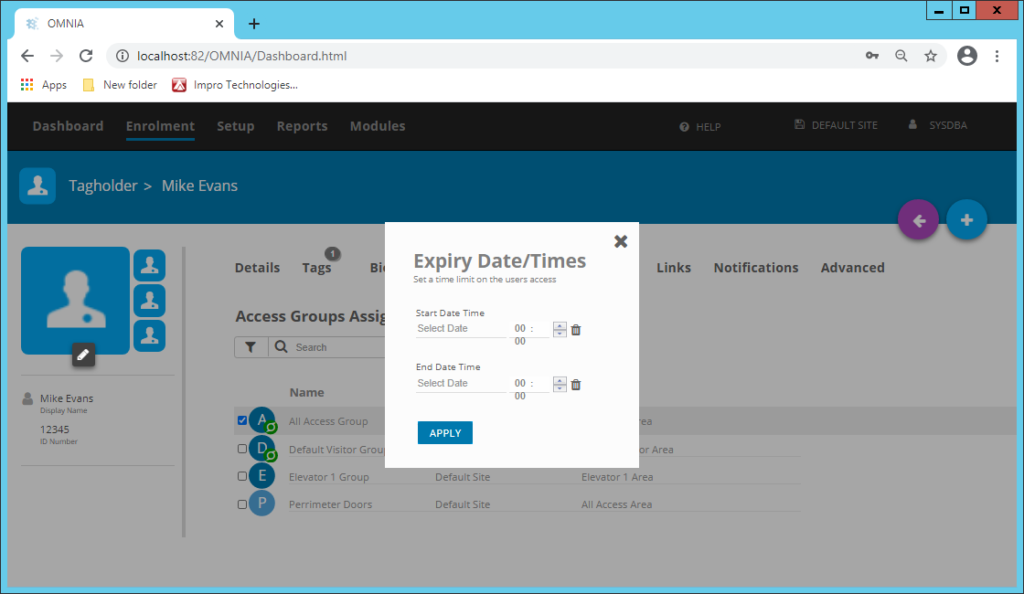
To grant temporary access to a specific area, use the area expiry feature. This will disable the selected Access Group according to the end date.
Fill in Expiry Date/Times

Need further assistance?

Submit a Support Ticket

Submit a Support Ticket

FAQ

General

Can I initiate RS485 comms to a terminal from an existing IP terminal?

How to Select the Right Cable for the job

IDEMIA Sigma Lite Readers NOT compatible for use in AmanoNet or Nexus220

Network Configuration – Best Practices

Technical Bulletins

OMNIA Run as a Service fix for v4.x

Access Control

AmanoNet

AmanoNet Back up using IB Console

AmanoNet Minimum PC Requirements and Specifications

AmanoNet System Migration Notes

Archive Tagholders in AmanoNet

Archive Transactions in AmanoNet

AutoID IP Hardware in AmanoNet

How to move AmanoNet Access Control System from one PC to another (Firebird)

IDEMIA Sigma Lite Readers NOT compatible for use in AmanoNet or Nexus220

ImproNet/AmanoNet Database Backup: SQL

NOTICE! UPGRADE TO AMANONET 7.74 – EC2/400i NO LONGER AVAILABLE

Nexxus220

Change Default Password in Nexus220
Database Migration from Nexus220/IXP220 to OMNIA
How to fix a Java SE Binary Error in Nexus220 Software
How to get a copy of a database from Nexus220 Software
How to move Nexus220 to a different PC
IDEMIA Sigma Lite Readers NOT compatible for use in AmanoNet or Nexus220
Move Nexus220 Access Control System from one PC to another (Firebird)
Nexus220 Firmware Upgrade
Nexus220 Notifications Configuration/Email Configuration
Nexus220 The number of doors for this license has been exceeded
Nexus220 Web Reports Using Microsoft Edge
Reduce length of time on buzzer for readers in Nexus220

Omnia

Adding Widgets to the OMNIA Dashboard

Basic Trouble Shooting OMNIA

Batch Operations OMNIA

Change SYSDBA Password in OMNIA

Configuring Web Session Timeouts in OMINA

Create a Database for OMNIA 4.5 After Running the .iso

Create a Site Lockdown Input for OMNIA

Creating an Input on a Wiegand Reader Module to Generate a Lockdown/Emergency Mode For a Single APC Controller In OMNIA

Creating Operator Profiles

Creating Relay Actions I/O in OMNIA

Omnia Lite

Convert a Nexus Lite Database into OMNIA Lite Database

OMNIA LiTE Backup

PM Tronics Hardware

Amano Readers and Credentials

Change Modulation mode on XQT904 Quad Transmitter
How do I change Wiegand Output Mode on Amano readers?

Legacy Hardware

Factory Reset legacy Amano IP Cameras (sold prior to 2018)

Factory Reset Nexus220 controller

How do I factory reset the EC2 (400i) controller?

Setting IP on PMTronics Inc. Access Control Hardware

Partner Products

Partner Products

IDEMIA Sigma Lite Readers NOT compatible for use in AmanoNet or Nexus220

Setting Read Range on a Conekt Reader

Video Management Systems

Cathexis Video (Amano Vision)

Cathexis Video AV (AntiVirus Exceptions)

AmanoDVMS

Which AmanoDVMS ports need to be open on my firewall?

Vision

AmanoVision web access user name case sensitivity usage

Access Control, OMNIA, Uncategorized Access Control, OMNIA

PMT Security

Copyright © 2025 PMT Security, Inc. | All Rights Reserved