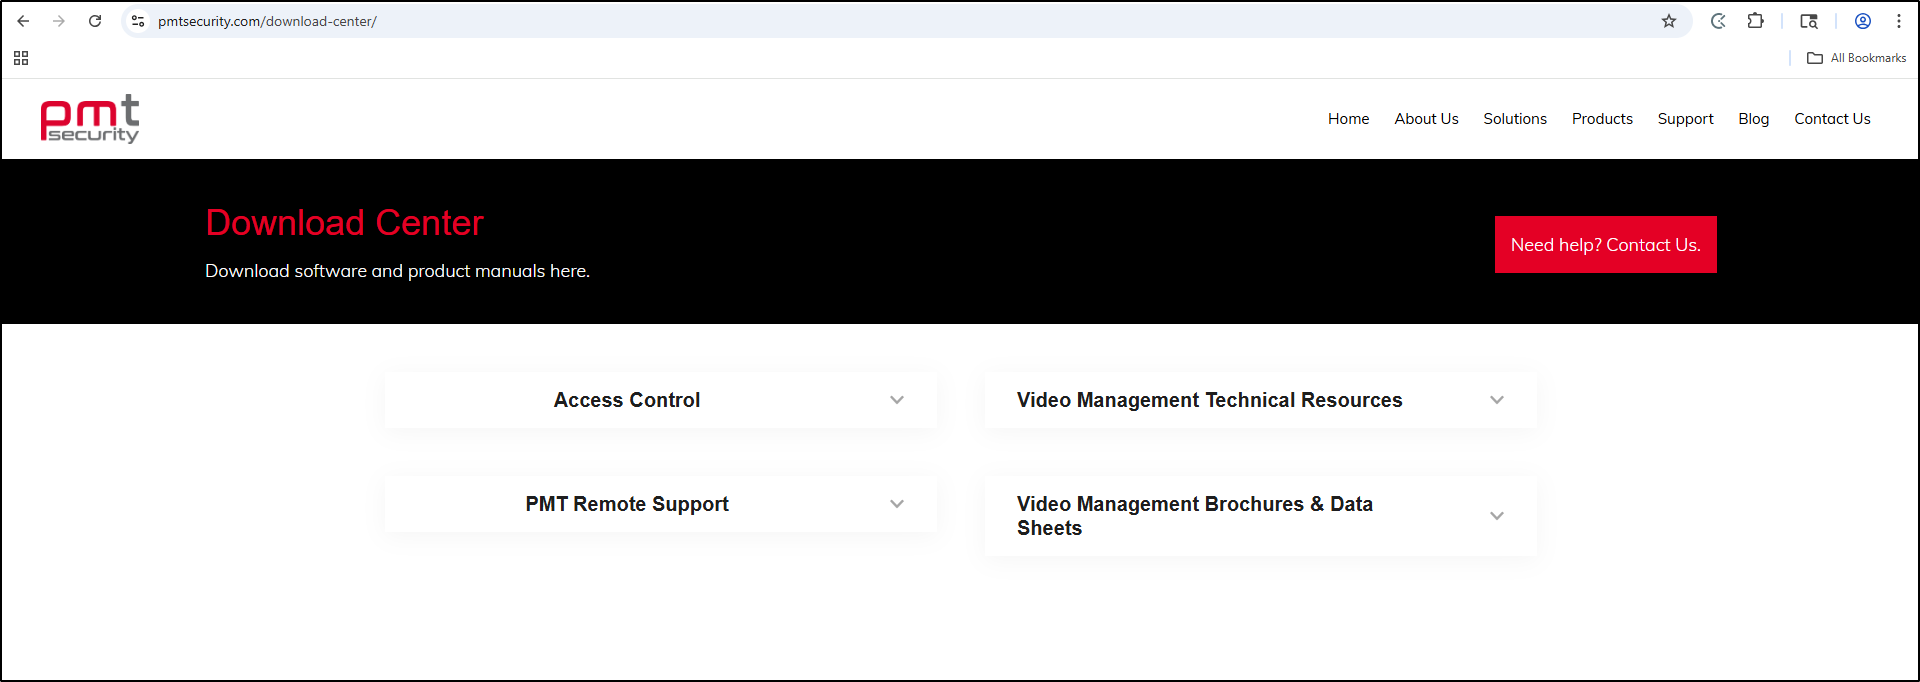
How to upgrade OMNIA and SQL Express
How to upgrade OMNIA and SQL Express to OMNIA 4.6.5 and 2019 SQL Express With Tools
Upgrading OMNIA to 4.65 and SQL to 2019 Express
Pre Installation NOTES:
SQL 2019 Express With Tools is only compatible with some Windows Operating System.
Windows 10, 11, and Windows Server 2016, 2019, and 2022 have been tested.
SQL Server Management Studio 19 (SSMS) does not install with the OMNIA.iso, this will have to be downloaded, installed, and used to Attach OMNIA database into SQL.
OMNIA 4.6.5 is compatible with SQL 2014 Express.
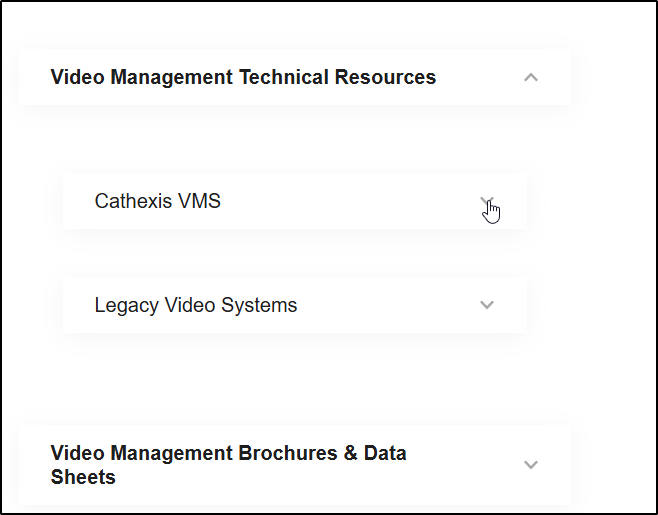
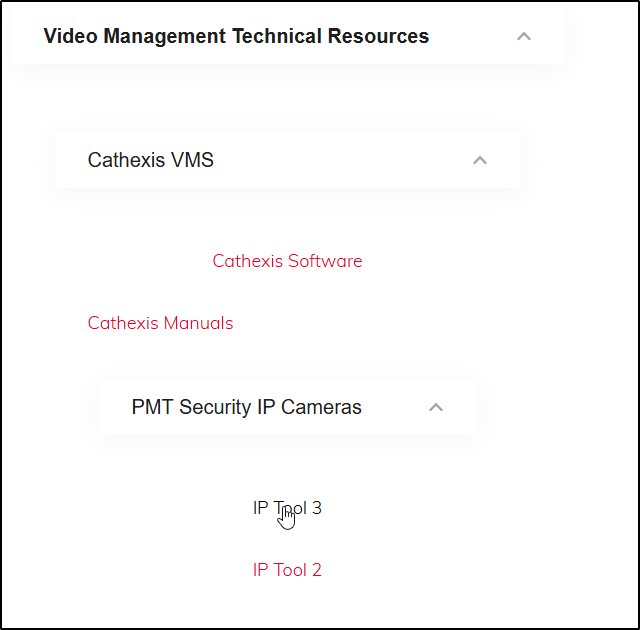
Download OMNIA 4.6.5
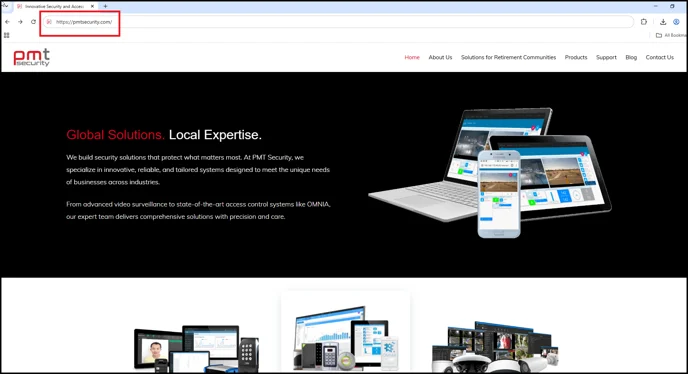
Navigate to PMTSecurity.com and download the software and save for use at a later step.

OMNIA.exe will Install OMNIA 4.6.5 ONLY
OMNIA.iso will Install OMNIA 4.6.5 and SQL2019 Express
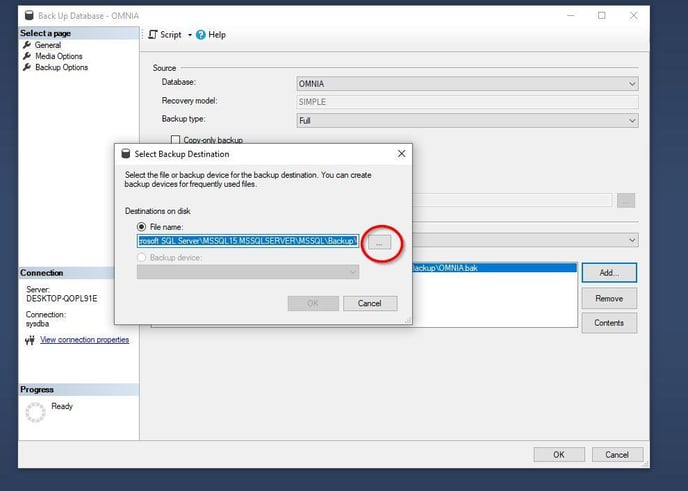
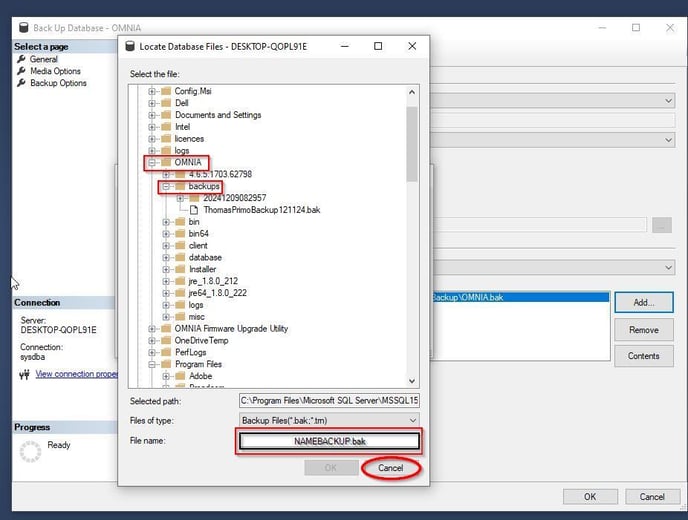
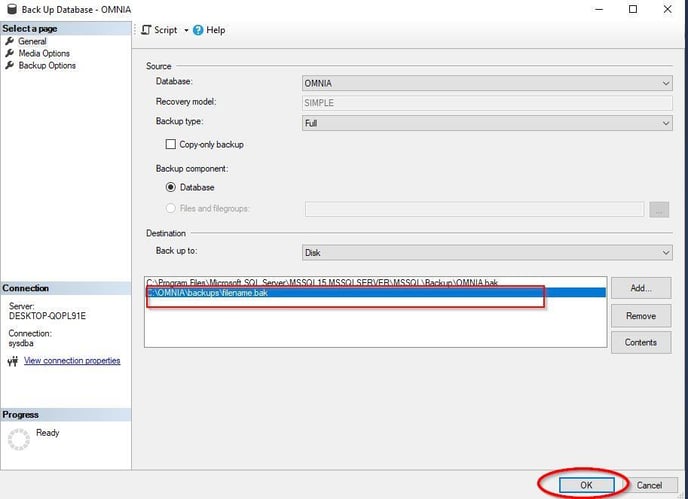
Backup the OMNIA database.
This step is highly recommended. Keep in mind, regular backups should be conducted. A backup kept off the localhost ensures recovery if OMNIA server becomes unrepairable.
See Knowledgebase Article for Backing Up OMNIA Database
https://pmtronics.com/omnia-database-backup
Ensure the current version of OMNIA Server App and/or OMNIA Service is not running.
OMNIA Server App
Exit out of the OMNIA Server App.
Right Click the OMNIA Server App Icon in the “Show Hidden Icons” from the taskbar and select EXIT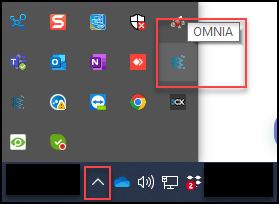

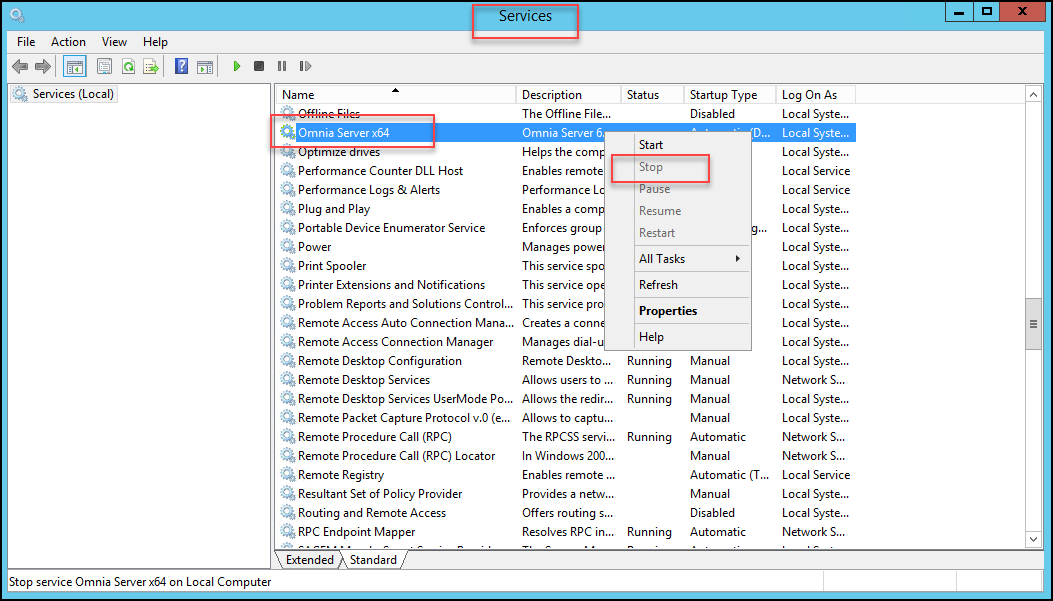
If OMNIA is running as a Service, Open Services and Stop the Service.
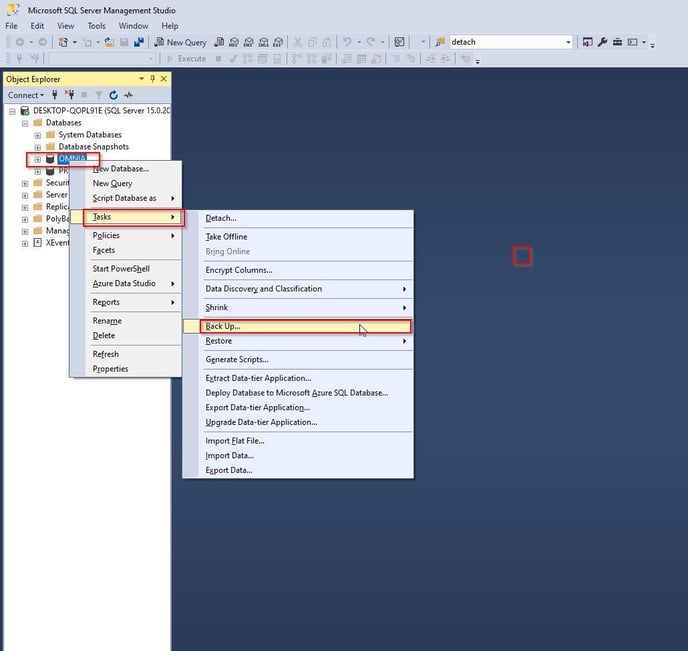
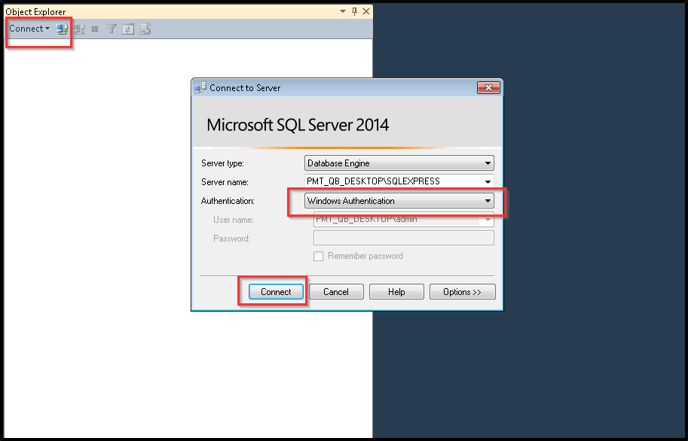
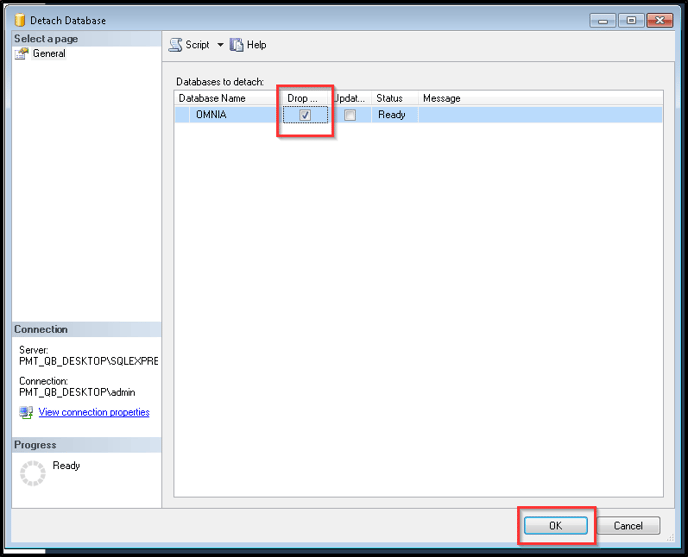
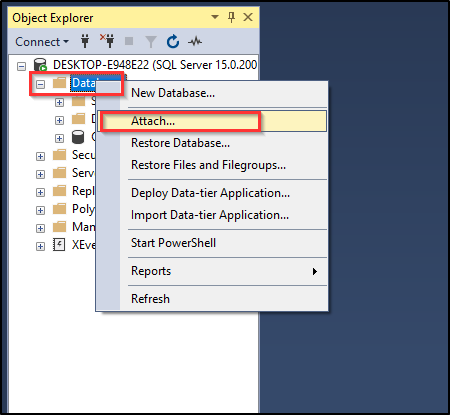
Detach the Database from SQL using the Sql Server Management Studio (SSMS)
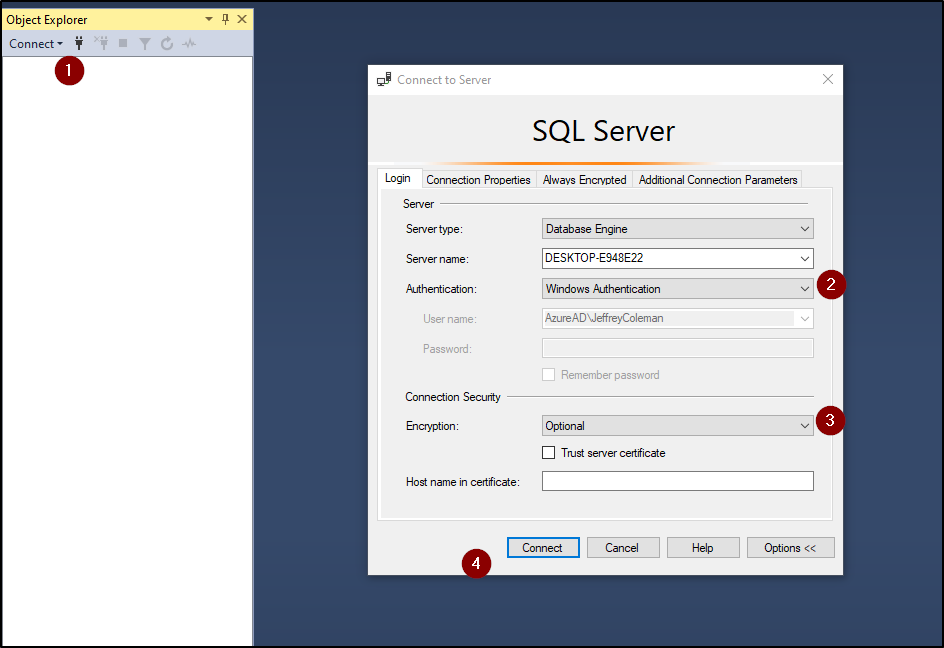
Open SQL Server Management Studio (SSMS)

Connect Using “Windows Authentication”
Expand the Database tree, Select OMNIA and Right Click, Select Tasks then Select Detach.
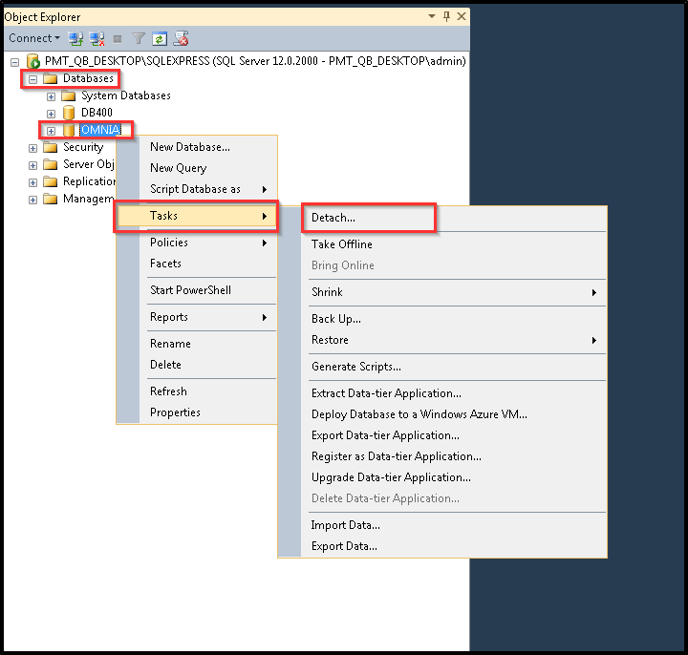
Select Drop and then Select OK
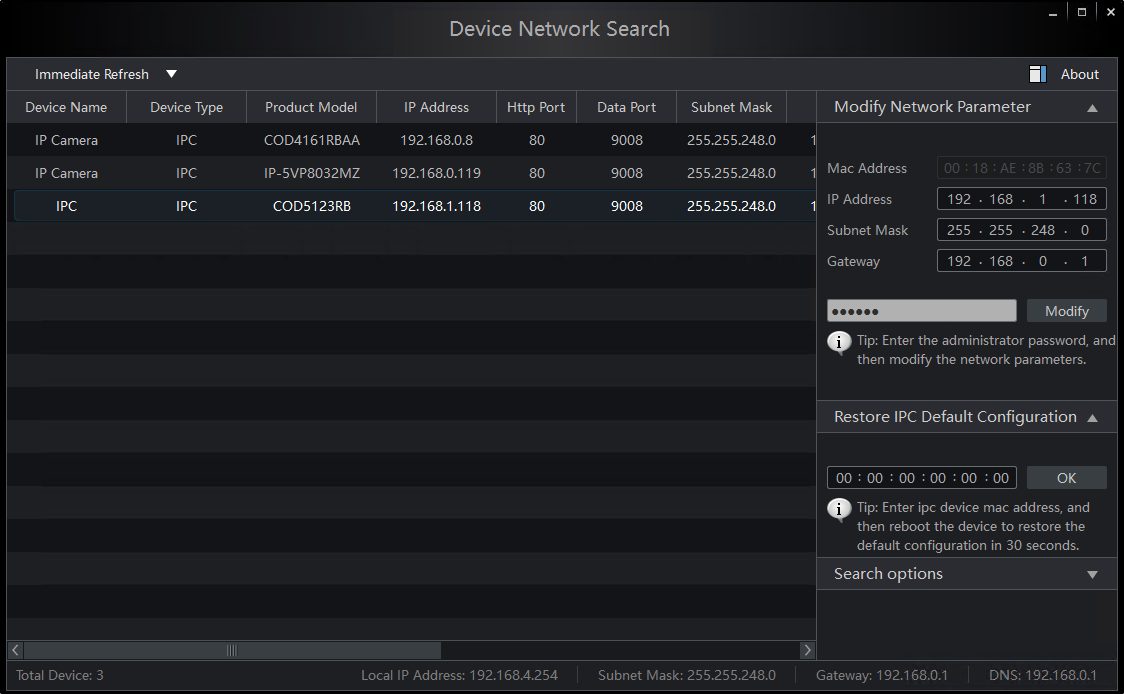
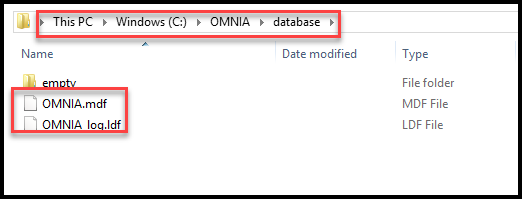
Create a Copy of the OMNIA Database and the OMNIA Database log file. Save for use in a following step
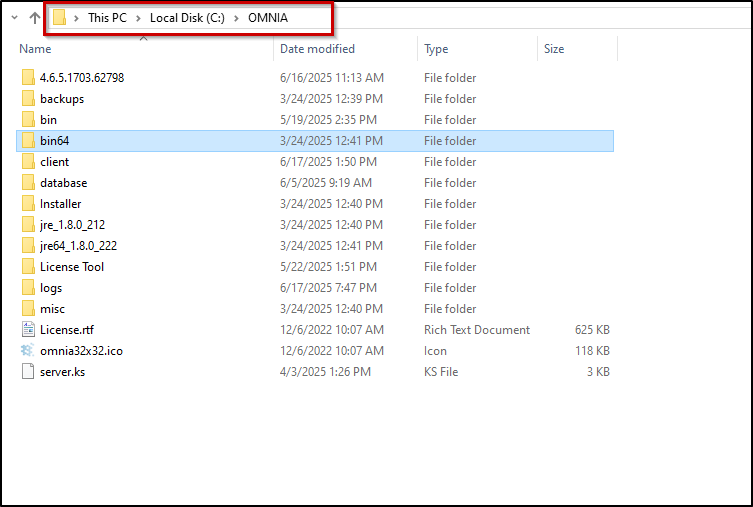
Navigate to C:\OMNIA\Database\
Select and Copy BOTH the OMNIA.mdf and OMNIA_log.ldf files. Save files where they can be accessed again.
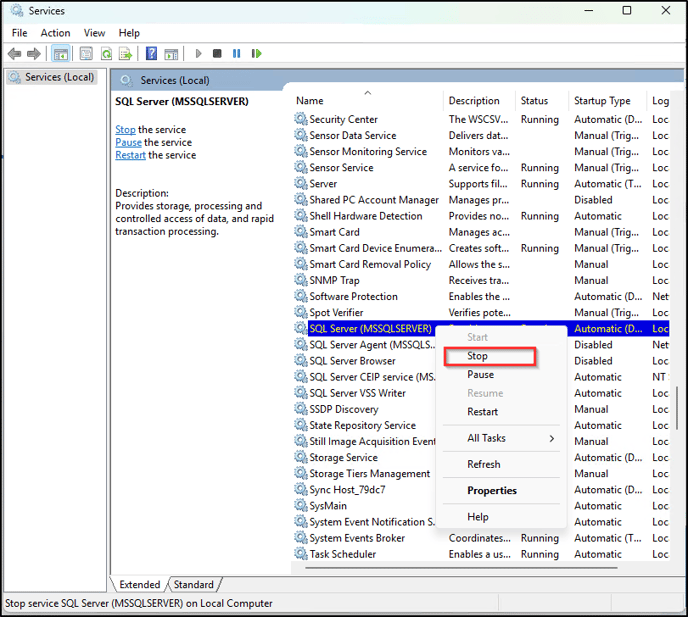
Stop the current SQL service
Open the Services, Search for SQL Server, Right Click and Select Stop
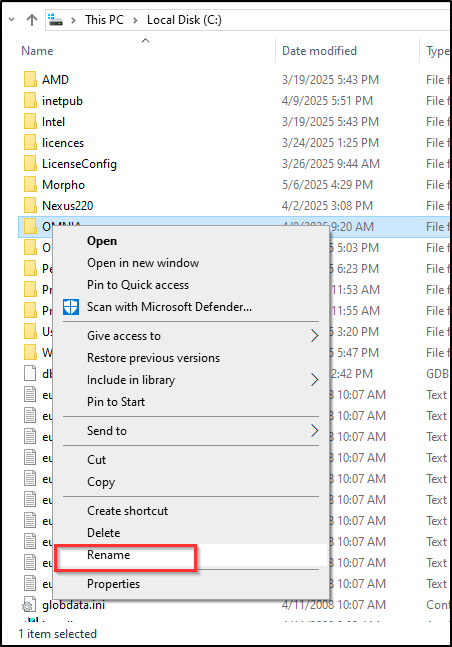
Rename the current OMNIA folder.
We recommend this step as a precaution, keeping the previous OMNIA version folder ensures the ability to roll back to the previous version in case of upgrade failure. Renaming the OMNIA folder will provided a clean path of installation for the new software version. The OMNIA installation will create a new OMNIA folder.
Navigate to C:\OMNIA, highlight the OMNIA folder, right click and select rename.
Name the folder something else. ex. OMNIA4_5
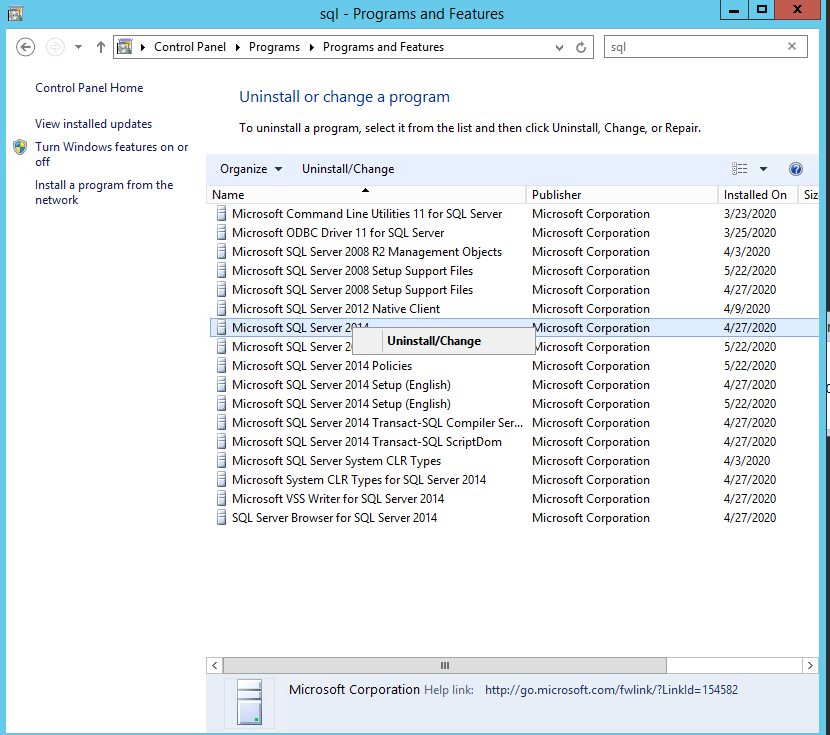
Uninstall the older version SQL Server Management Studio as well.
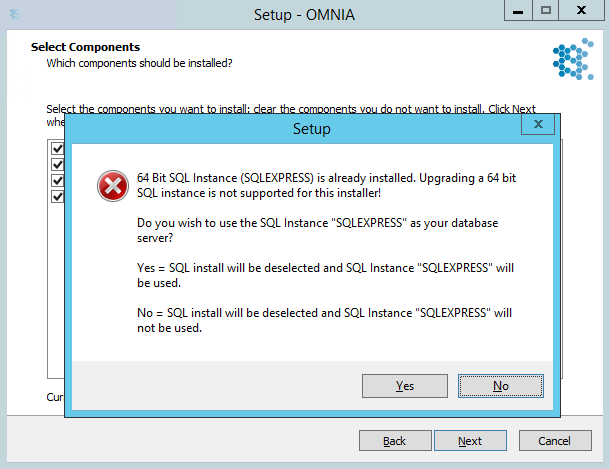
If the existing site has SQL 2014 configured, the uninstallation of SQL 2014 is required before installing 2019. The OMNIA installation does not upgrade SQL 2014 to SQL 2019 automatically and the SQL 2019 Installation will not occur.
Begin the OMNIA 4.6.5 Installation
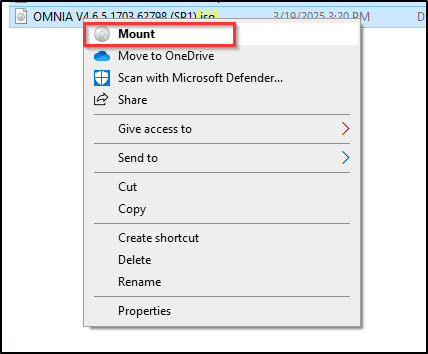
Mount the OMNIA 4.6.5 .ISO
Right Click OMNIA.exe and run as AdministratorUsing the new OMNIA installer, follow the prompts to complete installation.
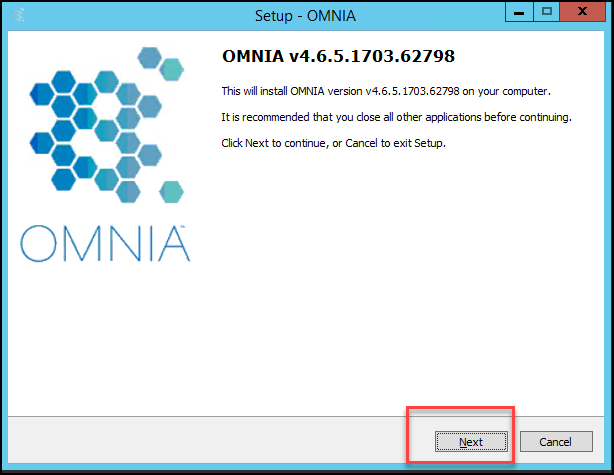
Accept the Agreement and Select Next

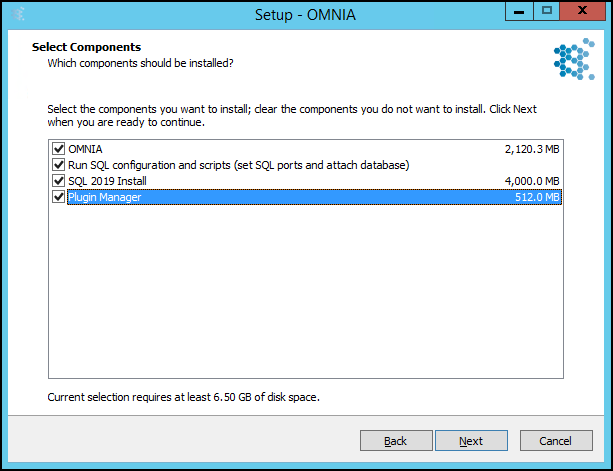
Select what options you want installed.
In this example we are installing OMNIA, the OMNIA Plugin Mgr, and SQL 2019 Express with tools. We will be also running the SQL Configuration and Scripts.
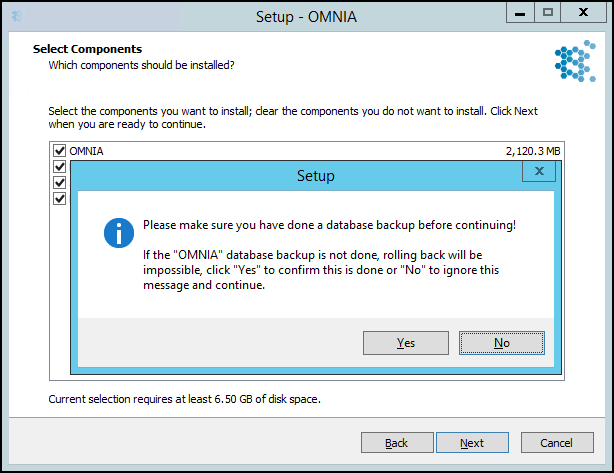
Confirm a Database backup has been made, or a copy of the database has been made.
If you receive the message below, you have not completely uninstalled the previous version of
SQL express completely. Select Yes and Next
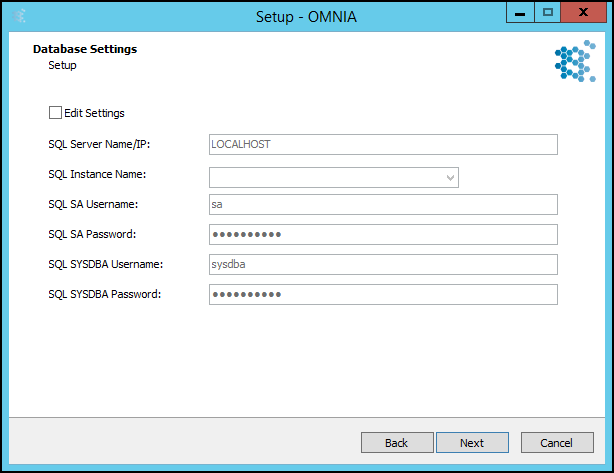
Leave this page blank unless the basic OMNIA information has been changed/updated.
Select Next
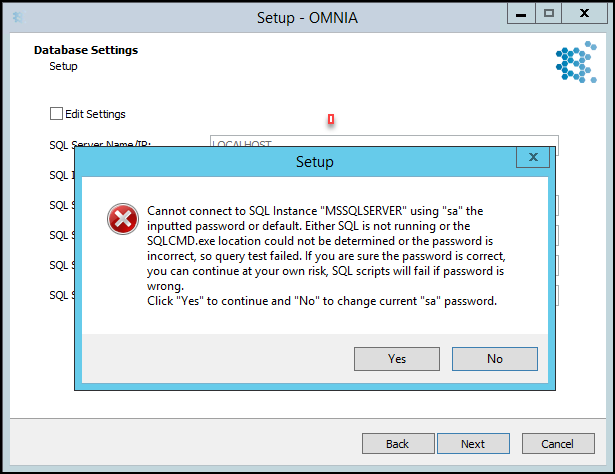
The below error is common and does not cause concern. SQL has not been installed yet so it cannot connect to the SQL Instance, Select Yes, then Next
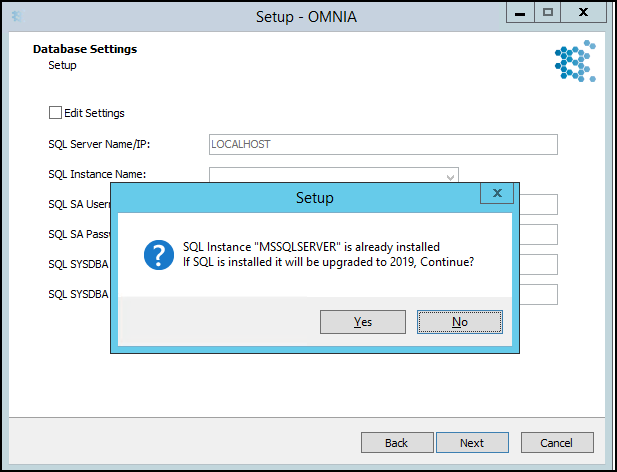
This is a false indicator, this installer will not upgrade SQL 2014 to SQL 2019. Select Yes
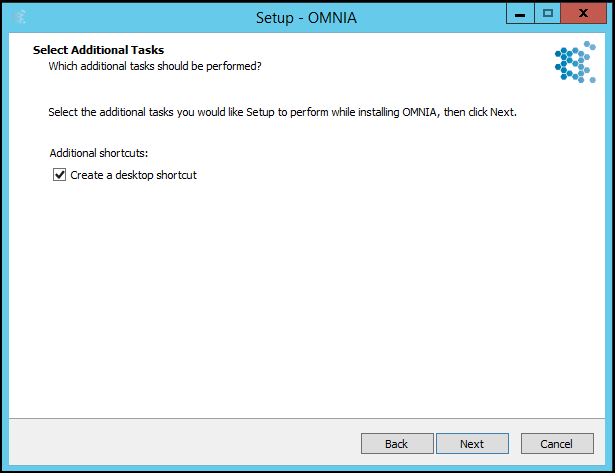
Select if you would like a short cut for the OMNIA Server App to be placed on the desktop,
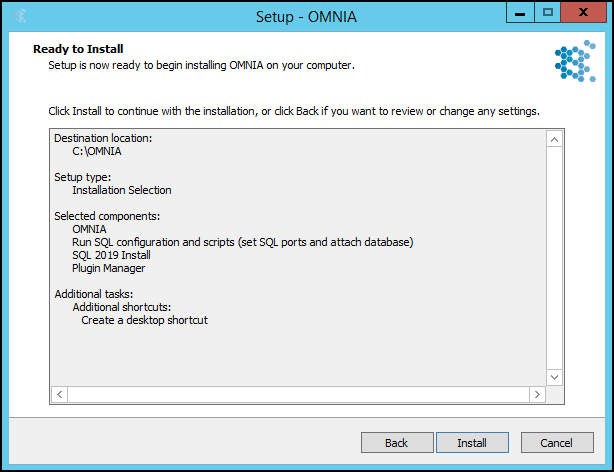
Select Install
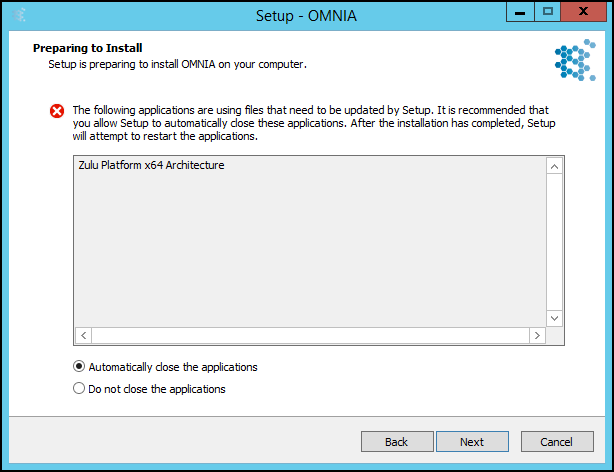
The installation process may find programs that need to be restarted, Select Automatically close the applications then select Next
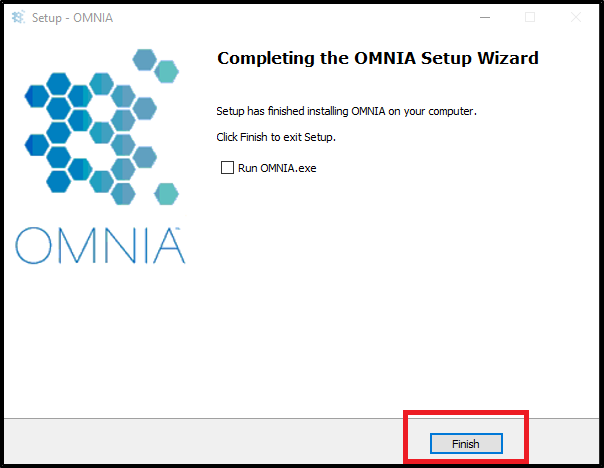
The Installation Wizard will complete.
NOTE:
Do not start OMNIA now, You will need to place the OMNIA Database and Log File into the new OMNIA installation database folder before starting OMNIA.
In the C: drive you will see two OMNIA folders.

Navigate to C:\OMNIA\Database and Place the copy of the OMNIA.mdf and OMNIA_log.ldf files there.
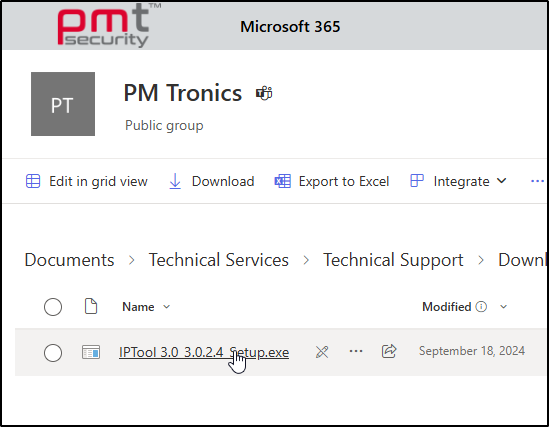
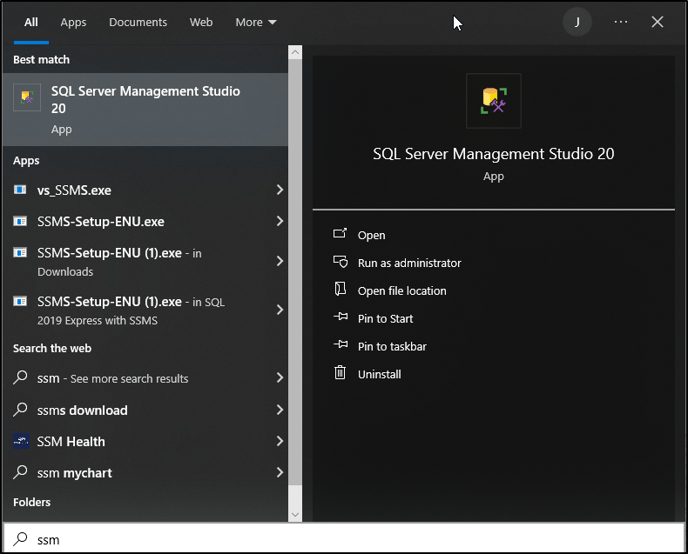
Download and install the latest version of the SQL Server Management Studio App.
Download from Microsoft.com and run the Installer as Administrator
Open the SQL Server Management Studio App
Open the SQL Server Management Studio App
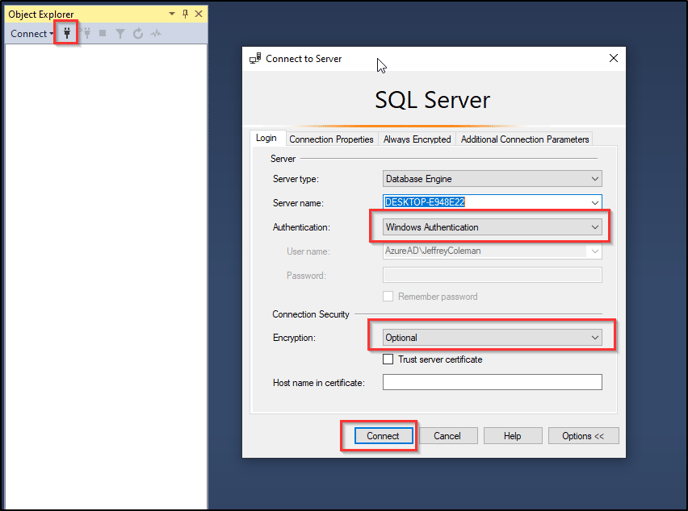
Log into SSMS with “Windows Authentication” with the Encryption set to “Optional”
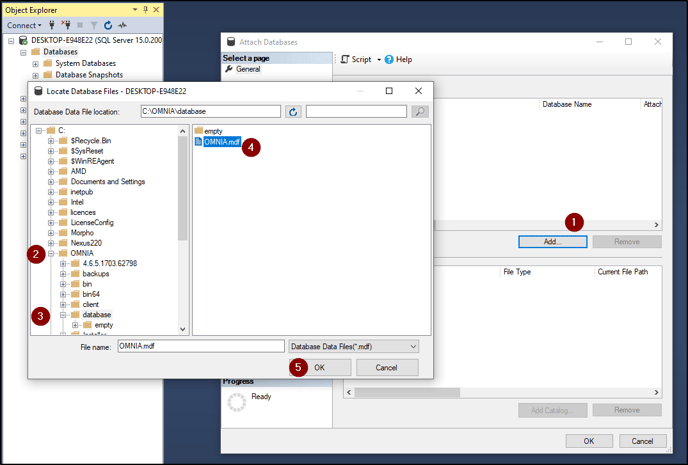
Highlight Databases, Right Click and Select Attach
In the Attach Database Window
- Select Add and a Locate Database Files window opens,
- in the Locate Database Files window, Use the tree to Navigate to OMNIA, click the (+) to Expand OMNIA
- Select database
- Select the OMINA.mdf file
- Select OK
In the next window, in the Database to Attach field, scroll right to display the “Owner” Column. Use the dropdown to select sysdba as the owner.
- In the Attach Database window and in the Databases to attach window, Scroll right
- Find the Owner Column
- Use the dropdown to select sysdba as the owner
- In the OMNIA database details, Scroll right to the Current File Path
- Verify location of database and log file is correct.
- Select OK

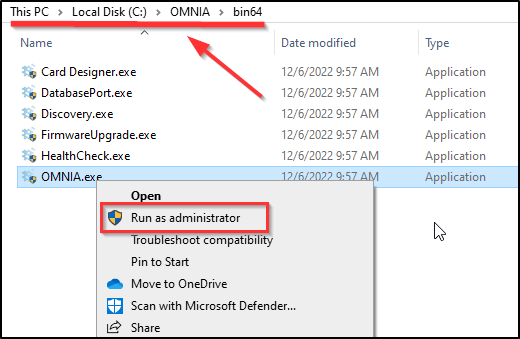
Start OMNIA Server App.
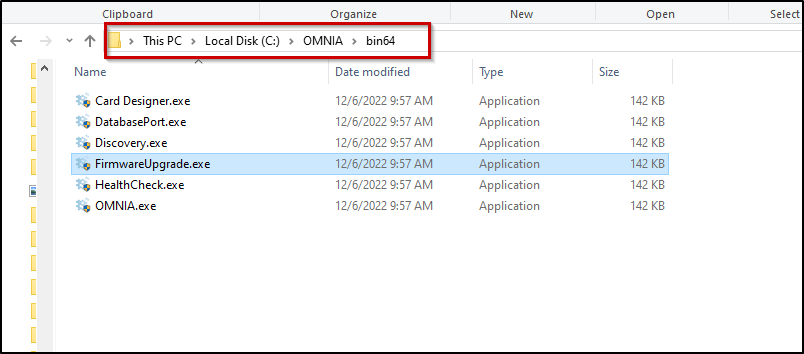
Navigate to C:\OMNIA\Bin64.
Run OMNIA.exe as Admin
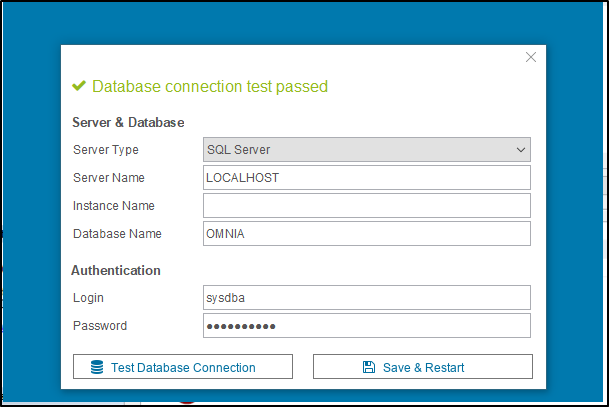
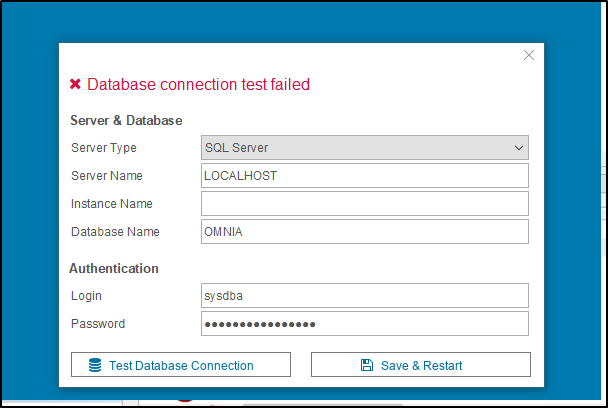
If you get Database connection test failed.
Replace the sysdba password with masterkey and select Test Database Connection
The End Result will be as below,
Select Save and Restart.
OMNIA is now Upgraded