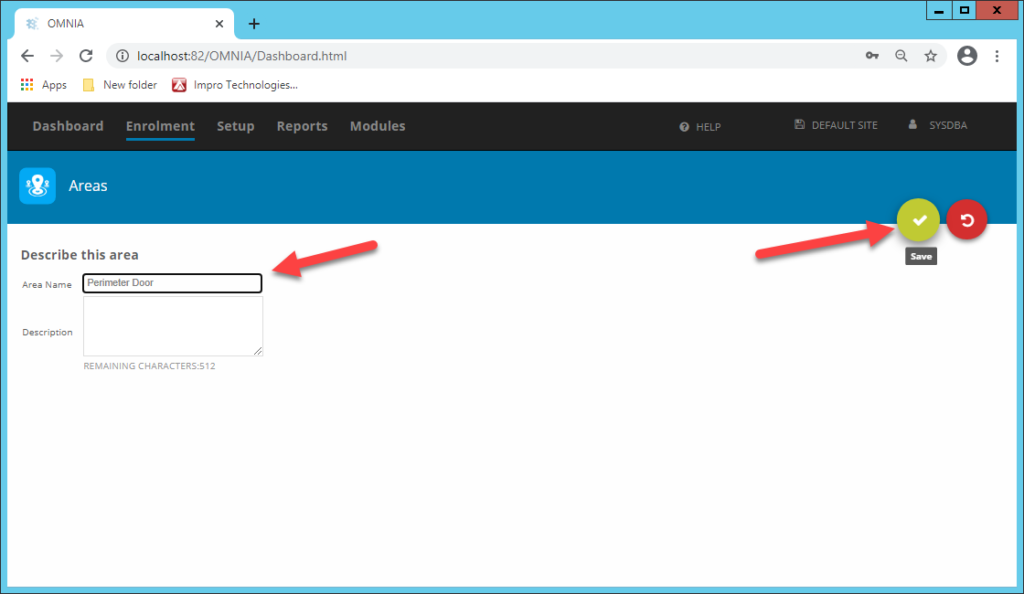
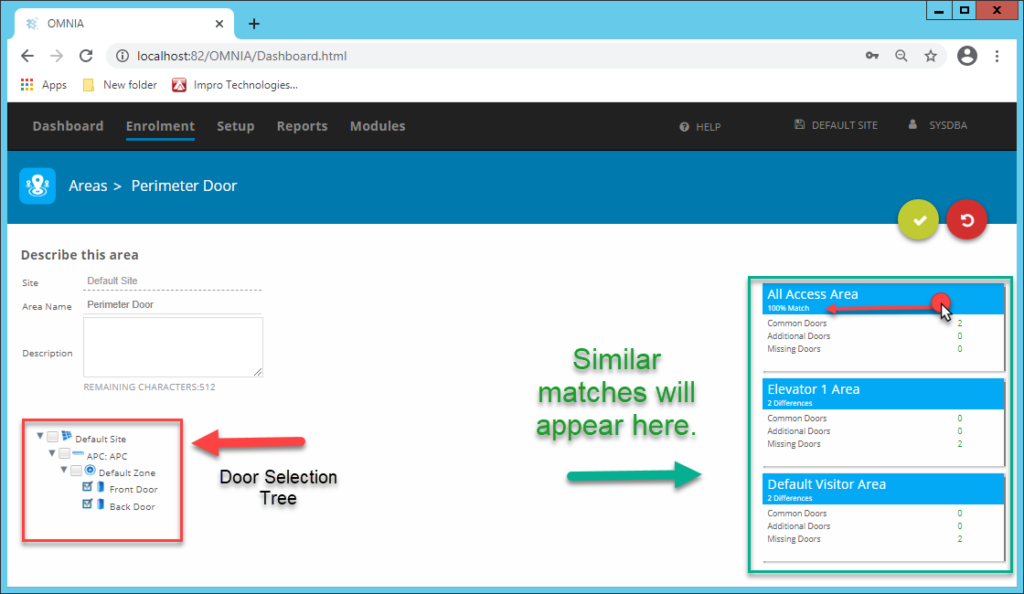
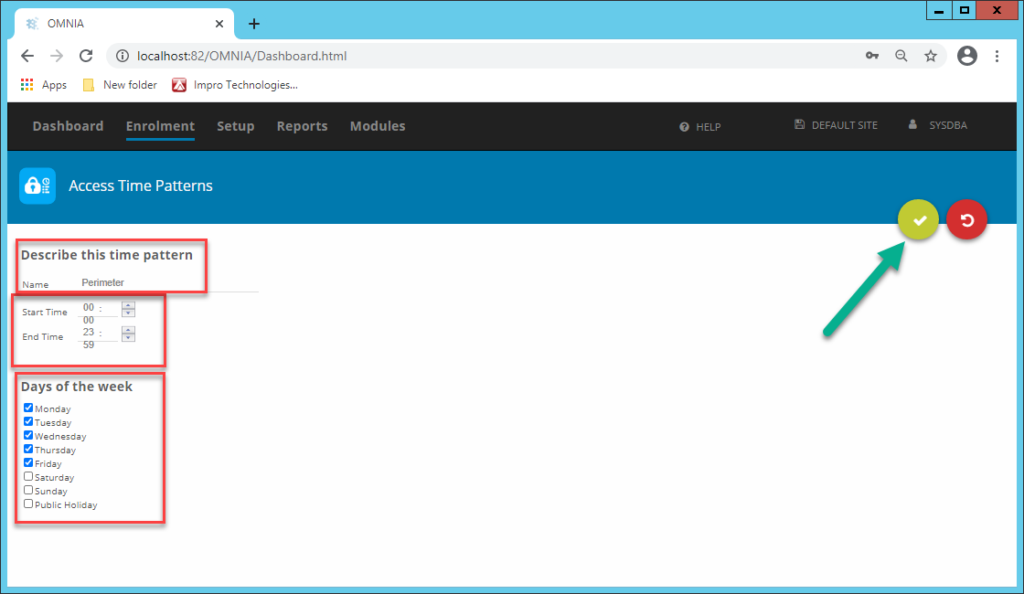
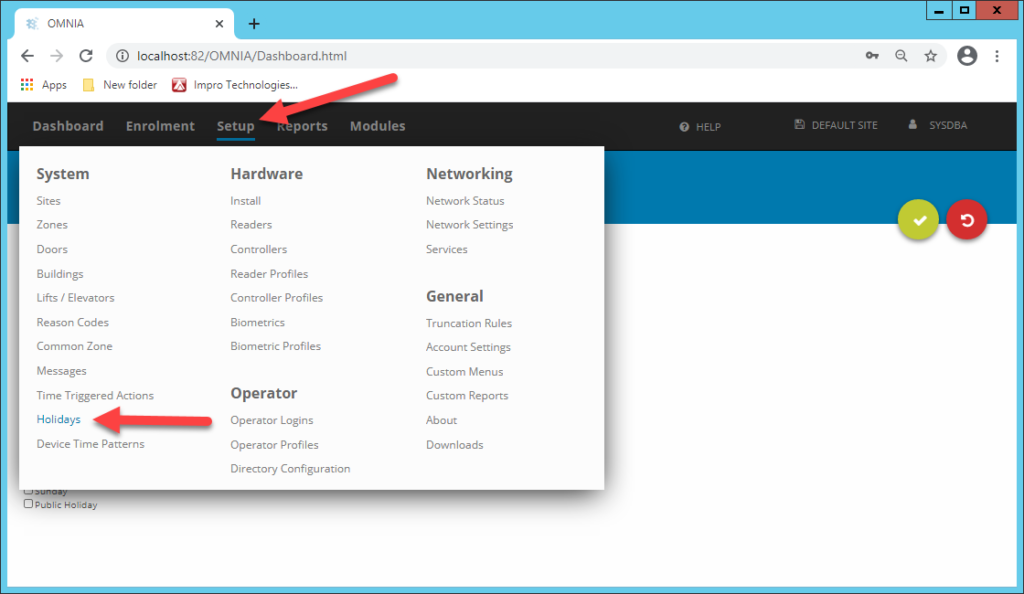
Setting the IP address of a PMT Security Device by Directly Connecting To It with a Laptop.
Setting an IP Address of a controller that is not found on the Network
Sometimes it is not possible to find the default address of the controller across a sites network. In that case it is recommended to use a laptop and ethernet cable to set the desired IP address.
You will need the Discovery Tool on the Laptop, The Discovery Tool is not a Stand Alone Tool and can only be found in the OMNIA Folder after OMNIA is Installed on the Laptop.
If OMNIA is not installed on the laptop, go to PMTSecurity.com, download and install OMNIA.exe, After installation the Laptop will have an OMNIA folder found under C:
- Direct Connection
Connect the controller directly to a laptop or PC using an Ethernet cable.
- Restore Factory Settings
Once connected, reset the controller to its factory default settings. * Change Dip switch one to ON and power cycle the device. * Leave Dip switch one ON for at least 45 seconds, then change dip switch one to OFF.
- Default IP Address
After resetting, the controller will revert to its default IP address:
192.168.100.1
Putting Laptop NIC in IP range of Default controller IP
In your search bar. Type View Network Connections. Select the icon shown below.
Rick click on the Ethernet Network Card you are using and select Properties.
Double Click the Internet Protocol Version 4(TCP/IPv4).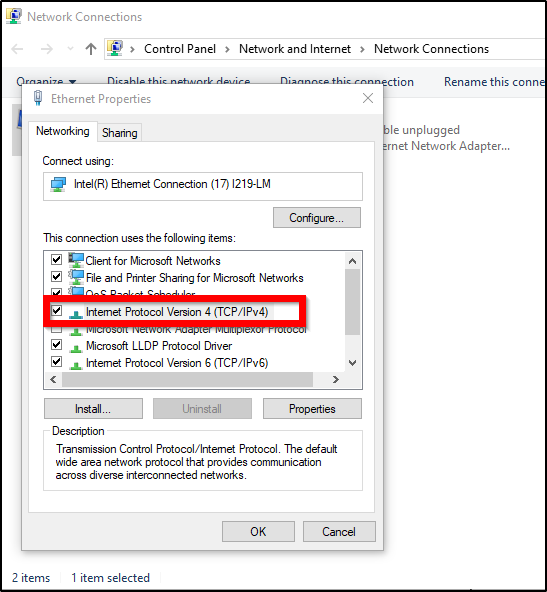
If PC has Obtain an IP address automatically
- Select Use the FollowingIP address.
- Set IP address to fall into the PMT Security’s default IP address range.
* Do not use 192.168.100.x, DO NOT USE .1 - Set the Subnet Mask to 255.255.255.0
- Set the Default Gateway to 192.168.100.1
* This will not interfere with communication to the device. - Set the Preferred DNS server address to anything.
* 8.8.8.8 and 8.8.4.4 are Googles DNS server addresses. - Select OK, This properties window will Close, Select OK to close Ethernet PropertiesWindow. Select Close on Ethernet Status Window.

You can verify your changes by using the Command Prompt and typing ipconfig and pressing enter. This will display current IP configuration settings.
If PC already has Use the Following IP address Selected
Select Advanced…
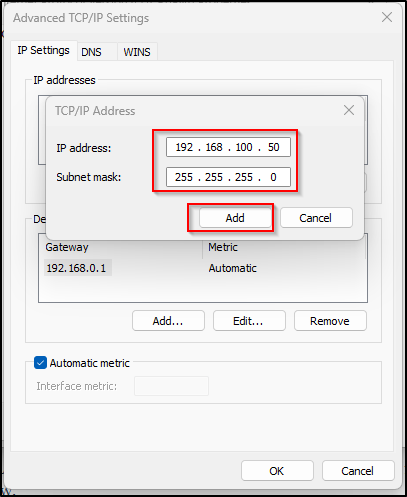
- Under the IP addresses Window, Select Add…a TCP/IP address window will open.
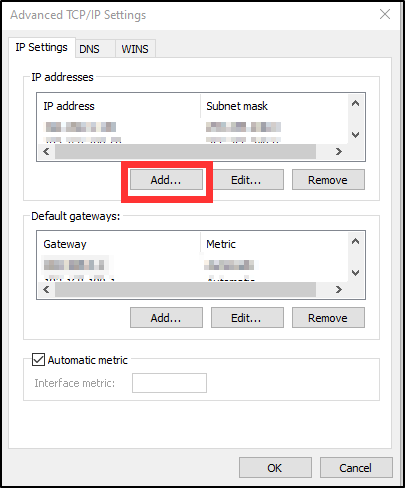
- Set the IP Address to 192.168.100.x
* Do Not Use .1 - Set the Subnet Mask to 255.255.255.0
- Select Add to close TCP/IP window, address added will be seen in the IP addresses window.
- Select Add… under Default Gateways:
* A TCP/IP Gateway Address window will open. - Set the Gateway to 192.168.100.1
* This will not interfere with communication to the device. - Select Add to close the TCP/IP Gateway Address window, gateway will be seen in the window.

7. Select OK, The properties window will Close, Select OK to close Ethernet Properties Window. Select Close on Ethernet Status Window.
You can verify your changes by using the Command Prompt and typing ipconfig /all and pressing enter. This will display current IP configuration settings.
Open the Discovery Tool. C: > OMNIA > bin64

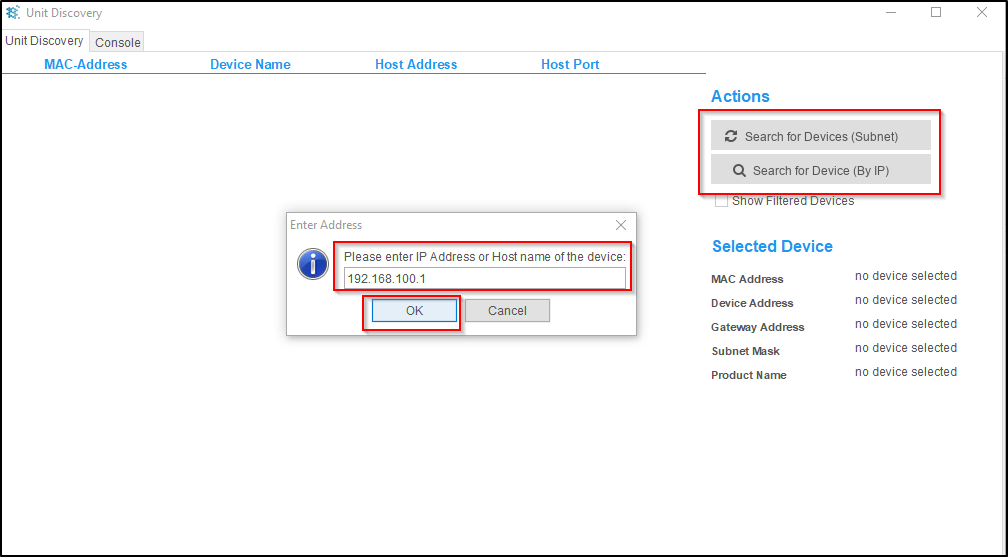
When the Discovery Tool opens:
Select the Search for Devices (Subnet) or Search forDevice (By IP). Searching by Subnet will search automatically. When selecting Search for Device (By IP) enter the default IP address of the device.192.168.100.1 and Select OK
Once Found the device will appear in the Discovery Tool.
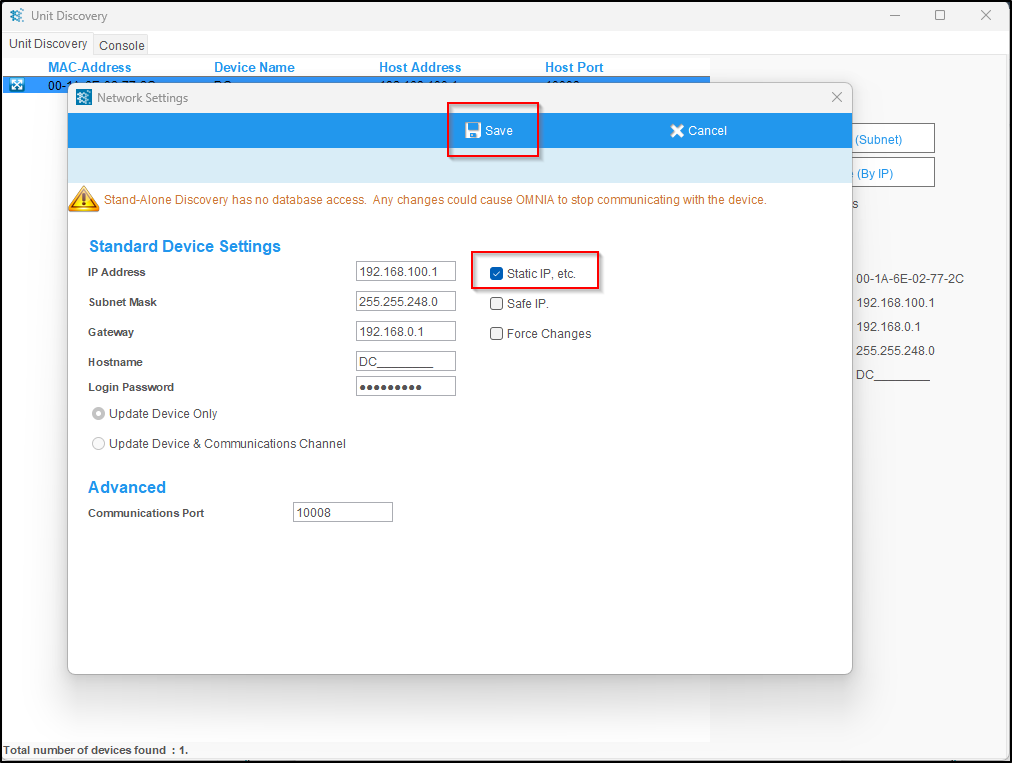
Double Click the Device to open the Network Settings Window.

Select Static IP, etc. Change the IP Address, Subnet Mask, and Gateway to the desired configuration. The password will be masterkey.
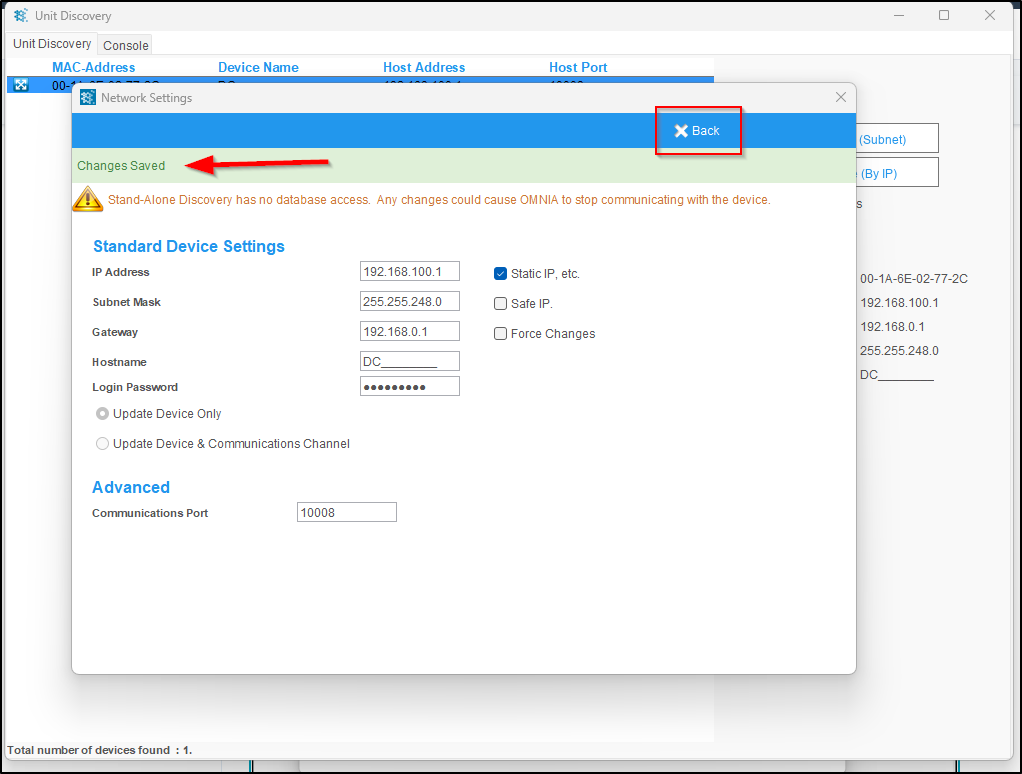
Select Save. You will see a changes saved message. Select Back to close this window.
NOTE:
- It is very important to enter the correct information here, an incorrect subnet mask and or gateway will cause communication issues once this device is put on the site’s network.
- Do NOT Select Safe IP, Safe IP will configure the device to only communicate with the device being used to set the IP address.
You have now Manually Configured the Device’s IP Address, Subnet Mask, and Gateway.
You can now place this device on the Site’s Network and Install into the Software.
Need further assistance?