• Skip to primary navigation
  • Skip to main content
PMT Security Logo

PMT Security

Advanced Access Control

  • Home
  • About Us
    • Our Partners
    • Our Integrators
  • Solutions
    • Residential
    • Government Facilities
    • Education
    • Retirement
    • Manufacturing
    • Retail Businesses
    • Campgrounds & Outdoor Resorts
  • Products
    • Access Control
      • Control Features
      • Reporting & Monitoring
      • Control Module
      • Digital IO Module
      • Reader Module
      • Readers
    • Video Management
      • Analytics
      • Security Cameras
    • Visitor Management
  • Support
    • Knowledgebase
    • Download Center
    • License Request
    • RMA Request Form
  • Blog
  • Contact Us

Email Notifications In OMNIA

Email Notifications In OMNIA

In order for Email Notifications to work in OMNIA,  The Integration Server must be downloaded and Installed.

After Integration Server installation Actions and Rules will need to be configured for Email Notifications.

In the OMNIA URL, go to Setup/downloads/Addons 

The addons installer will download.

Launch the Client Install

Accept the Agreement

Select which Options you want to install, click Next

This will place an Addons Folder in the root of OMNIA

Inside the Addon Folder there will be a Bin Folder

Launch the Integration Server

Integration Server

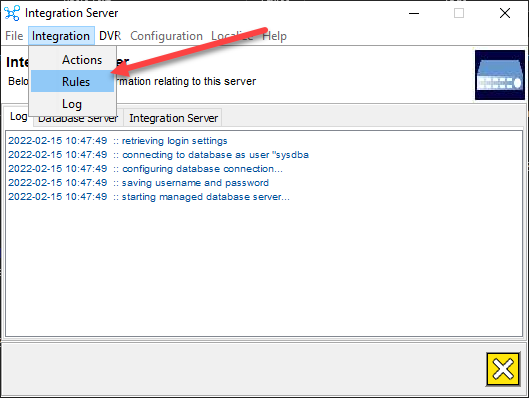
To Create Actions and Rules,  Click on Integration, Select Either Actions or Rules
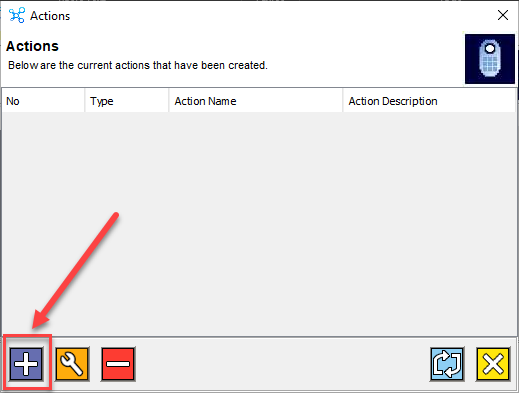
Creating Actions

Select Integration, from the drop down select Actions

Click on the Plus to add an Action

The Action Wizard Launches

Give the Action a Name, Give a Description if needed.

From the Action Type Drop Down Select Email

After Selecting Email, you will see areas that need the Email Server Information

After entering the Email Server Information, Click the Next Arrow

Enter a Valid Email address in the To: 

You can Enter any Value you would like in the from.

In this example we are using a Mailgun Email Server but chose to use OMNIA@OMNIA.com for the From email address

Right Click inside the box below the subject line to select what details will be included in the email.

For This example, Event Name, First Name, Last Name, and Time were selected for details in the Email Notification

Click Next

A summary of the Action created displays

Click the Next button

An Action is now created and will display. If this is your first action created the number will be 1, for this example this was the 9th Action Created.

Click the X to close the Actions Window

Creating a Rule

On the Integration Server, Select Integration, from the drop down select Rules

Select the Plus Button to create a New Rule

The Rule Wizard will Launch, Click Next

Give the Rule a Name, Give the Rule a Description if needed.

Always Select IXP400 as the Rule Type

In this example , we are setting up a rule to Email when a tagholder uses a specific Door

For this example , we selected Events, Tags, Terminals, and Tagholders.

Click Next

The Events Page Displays

We will now need to choose the Event for the Rule

Scroll to Find the Event, Highlight it, 

Click Next

The Tags Page Displays

We will now need to choose which tag for the rule

Scroll to find the Correct Tagholders Tag. 

Click Next

The Tagholders Page Displays

We will need to choose the Correct Tagholders Name

Click Next

The Terminal Page Displays

We will need to select the Terminal for the Rule

Click Next

The Active Time Page will Display

This will allow you to choose, if needed, an Active Time Period for the Rule to be Enforced

By Default the Active Time is 24/7 and Holidays.

Click Next

You may Edit the Active Time Period by clicking on the Wrench

You may Edit the Active Time, 

When Finished Editing the Active Time, click the Green Check Box

The Action Selection Page will Display

You will choose the Action you want to take place for this rule. In this example we have only created One Action.

Select the Action, Press the Arrow Left Button to move the Action to the Selected Actions

Click Next

You will get a notification of Completed, and will be able to scroll in the message listing the details of the Rule and Action Associated with the Rule

Click Next to Finish

A Rules page Displays

Click the X to Finish

Click on the Integration Server Tab to view the current rules and actions taking place

Need further assistance?

Submit a Support Ticket

Submit a Support Ticket

FAQ

General

Can I initiate RS485 comms to a terminal from an existing IP terminal?

How to Select the Right Cable for the job

IDEMIA Sigma Lite Readers NOT compatible for use in AmanoNet or Nexus220

Network Configuration – Best Practices

Technical Bulletins

OMNIA Run as a Service fix for v4.x

Access Control

AmanoNet

AmanoNet Back up using IB Console

AmanoNet Minimum PC Requirements and Specifications

AmanoNet System Migration Notes

Archive Tagholders in AmanoNet

Archive Transactions in AmanoNet

AutoID IP Hardware in AmanoNet

How to move AmanoNet Access Control System from one PC to another (Firebird)

IDEMIA Sigma Lite Readers NOT compatible for use in AmanoNet or Nexus220

ImproNet/AmanoNet Database Backup: SQL

NOTICE! UPGRADE TO AMANONET 7.74 – EC2/400i NO LONGER AVAILABLE

Nexxus220

Change Default Password in Nexus220
Database Migration from Nexus220/IXP220 to OMNIA
How to fix a Java SE Binary Error in Nexus220 Software
How to get a copy of a database from Nexus220 Software
How to move Nexus220 to a different PC
IDEMIA Sigma Lite Readers NOT compatible for use in AmanoNet or Nexus220
Move Nexus220 Access Control System from one PC to another (Firebird)
Nexus220 Firmware Upgrade
Nexus220 Notifications Configuration/Email Configuration
Nexus220 The number of doors for this license has been exceeded
Nexus220 Web Reports Using Microsoft Edge
Reduce length of time on buzzer for readers in Nexus220

Omnia

Adding Widgets to the OMNIA Dashboard

Basic Trouble Shooting OMNIA

Batch Operations OMNIA

Change SYSDBA Password in OMNIA

Configuring Web Session Timeouts in OMINA

Create a Database for OMNIA 4.5 After Running the .iso

Create a Site Lockdown Input for OMNIA

Creating an Input on a Wiegand Reader Module to Generate a Lockdown/Emergency Mode For a Single APC Controller In OMNIA

Creating Operator Profiles

Creating Relay Actions I/O in OMNIA

Omnia Lite

Convert a Nexus Lite Database into OMNIA Lite Database

OMNIA LiTE Backup

PM Tronics Hardware

Amano Readers and Credentials

Change Modulation mode on XQT904 Quad Transmitter
How do I change Wiegand Output Mode on Amano readers?

Legacy Hardware

Factory Reset legacy Amano IP Cameras (sold prior to 2018)

Factory Reset Nexus220 controller

How do I factory reset the EC2 (400i) controller?

Setting IP on PMTronics Inc. Access Control Hardware

Partner Products

Partner Products

IDEMIA Sigma Lite Readers NOT compatible for use in AmanoNet or Nexus220

Setting Read Range on a Conekt Reader

Video Management Systems

Cathexis Video (Amano Vision)

Cathexis Video AV (AntiVirus Exceptions)

AmanoDVMS

Which AmanoDVMS ports need to be open on my firewall?

Vision

AmanoVision web access user name case sensitivity usage

Access Control, OMNIA Access Control, OMNIA

PMT Security

Copyright © 2025 PMT Security, Inc. | All Rights Reserved