• Skip to primary navigation
  • Skip to main content
PMT Security Logo

PMT Security

Advanced Access Control

  • Home
  • About Us
    • Our Partners
    • Our Integrators
  • Solutions
    • Residential
    • Government Facilities
    • Education
    • Retirement
    • Manufacturing
    • Retail Businesses
    • Campgrounds & Outdoor Resorts
  • Products
    • Access Control
      • Control Features
      • Reporting & Monitoring
      • Control Module
      • Digital IO Module
      • Reader Module
      • Readers
    • Video Management
      • Integration
      • Analytics
      • Search & Export
    • Visitor Management
  • Support
    • Knowledgebase
    • Download Center
    • License Request
    • RMA Request Form
  • Blog
  • Contact Us

OMNIA

Email Notifications In OMNIA

Email Notifications In OMNIA

In order for Email Notifications to work in OMNIA,  The Integration Server must be downloaded and Installed.

After Integration Server installation Actions and Rules will need to be configured for Email Notifications.

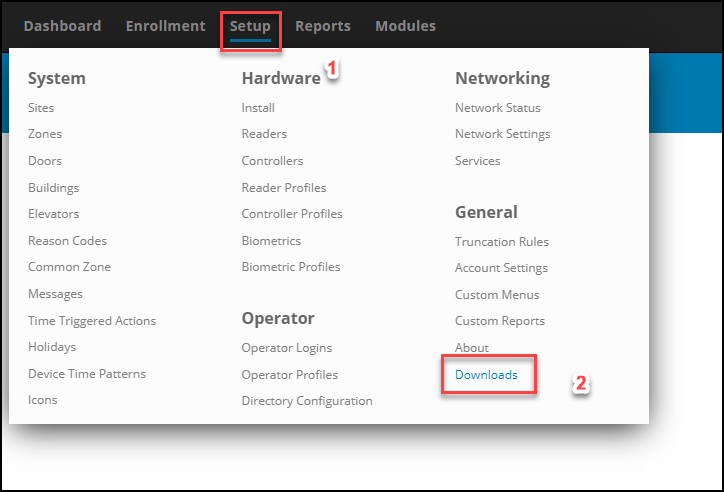
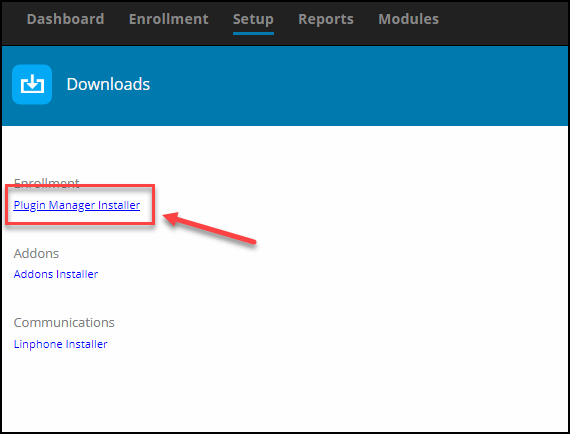
In the OMNIA URL, go to Setup/downloads/Addons 

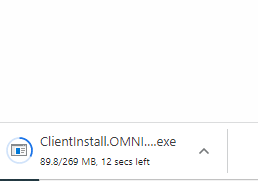
The addons installer will download.

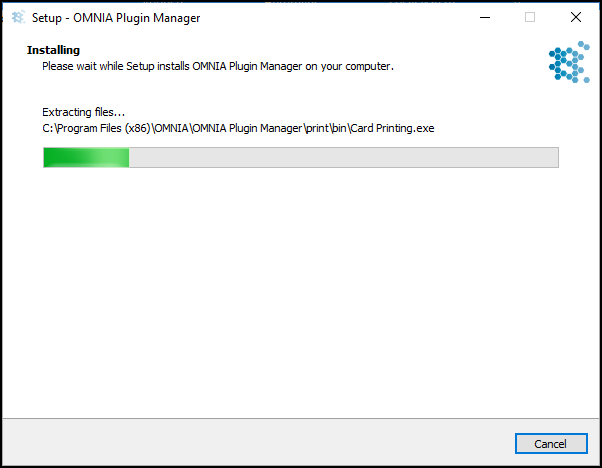
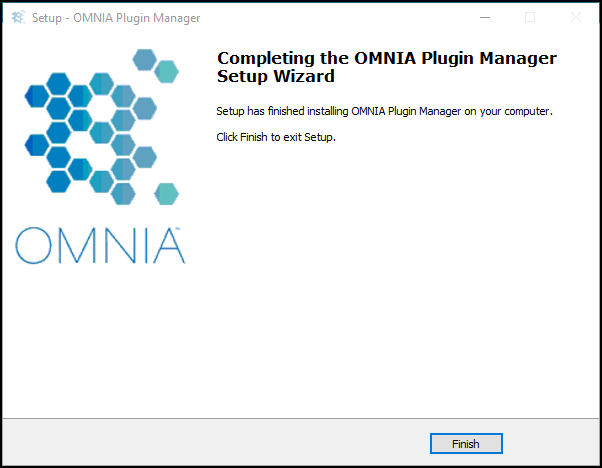
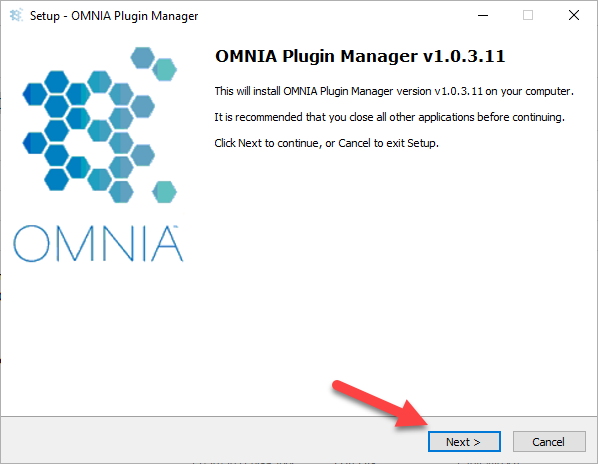
Launch the Client Install

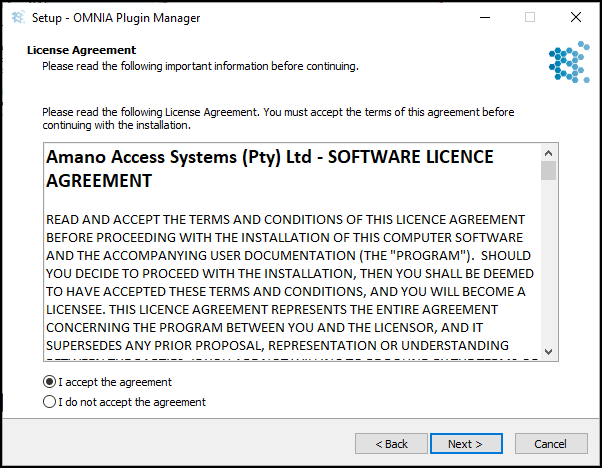
Accept the Agreement

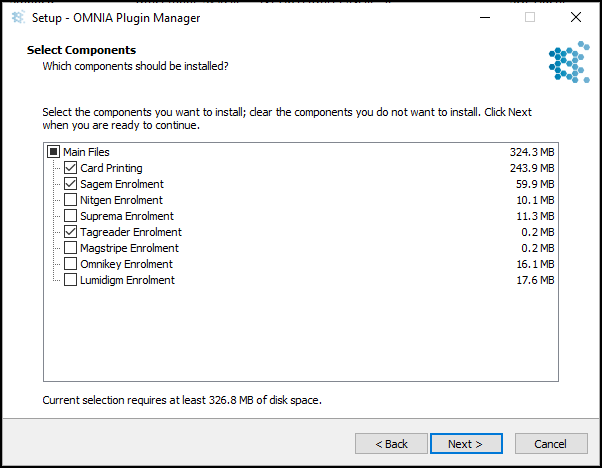
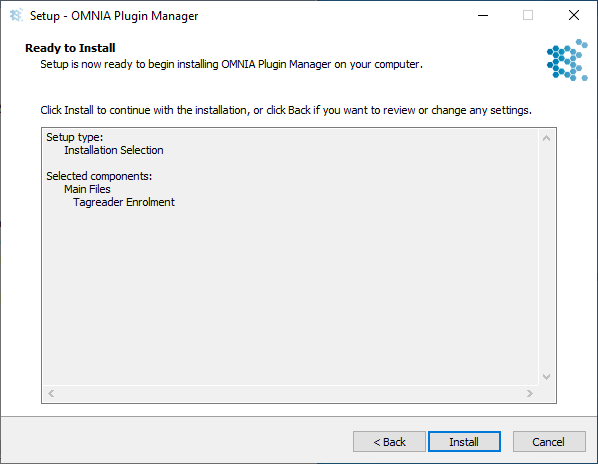
Select which Options you want to install, click Next

This will place an Addons Folder in the root of OMNIA

Inside the Addon Folder there will be a Bin Folder

Launch the Integration Server

Integration Server

To Create Actions and Rules,  Click on Integration, Select Either Actions or Rules

Creating Actions

Select Integration, from the drop down select Actions

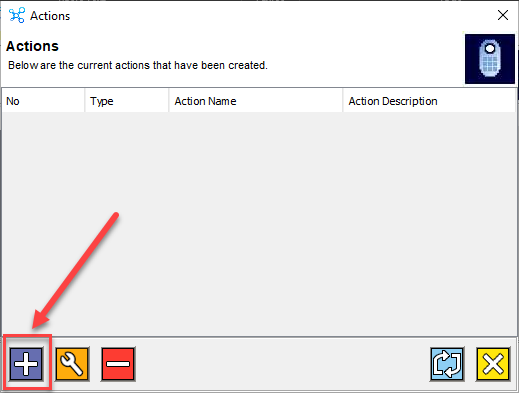
Click on the Plus to add an Action

The Action Wizard Launches

Give the Action a Name, Give a Description if needed.

From the Action Type Drop Down Select Email

After Selecting Email, you will see areas that need the Email Server Information

After entering the Email Server Information, Click the Next Arrow

Enter a Valid Email address in the To: 

You can Enter any Value you would like in the from.

In this example we are using a Mailgun Email Server but chose to use OMNIA@OMNIA.com for the From email address

Right Click inside the box below the subject line to select what details will be included in the email.

For This example, Event Name, First Name, Last Name, and Time were selected for details in the Email Notification

Click Next

A summary of the Action created displays

Click the Next button

An Action is now created and will display. If this is your first action created the number will be 1, for this example this was the 9th Action Created.

Click the X to close the Actions Window

Creating a Rule

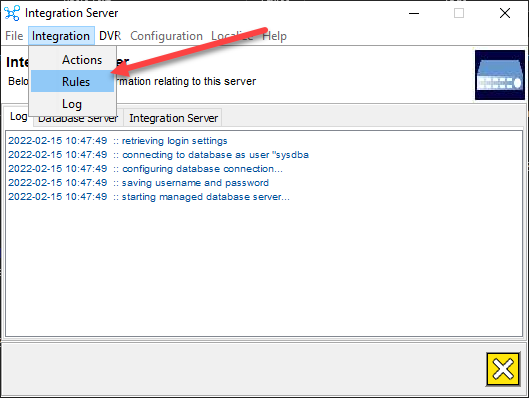
On the Integration Server, Select Integration, from the drop down select Rules

Select the Plus Button to create a New Rule

The Rule Wizard will Launch, Click Next

Give the Rule a Name, Give the Rule a Description if needed.

Always Select IXP400 as the Rule Type

In this example , we are setting up a rule to Email when a tagholder uses a specific Door

For this example , we selected Events, Tags, Terminals, and Tagholders.

Click Next

The Events Page Displays

We will now need to choose the Event for the Rule

Scroll to Find the Event, Highlight it, 

Click Next

The Tags Page Displays

We will now need to choose which tag for the rule

Scroll to find the Correct Tagholders Tag. 

Click Next

The Tagholders Page Displays

We will need to choose the Correct Tagholders Name

Click Next

The Terminal Page Displays

We will need to select the Terminal for the Rule

Click Next

The Active Time Page will Display

This will allow you to choose, if needed, an Active Time Period for the Rule to be Enforced

By Default the Active Time is 24/7 and Holidays.

Click Next

You may Edit the Active Time Period by clicking on the Wrench

You may Edit the Active Time, 

When Finished Editing the Active Time, click the Green Check Box

The Action Selection Page will Display

You will choose the Action you want to take place for this rule. In this example we have only created One Action.

Select the Action, Press the Arrow Left Button to move the Action to the Selected Actions

Click Next

You will get a notification of Completed, and will be able to scroll in the message listing the details of the Rule and Action Associated with the Rule

Click Next to Finish

A Rules page Displays

Click the X to Finish

Click on the Integration Server Tab to view the current rules and actions taking place

Need further assistance?
Submit a Support Ticket

Submit a Support Ticket

FAQ

General

Can I initiate RS485 comms to a terminal from an existing IP terminal?

How to Select the Right Cable for the job

IDEMIA Sigma Lite Readers NOT compatible for use in AmanoNet or Nexus220

Network Configuration – Best Practices

Technical Bulletins

How to upgrade OMNIA hardware firmware using the OMNIA Firmware Upgrade Tool

OMNIA Run as a Service fix for v4.x

Upgrading To OMNIA 4.6.5 and 2019 SQL Express With Tools

Access Control

AmanoNet

AmanoNet Back up using IB Console

AmanoNet Minimum PC Requirements and Specifications

AmanoNet System Migration Notes

Archive Tagholders in AmanoNet

Archive Transactions in AmanoNet

AutoID IP Hardware in AmanoNet

How to move AmanoNet Access Control System from one PC to another (Firebird)

IDEMIA Sigma Lite Readers NOT compatible for use in AmanoNet or Nexus220

ImproNet/AmanoNet Database Backup: SQL

NOTICE! UPGRADE TO AMANONET 7.74 – EC2/400i NO LONGER AVAILABLE

Nexxus220

Change Default Password in Nexus220
Database Migration from Nexus220/IXP220 to OMNIA
How to fix a Java SE Binary Error in Nexus220 Software
How to get a copy of a database from Nexus220 Software
How to move Nexus220 to a different PC
IDEMIA Sigma Lite Readers NOT compatible for use in AmanoNet or Nexus220
Move Nexus220 Access Control System from one PC to another (Firebird)
Nexus220 Firmware Upgrade
Nexus220 Notifications Configuration/Email Configuration
Nexus220 The number of doors for this license has been exceeded
Nexus220 Web Reports Using Microsoft Edge
Reduce length of time on buzzer for readers in Nexus220

Omnia

Adding Widgets to the OMNIA Dashboard

Basic Trouble Shooting OMNIA

Batch Operations OMNIA

Change SYSDBA Password in OMNIA

Changing the IP Address of a Previously Installed Controller using the Omnia Software/URL

Configuring Web Session Timeouts in OMINA

Create a Database for OMNIA 4.5 After Running the .iso

Create a Site Lockdown Input for OMNIA

Creating an Input on a Wiegand Reader Module to Generate a Lockdown/Emergency Mode For a Single APC Controller In OMNIA

Creating Mappable Import User Fields in OMNIA

Omnia Lite

Convert a Nexus Lite Database into OMNIA Lite Database

OMNIA LiTE Backup

PM Tronics Hardware

Amano Readers and Credentials

Change Modulation mode on XQT904 Quad Transmitter
How do I change Wiegand Output Mode on Amano readers?

Legacy Hardware

Factory Reset legacy Amano IP Cameras (sold prior to 2018)

Factory Reset Nexus220 controller

How do I factory reset the EC2 (400i) controller?

Setting IP on PMTronics Inc. Access Control Hardware

Partner Products

Partner Products

IDEMIA Sigma Lite Readers NOT compatible for use in AmanoNet or Nexus220

Setting Read Range on a Conekt Reader

Video Management Systems

Cathexis Video (Amano Vision)

Adding Cameras into Cathexis

Cathexis Video AV (AntiVirus Exceptions)

Quick Start Guide for Cathexis Vision Version 2025

AmanoDVMS

Which AmanoDVMS ports need to be open on my firewall?

Vision

Adding Cameras into Cathexis

AmanoVision web access user name case sensitivity usage

OMNIA Firmware Upgrade Tool

OMNIA Firmware Upgrade Tool

Firmware Upgrade: Using the Firmware Upgrade Utility

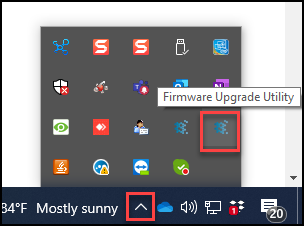
Navigate to C:\OMNIA\bin\FirmwareUpgrade.exe

From OMNIA v2.20 a new firmware upgrade utility has been included with the software. From OMNIA v3.00, the old utility has been removed and only the new one is available by default.

Note: USB/RS232 ping is no longer available – Only IP based controllers and associated hardware can be communicated with. Comms test is no longer available.

Note: Automatic sync must be disabled in the Services view, or the OMNIA application/service must be shut down in order to perform firmware upgrades when running the utility from the same server as the Portal application/service.

Main interface:

When running the utility, you have 2 options to find a device – search the local subnet, or search using IP address.

If the host PC is on the same subnet as the hardware devices, you can click ‘Search for devices’ to list all controllers that are found.

If the host PC is on a different subnet, or if controllers cannot be found using the above method, you can search for a controller directly by IP address. Type in the IP address to search for in the text box below the ‘Search by IP’ button, then click the button when ready.

Once a device has been found, it will appear in the device list table. Select the device you want to work with by clicking on it.

Once it is selected, you can inspect device information and perform various functions in the three tabs in the lower portion of the screen:

Network:

This tab can be used to edit or set the IP details of the controller you are working with. Click ‘Apply’ to save changes.

Note, only system controllers can have these changes made here. For other devices, (Eg, door controllers, readers) that use IP settings, make these changes in the Discovery tool. If you make any changes, you will be prompted for a password. The default password for all devices is ‘masterkey’.

System Status:

This tab can be used to perform a selective upgrade (only upgrading certain devices), as well as other functions like clearing memory and setting a logical address.

On the system status tab, first click ‘Refresh’ to populate the device information pane.

This process will scan the controller and all communications buses for devices, then display these in the information pane. Devices are displayed in a hierarchical tree, with controllers first, followed by door controllers, reader modules, and finally readers (if readers can be upgraded).

To select a device for upgrade, click it once. A green check will appear on the right of the device name to indicate it has been selected for upgrade.

Once you have selected all the devices you want to upgrade, click on the ‘Upgrade Selection’ button.

The firmware upgrade utility will now begin upgrading firmware, starting with readers, then reader modules, followed by door controllers, then finally controllers. This upgrade order is to ensure all devices are upgraded, as upgrading the controller first would clear its memory, and would thus also lose communications with any IP based door controllers or readers.

During the upgrade, the progress bar displayed on the device will advance, and the current state of the upgrade is displayed in text above the progress bar.

Once the upgrade is complete, the progress bar will turn green, and the text will display ‘Upgrade Complete’.

Should the upgrade fail, the progress bar will turn red, and the text will display the reason for the failure. More details can be found in the utility log file – C:\Portal\logs\firmware.utility.log.

Firmware Upgrade:

Use this tab if you prefer the utility to perform an automatic firmware upgrade on all units that require new firmware (all units that have older firmware than that included in the system), select the unit in the device list table then click on the ‘Start Upgrade’ button

This will scan each device, including the controller, and upgrade the firmware where necessary. The process is carried out automatically for each device, one at a time.

You can save a log at any point in the upgrade process here by clicking the ‘Save Log’ button.

This will save an HTML formatted log of the upgrade operation to a location of your choice.

Advanced configuration:

Additional functions can be performed in the ‘System Status’ tab, by double clicking on a device to enter the advance configuration. For controllers, you can set the logical address (LA) and clear the controller memory. For other devices, only setting the LA is available.

To set the LA, select the LA the device requires from the drop-down menu, then click on ‘Set Logical Address’ button. To clear controller memory, click on the ‘Clear Memory’ button.

Additional functions:

To perform a forced upgrade (loading the same or older firmware) on a device, hold down the CRTL key on the keyboard when clicking the ‘Upgrade Selection’ button in the ‘System Status’ tab.

Old firmware upgrade tool:

Should you need to use the old firmware upgrade tool, it can still be installed from the PortalAddons installer in C:\OMNIA\client\OMNIAAddons.exe. It will be installed to C:\OMNIAAddons

Need further assistance?
Submit a Support Ticket

Submit a Support Ticket

FAQ

General

Can I initiate RS485 comms to a terminal from an existing IP terminal?

How to Select the Right Cable for the job

IDEMIA Sigma Lite Readers NOT compatible for use in AmanoNet or Nexus220

Network Configuration – Best Practices

Technical Bulletins

How to upgrade OMNIA hardware firmware using the OMNIA Firmware Upgrade Tool

OMNIA Run as a Service fix for v4.x

Upgrading To OMNIA 4.6.5 and 2019 SQL Express With Tools

Access Control

AmanoNet

AmanoNet Back up using IB Console

AmanoNet Minimum PC Requirements and Specifications

AmanoNet System Migration Notes

Archive Tagholders in AmanoNet

Archive Transactions in AmanoNet

AutoID IP Hardware in AmanoNet

How to move AmanoNet Access Control System from one PC to another (Firebird)

IDEMIA Sigma Lite Readers NOT compatible for use in AmanoNet or Nexus220

ImproNet/AmanoNet Database Backup: SQL

NOTICE! UPGRADE TO AMANONET 7.74 – EC2/400i NO LONGER AVAILABLE

Nexxus220

Change Default Password in Nexus220
Database Migration from Nexus220/IXP220 to OMNIA
How to fix a Java SE Binary Error in Nexus220 Software
How to get a copy of a database from Nexus220 Software
How to move Nexus220 to a different PC
IDEMIA Sigma Lite Readers NOT compatible for use in AmanoNet or Nexus220
Move Nexus220 Access Control System from one PC to another (Firebird)
Nexus220 Firmware Upgrade
Nexus220 Notifications Configuration/Email Configuration
Nexus220 The number of doors for this license has been exceeded
Nexus220 Web Reports Using Microsoft Edge
Reduce length of time on buzzer for readers in Nexus220

Omnia

Adding Widgets to the OMNIA Dashboard

Basic Trouble Shooting OMNIA

Batch Operations OMNIA

Change SYSDBA Password in OMNIA

Changing the IP Address of a Previously Installed Controller using the Omnia Software/URL

Configuring Web Session Timeouts in OMINA

Create a Database for OMNIA 4.5 After Running the .iso

Create a Site Lockdown Input for OMNIA

Creating an Input on a Wiegand Reader Module to Generate a Lockdown/Emergency Mode For a Single APC Controller In OMNIA

Creating Mappable Import User Fields in OMNIA

Omnia Lite

Convert a Nexus Lite Database into OMNIA Lite Database

OMNIA LiTE Backup

PM Tronics Hardware

Amano Readers and Credentials

Change Modulation mode on XQT904 Quad Transmitter
How do I change Wiegand Output Mode on Amano readers?

Legacy Hardware

Factory Reset legacy Amano IP Cameras (sold prior to 2018)

Factory Reset Nexus220 controller

How do I factory reset the EC2 (400i) controller?

Setting IP on PMTronics Inc. Access Control Hardware

Partner Products

Partner Products

IDEMIA Sigma Lite Readers NOT compatible for use in AmanoNet or Nexus220

Setting Read Range on a Conekt Reader

Video Management Systems

Cathexis Video (Amano Vision)

Adding Cameras into Cathexis

Cathexis Video AV (AntiVirus Exceptions)

Quick Start Guide for Cathexis Vision Version 2025

AmanoDVMS

Which AmanoDVMS ports need to be open on my firewall?

Vision

Adding Cameras into Cathexis

AmanoVision web access user name case sensitivity usage

OMNIA Hardware Installation

OMNIA Hardware Installation

A Guide

Hardware Installation

Setup > Hardware > Install

Steps for adding hardware

1. Scan network for master Access Portal Controllers (APC’s) and select the APC you want to install

2. Scan the non-ip bus of the selected APC to test that all your fixed addresses return (Cluster, S-bus and RS485 devices)

3. Optional: Scan the local network for any IP slave door controllers (DC’s) and select the units that need to report to the APC

4. Make a selection in the door selection area. When adding new doors, door creation can speed things up by automatically creating “Quick Doors” for you. If you un-tick this option your readers will be installed but they will not be allocated to a Quick Door. You will need to create new doors and then select your readers manually.

5. Install your hardware (this process will install the hardware into the database and assign logical address to each unit.

Once your devices have been installed, you will notice them in the Installed Section.

Need further assistance?
Submit a Support Ticket

Submit a Support Ticket

FAQ

General

Can I initiate RS485 comms to a terminal from an existing IP terminal?

How to Select the Right Cable for the job

IDEMIA Sigma Lite Readers NOT compatible for use in AmanoNet or Nexus220

Network Configuration – Best Practices

Technical Bulletins

How to upgrade OMNIA hardware firmware using the OMNIA Firmware Upgrade Tool

OMNIA Run as a Service fix for v4.x

Upgrading To OMNIA 4.6.5 and 2019 SQL Express With Tools

Access Control

AmanoNet

AmanoNet Back up using IB Console

AmanoNet Minimum PC Requirements and Specifications

AmanoNet System Migration Notes

Archive Tagholders in AmanoNet

Archive Transactions in AmanoNet

AutoID IP Hardware in AmanoNet

How to move AmanoNet Access Control System from one PC to another (Firebird)

IDEMIA Sigma Lite Readers NOT compatible for use in AmanoNet or Nexus220

ImproNet/AmanoNet Database Backup: SQL

NOTICE! UPGRADE TO AMANONET 7.74 – EC2/400i NO LONGER AVAILABLE

Nexxus220

Change Default Password in Nexus220
Database Migration from Nexus220/IXP220 to OMNIA
How to fix a Java SE Binary Error in Nexus220 Software
How to get a copy of a database from Nexus220 Software
How to move Nexus220 to a different PC
IDEMIA Sigma Lite Readers NOT compatible for use in AmanoNet or Nexus220
Move Nexus220 Access Control System from one PC to another (Firebird)
Nexus220 Firmware Upgrade
Nexus220 Notifications Configuration/Email Configuration
Nexus220 The number of doors for this license has been exceeded
Nexus220 Web Reports Using Microsoft Edge
Reduce length of time on buzzer for readers in Nexus220

Omnia

Adding Widgets to the OMNIA Dashboard

Basic Trouble Shooting OMNIA

Batch Operations OMNIA

Change SYSDBA Password in OMNIA

Changing the IP Address of a Previously Installed Controller using the Omnia Software/URL

Configuring Web Session Timeouts in OMINA

Create a Database for OMNIA 4.5 After Running the .iso

Create a Site Lockdown Input for OMNIA

Creating an Input on a Wiegand Reader Module to Generate a Lockdown/Emergency Mode For a Single APC Controller In OMNIA

Creating Mappable Import User Fields in OMNIA

Omnia Lite

Convert a Nexus Lite Database into OMNIA Lite Database

OMNIA LiTE Backup

PM Tronics Hardware

Amano Readers and Credentials

Change Modulation mode on XQT904 Quad Transmitter
How do I change Wiegand Output Mode on Amano readers?

Legacy Hardware

Factory Reset legacy Amano IP Cameras (sold prior to 2018)

Factory Reset Nexus220 controller

How do I factory reset the EC2 (400i) controller?

Setting IP on PMTronics Inc. Access Control Hardware

Partner Products

Partner Products

IDEMIA Sigma Lite Readers NOT compatible for use in AmanoNet or Nexus220

Setting Read Range on a Conekt Reader

Video Management Systems

Cathexis Video (Amano Vision)

Adding Cameras into Cathexis

Cathexis Video AV (AntiVirus Exceptions)

Quick Start Guide for Cathexis Vision Version 2025

AmanoDVMS

Which AmanoDVMS ports need to be open on my firewall?

Vision

Adding Cameras into Cathexis

AmanoVision web access user name case sensitivity usage

Create a Database for OMNIA 4.5 After Running the .iso

Create a Database for OMNIA 4.5 After Running the .iso

When using the OMNIO.iso installer, a database will need to be created.

Launch Sequel Server Management Studio (SSMS)

Connect to the Management Studio

User Windows Authentication or SQL Server Authentication

Right Click Databases, Select New Database

Change the Database Name to OMNIA

Change the Database Owner to sysdba, this is a must for OMNIA to connect to the Database

Using the Browse Buttons, change the Path of the Database to C:\OMNIA\database

Click OK

This will create a blank/empty database in the C:\OMNIA\databse folder and attach it to the SQL instance name.

Need further assistance?

Submit a Support Ticket

Submit a Support Ticket

FAQ

General

Can I initiate RS485 comms to a terminal from an existing IP terminal?

How to Select the Right Cable for the job

IDEMIA Sigma Lite Readers NOT compatible for use in AmanoNet or Nexus220

Network Configuration – Best Practices

Technical Bulletins

How to upgrade OMNIA hardware firmware using the OMNIA Firmware Upgrade Tool

OMNIA Run as a Service fix for v4.x

Upgrading To OMNIA 4.6.5 and 2019 SQL Express With Tools

Access Control

AmanoNet

AmanoNet Back up using IB Console

AmanoNet Minimum PC Requirements and Specifications

AmanoNet System Migration Notes

Archive Tagholders in AmanoNet

Archive Transactions in AmanoNet

AutoID IP Hardware in AmanoNet

How to move AmanoNet Access Control System from one PC to another (Firebird)

IDEMIA Sigma Lite Readers NOT compatible for use in AmanoNet or Nexus220

ImproNet/AmanoNet Database Backup: SQL

NOTICE! UPGRADE TO AMANONET 7.74 – EC2/400i NO LONGER AVAILABLE

Nexxus220

Change Default Password in Nexus220
Database Migration from Nexus220/IXP220 to OMNIA
How to fix a Java SE Binary Error in Nexus220 Software
How to get a copy of a database from Nexus220 Software
How to move Nexus220 to a different PC
IDEMIA Sigma Lite Readers NOT compatible for use in AmanoNet or Nexus220
Move Nexus220 Access Control System from one PC to another (Firebird)
Nexus220 Firmware Upgrade
Nexus220 Notifications Configuration/Email Configuration
Nexus220 The number of doors for this license has been exceeded
Nexus220 Web Reports Using Microsoft Edge
Reduce length of time on buzzer for readers in Nexus220

Omnia

Adding Widgets to the OMNIA Dashboard

Basic Trouble Shooting OMNIA

Batch Operations OMNIA

Change SYSDBA Password in OMNIA

Changing the IP Address of a Previously Installed Controller using the Omnia Software/URL

Configuring Web Session Timeouts in OMINA

Create a Site Lockdown Input for OMNIA

Creating an Input on a Wiegand Reader Module to Generate a Lockdown/Emergency Mode For a Single APC Controller In OMNIA

Creating Mappable Import User Fields in OMNIA

Creating Operator Profiles

Omnia Lite

Convert a Nexus Lite Database into OMNIA Lite Database

OMNIA LiTE Backup

PM Tronics Hardware

Amano Readers and Credentials

Change Modulation mode on XQT904 Quad Transmitter
How do I change Wiegand Output Mode on Amano readers?

Legacy Hardware

Factory Reset legacy Amano IP Cameras (sold prior to 2018)

Factory Reset Nexus220 controller

How do I factory reset the EC2 (400i) controller?

Setting IP on PMTronics Inc. Access Control Hardware

Partner Products

Partner Products

IDEMIA Sigma Lite Readers NOT compatible for use in AmanoNet or Nexus220

Setting Read Range on a Conekt Reader

Video Management Systems

Cathexis Video (Amano Vision)

Adding Cameras into Cathexis

Cathexis Video AV (AntiVirus Exceptions)

Quick Start Guide for Cathexis Vision Version 2025

AmanoDVMS

Which AmanoDVMS ports need to be open on my firewall?

Vision

Adding Cameras into Cathexis

AmanoVision web access user name case sensitivity usage

Upgrading OMNIA License

Upgrading OMNIA License

Licensing the OMNIA software

The true power of OMNIA lies in its flexibility and scalability.  Upgrading to a new tier simply requires a license key – no data migration or software re-installation is necessary. In order to obtain a license for your server, you will first need to get the Machine ID and send this to your Impro supplier, along with your license order. 

From the “C:\OMNIA)\bin” application folder run the “get_machine_id.exe” executable as Administrator. 

Once you’ve run this application, it will detect the Machine ID ( MAC address of the primary server NIC ) and pop up an information message. Click “OK”.

A new folder called “MachineID” will be created in the “bin” folder, containing a file called “machine_id.txt” You need to send this file together with your license order to your Impro supplier in order to obtain a license.

Once you have submitted your order with your Machine ID, your impro supplier will send you a zipped license file. It should be similar to the below (note the Machine ID in the file name).

Extract the contents of the zipped license file directly to the root of the C: drive. Extract to this location even if OMNIA is installed on another drive. You should end up with a folder called “LicenseConfig” on root of the C: drive, which contains the original “machine_id.txt” file, as well as your new software license – “software_license.conf”. 

Once you have extracted the license, you MUST restart the OMNIA application on the server, for your new license to be detected. If it has been correctly detected, you will see this reflected in the “About” dialog box on your OMNIA base application.  

Need further assistance?
Submit a Support Ticket

Submit a Support Ticket

FAQ

General

Can I initiate RS485 comms to a terminal from an existing IP terminal?

How to Select the Right Cable for the job

IDEMIA Sigma Lite Readers NOT compatible for use in AmanoNet or Nexus220

Network Configuration – Best Practices

Technical Bulletins

How to upgrade OMNIA hardware firmware using the OMNIA Firmware Upgrade Tool

OMNIA Run as a Service fix for v4.x

Upgrading To OMNIA 4.6.5 and 2019 SQL Express With Tools

Access Control

AmanoNet

AmanoNet Back up using IB Console

AmanoNet Minimum PC Requirements and Specifications

AmanoNet System Migration Notes

Archive Tagholders in AmanoNet

Archive Transactions in AmanoNet

AutoID IP Hardware in AmanoNet

How to move AmanoNet Access Control System from one PC to another (Firebird)

IDEMIA Sigma Lite Readers NOT compatible for use in AmanoNet or Nexus220

ImproNet/AmanoNet Database Backup: SQL

NOTICE! UPGRADE TO AMANONET 7.74 – EC2/400i NO LONGER AVAILABLE

Nexxus220

Change Default Password in Nexus220
Database Migration from Nexus220/IXP220 to OMNIA
How to fix a Java SE Binary Error in Nexus220 Software
How to get a copy of a database from Nexus220 Software
How to move Nexus220 to a different PC
IDEMIA Sigma Lite Readers NOT compatible for use in AmanoNet or Nexus220
Move Nexus220 Access Control System from one PC to another (Firebird)
Nexus220 Firmware Upgrade
Nexus220 Notifications Configuration/Email Configuration
Nexus220 The number of doors for this license has been exceeded
Nexus220 Web Reports Using Microsoft Edge
Reduce length of time on buzzer for readers in Nexus220

Omnia

Adding Widgets to the OMNIA Dashboard

Basic Trouble Shooting OMNIA

Batch Operations OMNIA

Change SYSDBA Password in OMNIA

Changing the IP Address of a Previously Installed Controller using the Omnia Software/URL

Configuring Web Session Timeouts in OMINA

Create a Database for OMNIA 4.5 After Running the .iso

Create a Site Lockdown Input for OMNIA

Creating an Input on a Wiegand Reader Module to Generate a Lockdown/Emergency Mode For a Single APC Controller In OMNIA

Creating Mappable Import User Fields in OMNIA

Omnia Lite

Convert a Nexus Lite Database into OMNIA Lite Database

OMNIA LiTE Backup

PM Tronics Hardware

Amano Readers and Credentials

Change Modulation mode on XQT904 Quad Transmitter
How do I change Wiegand Output Mode on Amano readers?

Legacy Hardware

Factory Reset legacy Amano IP Cameras (sold prior to 2018)

Factory Reset Nexus220 controller

How do I factory reset the EC2 (400i) controller?

Setting IP on PMTronics Inc. Access Control Hardware

Partner Products

Partner Products

IDEMIA Sigma Lite Readers NOT compatible for use in AmanoNet or Nexus220

Setting Read Range on a Conekt Reader

Video Management Systems

Cathexis Video (Amano Vision)

Adding Cameras into Cathexis

Cathexis Video AV (AntiVirus Exceptions)

Quick Start Guide for Cathexis Vision Version 2025

AmanoDVMS

Which AmanoDVMS ports need to be open on my firewall?

Vision

Adding Cameras into Cathexis

AmanoVision web access user name case sensitivity usage

  • « Go to Previous Page
  • Page 1
  • Interim pages omitted …
  • Page 3
  • Page 4
  • Page 5
  • Page 6
  • Page 7
  • Interim pages omitted …
  • Page 10
  • Go to Next Page »

PMT Security

Copyright © 2025 PMT Security, Inc. | All Rights Reserved